下面由Laravel教程栏目给大家介绍实现 laravel 的artisan 的方法,希望对需要的朋友有所帮助!
laravel 的 artisan 命令行太好用了,换个框架没有这个功能,于是自己学习实现一些,直接上代码
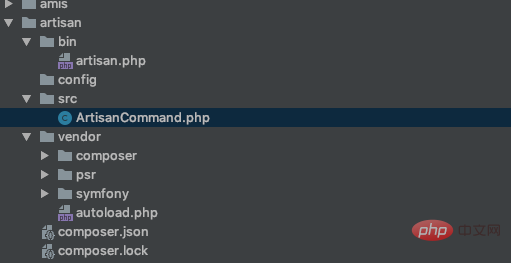
新建目录
-artisan
--bin
--src
进入artisan composer init
composer require symfony/console
#!/usr/bin/env php
<?php
use Symfony\Component\Console\Application;
use Symfony\Component\Console\Input\InputInterface;
use Symfony\Component\Console\Output\OutputInterface;
require_once __DIR__.'/../vendor/autoload.php';
$app = new Application('artisan','1.1.1');
$app->register('artisan')->setCode(function(InputInterface $input, OutputInterface $output){
$output->writeln('artisan start');
});
$app->run();
exit();
以上是简单的实现#!/usr/bin/env php
<?php
use Symfony\Component\Console\Application;
use Symfony\Component\Console\Input\InputInterface;
use Symfony\Component\Console\Output\OutputInterface;
use Symfony\Component\Console\Input\InputArgument;
require_once __DIR__ . '/../vendor/autoload.php';
$app = new Application('artisan', '1.1.1');
$app->register('artisan')
->setDescription('myself artisan description')
->setCode(
function (InputInterface $input, OutputInterface $output) {
$name = $input->getArgument('name');
$output->writeln("hello {$name}");
}
)->addArgument('name', InputArgument::REQUIRED, 'please input your name');
$app->run();
exit();
这里演示了如何接收参数#!/usr/bin/env php
<?php
use Symfony\Component\Console\Application;
use Symfony\Component\Console\Input\InputInterface;
use Symfony\Component\Console\Output\OutputInterface;
use Symfony\Component\Console\Input\InputArgument;
use Symfony\Component\Console\Input\InputOption;
require_once __DIR__ . '/../vendor/autoload.php';
$app = new Application('artisan', '1.1.1');
$app->register('artisan')
->setDescription('myself artisan description')
->setCode(
function (InputInterface $input, OutputInterface $output) {
$string = $input->getOption('string');
$name = $input->getArgument('name');
if($string == 'lower'){
$name = strtolower($name);
}
if($string == 'upper'){
$name = strtoupper($name);
}
$output->writeln("hello {$name}");
}
)->addArgument('name', InputArgument::REQUIRED, 'please input your name')
->addOption('string',null,InputOption::VALUE_OPTIONAL,'转换字符串大小','lower')
;
$app->run();
exit();
这里演示了如何给命令行添加选项 ./bin/artisan.php artisan ffff --string='upper' echo FFFF$output->writeln("<info>hello {$name}</info>");
$output->writeln("<error>hello {$name}</error>");
$output->writeln("<comment>hello {$name}</comment>");
$output->writeln("hello {$name}");
可以给它们加上颜色
接下来将命令行拆分为文件

bin/artisan.php
ArtisanCommand.php
#!/usr/bin/env php <?php use Symfony\Component\Console\Application; use Artisan\ArtisanCommand; require_once __DIR__ . '/../vendor/autoload.php'; $app = new Application('artisan', '1.1.1'); $app->add(new ArtisanCommand()); $app->run(); exit(); ArtisanCommand.php
f7184d4e9c8be36f7965d1cbce408c7bsetName('artisan');
        $this->setDescription('myself artisan description')
        ->addArgument('name', InputArgument::REQUIRED, 'please input your name')
        ->addOption('string',null,InputOption::VALUE_OPTIONAL,'转换字符串大小','lower');
    }

    public function execute(InputInterface $input, OutputInterface $output)
    {
        $string = $input->getOption('string');
        $name = $input->getArgument('name');
        if($string == 'lower'){
            $name = strtolower($name);
        }
        if($string == 'upper'){
            $name = strtoupper($name);
        }
        $output->writeln("861e5d1625be16cce5a3569e3482b67ehello {$name}bbc97313deb00a409dd479bbec5543a1");
        $output->writeln("bbbcc7d749ec7f3e0fb2ba5af34b74a7hello {$name}4c8d80f29f204b22c4490983d39ebac7");
        $output->writeln("6f015a708a781f34e0698e64f5bd90f4hello {$name}ae21f3e2b2506a19cbde269e161e0250");
        $output->writeln("hello {$name}");
    }
}
composer.json
{
    "name": "baidu/artisan",
    "authors": [
        {
            "name": "gaobingbing",
            "email": "v_gaobingbing01@baidu.com"
        }
    ],
    "require": {
        "symfony/console": "^4.3"
    },
    "autoload":  {
        "psr-4": {
            "Artisan\\": "src"
        }
    }
}

至此大功告成,还有其他功能可以去看Symfony文档
以上是如何实现 laravel 的artisan的详细内容。更多信息请关注PHP中文网其他相关文章!
 行动中的Laravel:现实世界的应用和示例Apr 16, 2025 am 12:02 AM
laravelcanbeeffectefection ininreal-worldapplications forbuildingscalablewebsolutions.1)ITSImplifieCrudoperationsInrestfulaPisusingEloquentorm.2)laravel'secosystem,包括Toolslikenova,包括Toolslikenova,增强功能
 Laravel的主要功能:后端开发Apr 15, 2025 am 12:14 AM
Laravel在后端开发中的核心功能包括路由系统、EloquentORM、迁移功能、缓存系统和队列系统。1.路由系统简化了URL映射,提高了代码组织和维护性。2.EloquentORM提供了面向对象的数据操作,提升了开发效率。3.迁移功能通过版本控制管理数据库结构,确保一致性。4.缓存系统减少数据库查询,提升响应速度。5.队列系统有效处理大规模数据,避免阻塞用户请求,提升整体性能。
 Laravel的后端功能:数据库,逻辑等等Apr 14, 2025 am 12:04 AM
Laravel在后端开发中表现强大,通过EloquentORM简化数据库操作,控制器和服务类处理业务逻辑,并提供队列、事件等功能。1)EloquentORM通过模型映射数据库表,简化查询。2)业务逻辑在控制器和服务类中处理,提高模块化和可维护性。3)其他功能如队列系统帮助处理复杂需求。
 Laravel的多功能性:从简单站点到复杂系统Apr 13, 2025 am 12:13 AM
选择Laravel开发项目是因为其灵活性和强大功能适应不同规模和复杂度的需求。Laravel提供路由系统、EloquentORM、Artisan命令行等功能,支持从简单博客到复杂企业级系统的开发。
 Laravel(PHP)与Python:开发环境和生态系统Apr 12, 2025 am 12:10 AM
Laravel和Python在开发环境和生态系统上的对比如下:1.Laravel的开发环境简单,仅需PHP和Composer,提供了丰富的扩展包如LaravelForge,但扩展包维护可能不及时。2.Python的开发环境也简单,仅需Python和pip,生态系统庞大,涵盖多个领域,但版本和依赖管理可能复杂。
 Laravel和后端:为Web应用程序提供动力逻辑Apr 11, 2025 am 11:29 AM
Laravel是如何在后端逻辑中发挥作用的?它通过路由系统、EloquentORM、认证与授权、事件与监听器以及性能优化来简化和增强后端开发。1.路由系统允许定义URL结构和请求处理逻辑。2.EloquentORM简化数据库交互。3.认证与授权系统便于用户管理。4.事件与监听器实现松耦合代码结构。5.性能优化通过缓存和队列提高应用效率。
 为什么Laravel如此受欢迎?Apr 02, 2025 pm 02:16 PM
Laravel受欢迎的原因包括其简化开发过程、提供愉快的开发环境和丰富的功能。1)它吸收了RubyonRails的设计理念,结合PHP的灵活性。2)提供了如EloquentORM、Blade模板引擎等工具,提高开发效率。3)其MVC架构和依赖注入机制使代码更加模块化和可测试。4)提供了强大的调试工具和性能优化方法,如缓存系统和最佳实践。
 django或laravel哪个更好?Mar 28, 2025 am 10:41 AM
Django和Laravel都是全栈框架,Django适合Python开发者和复杂业务逻辑,Laravel适合PHP开发者和优雅语法。1.Django基于Python,遵循“电池齐全”哲学,适合快速开发和高并发。2.Laravel基于PHP,强调开发者体验,适合小型到中型项目。


热AI工具

Undresser.AI Undress
人工智能驱动的应用程序,用于创建逼真的裸体照片

AI Clothes Remover
用于从照片中去除衣服的在线人工智能工具。

Undress AI Tool
免费脱衣服图片

Clothoff.io
AI脱衣机

AI Hentai Generator
免费生成ai无尽的。

热门文章

热工具

WebStorm Mac版
好用的JavaScript开发工具

适用于 Eclipse 的 SAP NetWeaver 服务器适配器
将Eclipse与SAP NetWeaver应用服务器集成。

VSCode Windows 64位 下载
微软推出的免费、功能强大的一款IDE编辑器

SublimeText3汉化版
中文版,非常好用

Atom编辑器mac版下载
最流行的的开源编辑器


