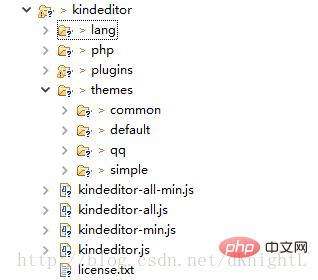
php kindeditor使用方法:首先下载kindeditor并解压到项目中;然后删除不需要的文件夹;最后初始化kindeditor富文本编辑器即可。

推荐:《PHP视频教程》
下载kindeditor
可以选择去官网下载(http://kindeditor.net/down.php),不过要翻墙;或者直接CSDNhttp://download.csdn.net/download/dknightl/9813052下载解压完放入自己的项目中
在解压完后可以删除不需要的文件夹,我是删除了asp、asp.net、jsp、php,examples可以放到其他地方,用作代码参考。
初始化kindeditor富文本编辑器
首先先导入下面css和js文件
<link rel="stylesheet" href="../themes/default/default.css" />
<script charset="utf-8" src="../kindeditor-min.js"></script>
<script charset="utf-8" src="../lang/zh_CN.js"></script>
然后初始化(textarea 为富文本编辑器主题,script代码初始化)
<textarea id="mul_input" name="content" style="width:700px;height:200px;visibility:hidden;display: block;">KindEditor</textarea>
<script>
//简单模式初始化
var editor;
KindEditor.ready(function(K) {
editor = K.create('textarea[name="content"]', {
resizeType : 1,
allowPreviewEmoticons : false,
allowImageUpload : false,
items : [ 'fontname', 'fontsize', '|', 'forecolor', 'hilitecolor', 'bold', 'italic', 'underline', 'removeformat', '|', 'justifyleft', 'justifycenter', 'justifyright', 'insertorderedlist', 'insertunorderedlist', '|', 'emoticons', 'image', 'link']
});
}); </script>
//默认模式 <script>
var editor;
KindEditor.ready(function(K) {
editor = K.create('textarea[name="content"]', {
allowFileManager : true
});
K('input[name=getHtml]').click(function(e) {
alert(editor.html());
});
K('input[name=isEmpty]').click(function(e) {
alert(editor.isEmpty());
});
K('input[name=getText]').click(function(e) {
alert(editor.text());
});
K('input[name=selectedHtml]').click(function(e) {
alert(editor.selectedHtml());
});
K('input[name=setHtml]').click(function(e) {
editor.html('<h3>Hello KindEditor</h3>');
});
K('input[name=setText]').click(function(e) {
editor.text('<h3>Hello KindEditor</h3>');
});
K('input[name=insertHtml]').click(function(e) {
editor.insertHtml('<strong>插入HTML</strong>');
});
K('input[name=appendHtml]').click(function(e) {
editor.appendHtml('<strong>添加HTML</strong>');
});
K('input[name=clear]').click(function(e) {
editor.html('');
});
}); </script>
</head>
<body>
<h3>默认模式</h3>
<form style="margin: 0;">
<textarea name="content" style="width:800px;height:400px;visibility:hidden;display: block;">KindEditor</textarea>
<p>
<input type="button" name="getHtml" value="取得HTML" />
<input type="button" name="isEmpty" value="判断是否为空" />
<input type="button" name="getText" value="取得文本(包含img,embed)" />
<input type="button" name="selectedHtml" value="取得选中HTML" />
<br />
<br />
<input type="button" name="setHtml" value="设置HTML" />
<input type="button" name="setText" value="设置文本" />
<input type="button" name="insertHtml" value="插入HTML" />
<input type="button" name="appendHtml" value="添加HTML" />
<input type="button" name="clear" value="清空内容" />
<input type="reset" name="reset" value="Reset" />
</p>
</form>
</body>[object Object]- 获得内容等方法可以参考API
http://kindeditor.net/doc.php


