【相关学习推荐:python教程】
文章目录
- 前言
- Github
- 效果
- 实现过程
- 整体代码
前言
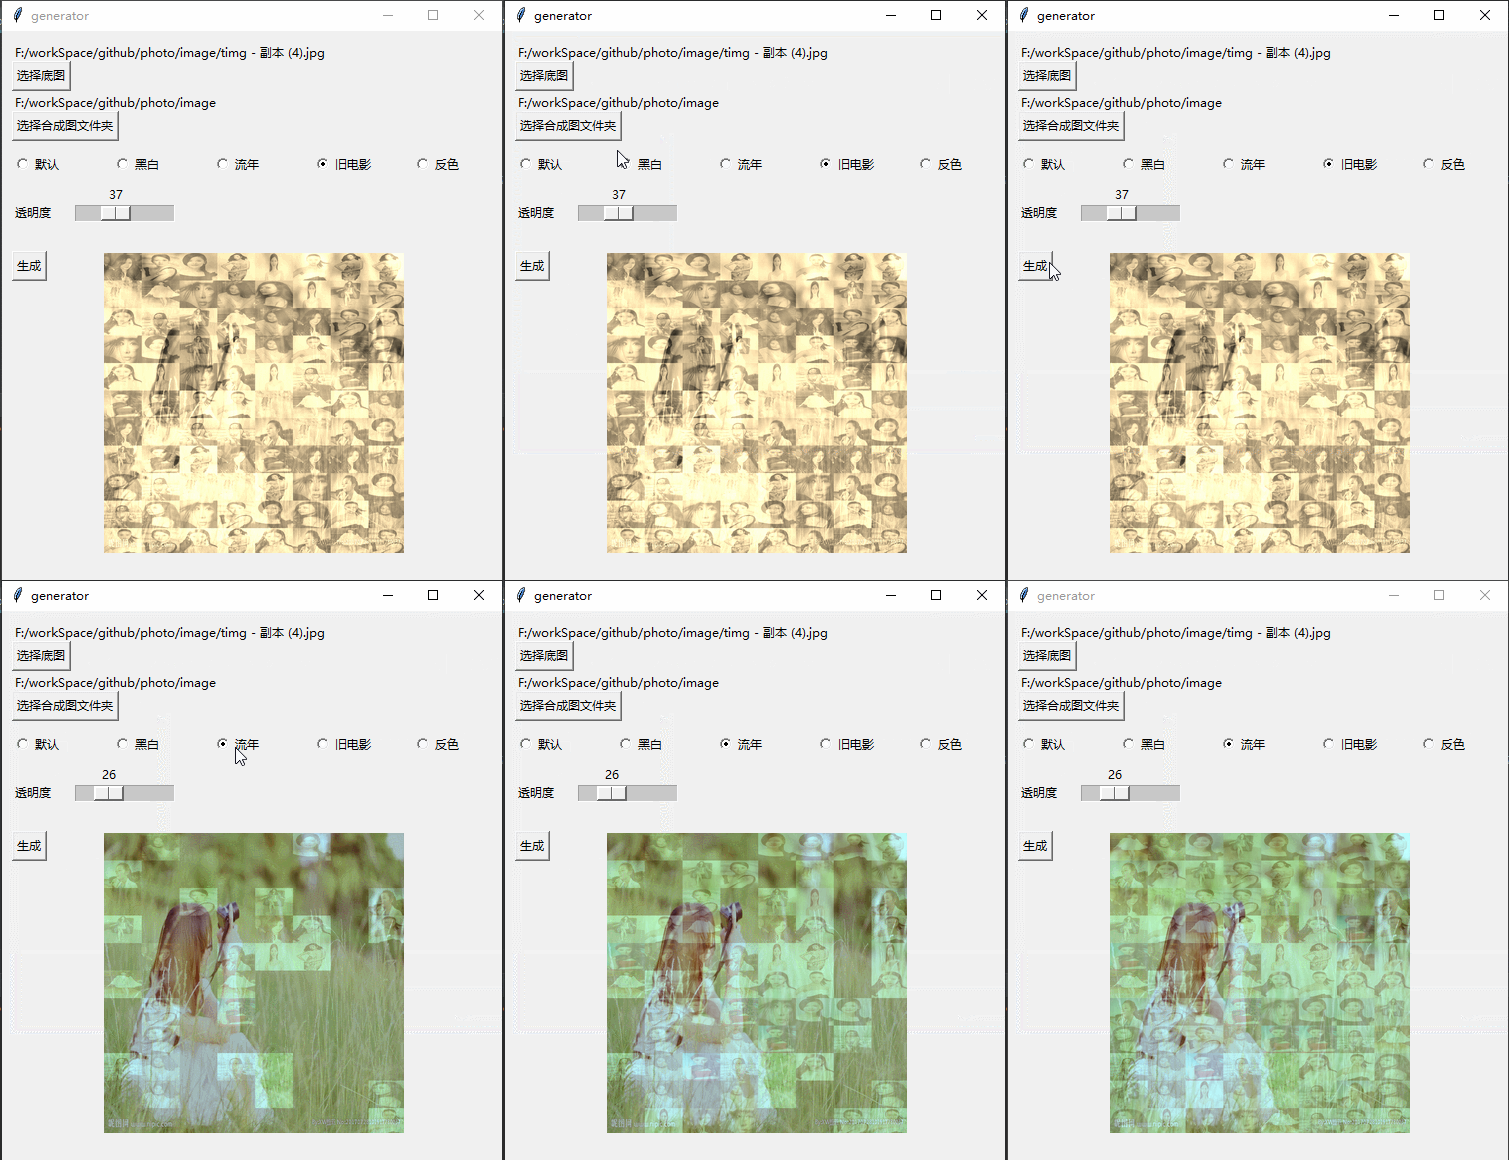
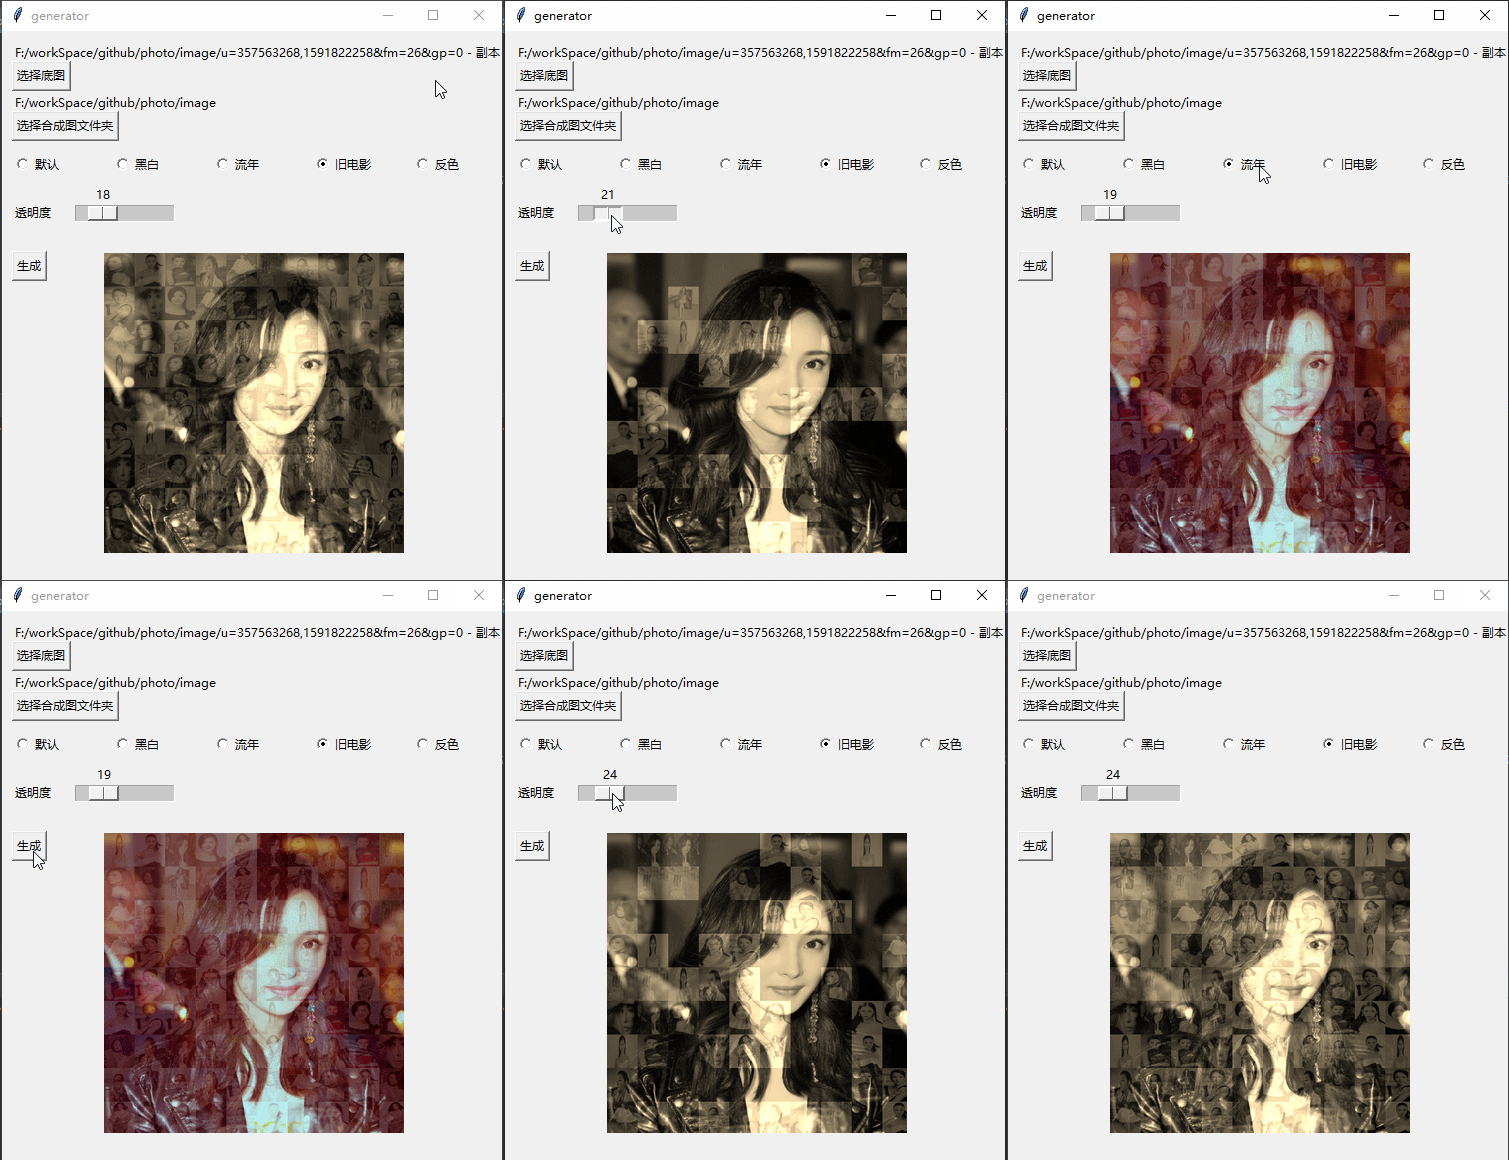
看电影的时候发现一个照片墙的功能,觉得这样生成照片挺好玩的,于是就动手用Python做了一下,觉得用来作照片纪念的效果可能会不错。
P:后面了解到我想做的功能叫蒙太奇拼图,所以这篇博客记录先留着,闲下来会去看一下蒙太奇拼图的算法
Github
https://github.com/jiandi1027/photo.git
效果


实现过程
1.获取图片文件夹的图片个数N,将底图拆分成XY块区域,且使X * Y
	# 打开图片
	base = Image.open(baseImgPath)
    base = base.convert('RGBA')
    # 获取图片文件夹图片并打乱顺序
    files = glob.glob(imagesPath + '/*.*')
    random.shuffle(files)
    # 图片数量
    num = len(files)
	# 底图大小
    x = base.size[0]
    y = base.size[1]
    # 每张图片数量 这个公式是为了xNum * yNum 的总图片数量<num又成比例的最大整数
    yNum = int((num / (y / x)) ** 0.5)
    if yNum == 0:
        yNum = 1
    xNum = int(num / yNum)
    # 图片大小 因为像素没有小数点 为防止黑边所以+1
    xSize = int(x / xNum) + 1
    ySize = int(y / yNum) + 1
2.遍历文件夹的图片,依次填充生成最终合成图
for file in files:
        fromImage = Image.open(file)
        i = int(num % xNum)
        j = int(num / xNum)
        out = fromImage.resize((xSize, ySize), Image.ANTIALIAS).convert('RGBA')
        toImage.paste(out, (i * xSize, j * ySize))
        toImage = toImage.convert('RGBA')
        img = Image.blend(base, toImage, 0.3)
        # 显示图片
        photo = ImageTk.PhotoImage(img)
        showLabel.config(image=photo)
        showLabel.image = photo
        if num < xNum * yNum:
            num = num + 1
3.生成结束后保存图片
toImage.save(‘generator.png’)
img.save(“final.png”)

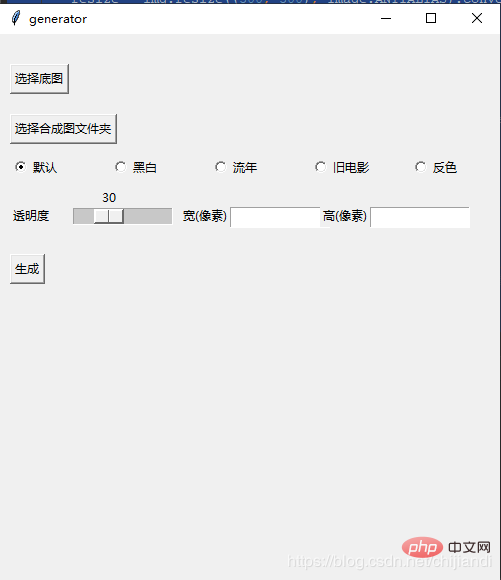
4.建立可视化界面
5.Pyinstaller生成exe可执行文件
安装pyinstaller模块,执行命令生成exe文件
pyinstaller -F -w test.py (-w就是取消窗口)
整体代码
Python的语法和设计规范还没学过,所以代码规范代码复用之类的可能会有点不到位,本博文主要是一个思路与整体流程的记录。
后续又优化了一下一些特效,比如合成图片采用随机位置,增加黑白,流年等显示特效,透明度自选等。
import PIL.Image as Image
import glob
import random
import tkinter.filedialog
from tkinter.filedialog import askdirectory, Label, Button, Radiobutton, Entry
import threading
import numpy as np
from PIL import ImageTk
alpha = 0.3
imagesPath = ''
# 滑动条回调 修改透明度
def resize(ev=None):
global alpha
alpha = scale.get() / 100
# 黑白
def blackWithe(image):
# r,g,b = r*0.299+g*0.587+b*0.114
im = np.asarray(image.convert('RGB'))
trans = np.array([[0.299, 0.587, 0.114], [0.299, 0.587, 0.114], [0.299, 0.587, 0.114]]).transpose()
im = np.dot(im, trans)
return Image.fromarray(np.array(im).astype('uint8'))
# 流年
def fleeting(image, params=12):
im = np.asarray(image.convert('RGB'))
im1 = np.sqrt(im * [1.0, 0.0, 0.0]) * params
im2 = im * [0.0, 1.0, 1.0]
im = im1 + im2
return Image.fromarray(np.array(im).astype('uint8'))
# 旧电影
def oldFilm(image):
im = np.asarray(image.convert('RGB'))
# r=r*0.393+g*0.769+b*0.189 g=r*0.349+g*0.686+b*0.168 b=r*0.272+g*0.534b*0.131
trans = np.array([[0.393, 0.769, 0.189], [0.349, 0.686, 0.168], [0.272, 0.534, 0.131]]).transpose()
# clip 超过255的颜色置为255
im = np.dot(im, trans).clip(max=255)
return Image.fromarray(np.array(im).astype('uint8'))
# 反色
def reverse(image):
im = 255 - np.asarray(image.convert('RGB'))
return Image.fromarray(np.array(im).astype('uint8'))
def chooseBaseImagePath():
name = tkinter.filedialog.askopenfilename()
if name != '':
global baseImgPath
baseImgPath = name
baseImageLabel.config(text=name)
baseImg = Image.open(baseImgPath)
widthEntry.delete(0, tkinter.END)
heightEntry.delete(0, tkinter.END)
widthEntry.insert(0, baseImg.size[0])
heightEntry.insert(0, baseImg.size[1])
else:
baseImageLabel.config(text="您没有选择任何文件")
def chooseImagesPath():
name = askdirectory()
if name != '':
global imagesPath
imagesPath = name
ImagesLabel.config(text=name)
else:
ImagesLabel.config(text="您没有选择任何文件")
def thread_it(func, *args):
# 创建
t = threading.Thread(target=func, args=args)
# 守护 !!!
t.setDaemon(True)
# 启动
t.start()
def test():
MyThread(1, "Thread-1", 1).start()
baseImgPath = ''
def generator():
baseImg = Image.open(baseImgPath)
baseImg = baseImg.convert('RGBA')
files = glob.glob(imagesPath + '/*.*') # 获取图片
random.shuffle(files)
num = len(files)
# 模板图片大小
x = baseImg.size[0]
y = baseImg.size[1]
# 每张图片数量 这个公式是为了xNum * yNum 的总图片数量<num又成比例的最大整数
yNum = int((num / (y / x)) ** 0.5)
if yNum == 0:
yNum = 1
xNum = int(num / yNum)
# 图片大小 因为像素没有小数点 为防止黑边所以+1
xSize = int(x / xNum) + 1
ySize = int(y / yNum) + 1
# 生成数量的随机列表 用于随机位置合成图片
l = [n for n in range(0, xNum * yNum)]
random.shuffle(l)
toImage = Image.new('RGB', (x, y))
num = 1
for file in files:
if num <= xNum * yNum:
num = num + 1
else:
break
fromImage = Image.open(file)
temp = l.pop()
i = int(temp % xNum)
j = int(temp / xNum)
out = fromImage.resize((xSize, ySize), Image.ANTIALIAS).convert('RGBA')
toImage.paste(out, (i * xSize, j * ySize))
toImage = toImage.convert('RGBA')
img = Image.blend(baseImg, toImage, alpha)
# 特效 但是会读取像素会降低效率
choose = v.get()
if choose == 1:
img = blackWithe(img)
elif choose == 2:
img = fleeting(img)
elif choose == 3:
img = oldFilm(img)
elif choose == 4:
img = reverse(img)
resize = img.resize((300, 300), Image.ANTIALIAS).convert('RGBA')
# 显示图片
photo = ImageTk.PhotoImage(resize)
showLabel.config(image=photo)
showLabel.image = photo
toImage.save('generator.png')
img = img.resize((int(widthEntry.get()),int(heightEntry.get())), Image.ANTIALIAS).convert('RGBA')
img.save("final.png")
resize.save("resize.png")
class MyThread(threading.Thread): # 继承父类threading.Thread
def __init__(self, threadID, name, counter):
threading.Thread.__init__(self)
self.threadID = threadID
self.name = name
self.counter = counter
def run(self): # 把要执行的代码写到run函数里面 线程在创建后会直接运行run函数
generator()
root = tkinter.Tk()
root.title('generator')
root.geometry('500x550')
baseImageLabel = Label(root, text='')
baseImageLabel.place(x=10, y=10)
baseImageBtn = Button(root, text="选择底图", command=chooseBaseImagePath).place(x=10, y=30)
ImagesLabel = Label(root, text='')
ImagesLabel.place(x=10, y=60)
ImagesBtn = Button(root, text="选择合成图文件夹", command=chooseImagesPath).place(x=10, y=80)
v = tkinter.IntVar()
v.set(0)
Radiobutton(root, variable=v, text='默认', value=0, ).place(x=10, y=120)
Radiobutton(root, variable=v, text='黑白', value=1, ).place(x=110, y=120)
Radiobutton(root, variable=v, text='流年', value=2, ).place(x=210, y=120)
Radiobutton(root, variable=v, text='旧电影', value=3, ).place(x=310, y=120)
Radiobutton(root, variable=v, text='反色', value=4, ).place(x=410, y=120)
scaleLabel = Label(root, text='透明度').place(x=10, y=170)
scale = tkinter.Scale(root, from_=0, to=100, orient=tkinter.HORIZONTAL, command=resize)
scale.set(30) # 设置初始值
scale.pack(fill=tkinter.X, expand=1)
scale.place(x=70, y=150)
Label(root, text='宽(像素)').place(x=180, y=170)
widthEntry = Entry(root, bd=1)
widthEntry.place(x=230, y=173, width=100)
Label(root, text='高(像素)').place(x=320, y=170)
heightEntry = Entry(root, bd=1)
heightEntry.place(x=370, y=173, width=100)
generatorBtn = Button(root, text="生成", command=test).place(x=10, y=220)
showLabel = Label(root)
showLabel.place(x=100, y=220)
root.mainloop()想了解更多编程学习,敬请关注php培训栏目!
以上是Python照片合成的方法详解的详细内容。更多信息请关注PHP中文网其他相关文章!
 Python的科学计算中如何使用阵列?Apr 25, 2025 am 12:28 AM
Arraysinpython,尤其是Vianumpy,ArecrucialInsCientificComputingfortheireftheireffertheireffertheirefferthe.1)Heasuedfornumerericalicerationalation,dataAnalysis和Machinelearning.2)Numpy'Simpy'Simpy'simplementIncressionSressirestrionsfasteroperoperoperationspasterationspasterationspasterationspasterationspasterationsthanpythonlists.3)inthanypythonlists.3)andAreseNableAblequick
 您如何处理同一系统上的不同Python版本?Apr 25, 2025 am 12:24 AM
你可以通过使用pyenv、venv和Anaconda来管理不同的Python版本。1)使用pyenv管理多个Python版本:安装pyenv,设置全局和本地版本。2)使用venv创建虚拟环境以隔离项目依赖。3)使用Anaconda管理数据科学项目中的Python版本。4)保留系统Python用于系统级任务。通过这些工具和策略,你可以有效地管理不同版本的Python,确保项目顺利运行。
 与标准Python阵列相比,使用Numpy数组的一些优点是什么?Apr 25, 2025 am 12:21 AM
numpyarrayshaveseveraladagesoverandastardandpythonarrays:1)基于基于duetoc的iMplation,2)2)他们的aremoremoremorymorymoremorymoremorymoremorymoremoremory,尤其是WithlargedAtasets和3)效率化,效率化,矢量化函数函数函数函数构成和稳定性构成和稳定性的操作,制造
 阵列的同质性质如何影响性能?Apr 25, 2025 am 12:13 AM
数组的同质性对性能的影响是双重的:1)同质性允许编译器优化内存访问,提高性能;2)但限制了类型多样性,可能导致效率低下。总之,选择合适的数据结构至关重要。
 编写可执行python脚本的最佳实践是什么?Apr 25, 2025 am 12:11 AM
到CraftCraftExecutablePythcripts,lollow TheSebestPractices:1)Addashebangline(#!/usr/usr/bin/envpython3)tomakethescriptexecutable.2)setpermissionswithchmodwithchmod xyour_script.3)
 Numpy数组与使用数组模块创建的数组有何不同?Apr 24, 2025 pm 03:53 PM
numpyArraysareAreBetterFornumericalialoperations andmulti-demensionaldata,而learthearrayModuleSutableforbasic,内存效率段
 Numpy数组的使用与使用Python中的数组模块阵列相比如何?Apr 24, 2025 pm 03:49 PM
numpyArraySareAreBetterForHeAvyNumericalComputing,而lelethearRayModulesiutable-usemoblemory-connerage-inderabledsswithSimpleDatateTypes.1)NumpyArsofferVerverVerverVerverVersAtility andPerformanceForlargedForlargedAtatasetSetsAtsAndAtasEndCompleXoper.2)
 CTYPES模块与Python中的数组有何关系?Apr 24, 2025 pm 03:45 PM
ctypesallowscreatingingangandmanipulatingc-stylarraysinpython.1)usectypestoInterfacewithClibrariesForperfermance.2)createc-stylec-stylec-stylarraysfornumericalcomputations.3)passarraystocfunctions foreforfunctionsforeffortions.however.however,However,HoweverofiousofmemoryManageManiverage,Pressiveo,Pressivero


热AI工具

Undresser.AI Undress
人工智能驱动的应用程序,用于创建逼真的裸体照片

AI Clothes Remover
用于从照片中去除衣服的在线人工智能工具。

Undress AI Tool
免费脱衣服图片

Clothoff.io
AI脱衣机

Video Face Swap
使用我们完全免费的人工智能换脸工具轻松在任何视频中换脸!

热门文章

热工具

Dreamweaver Mac版
视觉化网页开发工具

VSCode Windows 64位 下载
微软推出的免费、功能强大的一款IDE编辑器

SublimeText3 Mac版
神级代码编辑软件(SublimeText3)

安全考试浏览器
Safe Exam Browser是一个安全的浏览器环境,用于安全地进行在线考试。该软件将任何计算机变成一个安全的工作站。它控制对任何实用工具的访问,并防止学生使用未经授权的资源。

Dreamweaver CS6
视觉化网页开发工具


