原生JS使用transform实现banner的无限滚动效果
- hzc转载
- 2020-06-20 09:15:252502浏览
功能

- 默认情况无限循环向右移动
- 点击数字切换到对应图片
- 点击左右切换可切换图片
原理
首先说下原理。
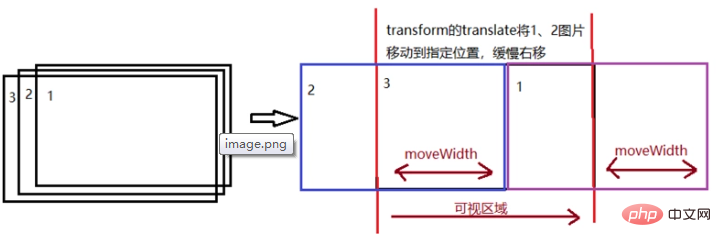
- 在布局上所有的图片都是重叠的,即只要保证Y方向对齐即可,当前可见的图z-index层级最高。
- 每隔3s中更换一张图片,使用setTimeout定时。
- 使用gIndex记录当前可视区域的展示的是哪张图片下标,每次更换,计算下一张图片的下标。
- 通过requestAnimationFrame实现一次图片切换的动画。
这种方法也可以做到整个页面始终只有2个img标签,而不必把所有的img节点全部创建出来,要点是每次更换不可见img的src。
动画的实现
- 首先定义一个timestap,这个值记录每个帧移动多少距离。定义初始step=0,记录移动的步数。
- 每次移动的距离moveWidth是timestamp*step,图片1向右移动增加moveWidth,图片2从左侧进入moveWidth。因此,图片1的transform是translate(moveWidth), 而图片2的transform则是translate(moveWidth-图片宽度)。
- step+1
- 如果moveWidth>图片宽度,步骤5,否则requestAnimationFrame请求下一次执行,继续2-4.
- 图片1和2都将位置放置在起始位置,图片2的z-index设置为最高。
这样就完成了一次移动的动画。
html代码
1aa9e5d373740b65a0cc8f0a02150c53
    9890cd3db8af2c13be66110fccb4c149
        46035cfb8a0d95635d920894d340f673
        d9fd74ace3179368a73ced5900692227
        3f1c436ee4702584088029595ffdb561
        6981aaf13a5329ce3c343a98790a928b
    94b3e26ee717c64999d7867364b1b4a3
    5854fa88d579fae799b3987b589adf23
        2ca9b26f56e442d164d8198af3bc456e194b3e26ee717c64999d7867364b1b4a3
        e388a4556c0f65e1904146cc1a846bee294b3e26ee717c64999d7867364b1b4a3
        e388a4556c0f65e1904146cc1a846bee394b3e26ee717c64999d7867364b1b4a3
        e388a4556c0f65e1904146cc1a846bee494b3e26ee717c64999d7867364b1b4a3
    94b3e26ee717c64999d7867364b1b4a3
    ef97f43c01124fc78febd898df2aef5e
        b9821f58e2671d6195de476b0e283f7d94b3e26ee717c64999d7867364b1b4a3
    94b3e26ee717c64999d7867364b1b4a3
    d63265fd15dd0bd32166bea3d879ea48
        b9821f58e2671d6195de476b0e283f7d94b3e26ee717c64999d7867364b1b4a3
    94b3e26ee717c64999d7867364b1b4a3
ab946e7546ab66a280dd9c9f9310ecd5
JS代码
var timeout = null;
window.onload = function () {
    var oLeft = document.querySelector('.left');
    var oRight = document.querySelector('.right');
    var oButton = document.querySelector('.buttons');
    var oButtons = document.querySelectorAll('.buttons p');
    var oImgs = document.querySelectorAll('.box img');
    var imgWidth = oImgs[0].width;
    var gIndex = 0;
    begainAnimate();

    // 绑定左右点击事件
    oLeft.onclick = function () {
        clearTimeout(timeout);
        leftMove();
        begainAnimate();
    };
    oRight.onclick = function () {
        clearTimeout(timeout);
        rightMove();
        begainAnimate();
    };
    // 绑定数字序号事件
    oButton.onclick = function (event) {
        clearTimeout(timeout);
        var targetEl = event.target;
        var nextIndex = (+targetEl.innerText) - 1;
        console.log(nextIndex);
        rightMove(nextIndex);
        begainAnimate();
    }
    // 默认初始动画朝右边
    function begainAnimate() {
        clearTimeout(timeout);
        timeout = setTimeout(function () {
            rightMove();
            begainAnimate();
        }, 3000);
    }
    // 向左移动动画
    function leftMove() {
        var nextIndex = (gIndex - 1 b54d92a8a8de0d7ff1f90055ffc7a263= oImgs.length) ? 0 : gIndex + 1;
        }
        animateSteps(nextIndex, 50);
    }
    // 一次动画
    function animateSteps(nextIndex, timestamp) {
        var currentImg = oImgs[gIndex];
        var nextImg = oImgs[nextIndex];
        nextImg.style.zIndex = 10;
        var step = 0;
        requestAnimationFrame(goStep);
        // 走一帧的动画,移动timestamp
        function goStep() {
            var moveWidth = timestamp * step++;
            if (Math.abs(moveWidth) aa8c7bda5196a2425f3940c27f8cd2eb 0 ? (moveWidth - imgWidth) : (imgWidth + moveWidth)}px)`;
                requestAnimationFrame(goStep);
            } else {
                currentImg.style.zIndex = 1;
                currentImg.style.transform = `translate(0px)`;
                nextImg.style.transform = `translate(0px)`;
                oButtons[gIndex].setAttribute('class', '');
                oButtons[nextIndex].setAttribute('class', 'active');
                gIndex = nextIndex;
            }
        }
    }
}
window.onclose = function () {
    clearTimeout(timeout);
}
css布局样式
<style>
    /* 首先设置图片box的区域,将图片重叠在一起  */
    header {
        width: 100%;
        position: relative;
        overflow: hidden;
    }
    .box {
        width: 100%;
        height: 300px;
    }
    .box img {
        width: 100%;
        height: 100%;
        position: absolute;
        transform: translateX(0);
        z-index: 1;
    }
    .box img:first-child {
        z-index: 10;
    }

    /* 数字序列按钮 */
    .buttons {
        position: absolute;
        right: 10%;
        bottom: 5%;
        display: flex;
        z-index: 100;
    }

    .buttons p {
        width: 30px;
        height: 30px;
        background-color: #aaa;
        border: 1px solid #aaa;
        text-align: center;
        margin: 10px;
        cursor: pointer;
        opacity: .7;
        border-radius: 15px;
        line-height: 30px;
    }

    .buttons p.active {
        background-color: white;
    }

    /* 左右切换按钮 */
    .left,
    .right {
        position: absolute;
        width: 80px;
        height: 80px;
        background-color: #ccc;
        z-index: 100;
        top: 110px;
        border-radius: 40px;
        opacity: .5;
        cursor: pointer;
    }

    .left {
        left: 2%;
    }

    .right {
        right: 2%;
    }

    .left .arrow {
        width: 30px;
        height: 30px;
        border-left: solid 5px #666;
        border-top: solid 5px #666;
        transform: translate(-5px, 25px) rotate(-45deg) translate(25px, 25px);
    }

    .right .arrow {
        width: 30px;
        height: 30px;
        border-left: solid 5px #666;
        border-top: solid 5px #666;
        transform: translate(50px, 25px) rotate(135deg) translate(25px, 25px);
    }
</style>
推荐教程: 《js教程》
以上是原生JS使用transform实现banner的无限滚动效果的详细内容。更多信息请关注PHP中文网其他相关文章!
声明:
本文转载于:segmentfault.com。如有侵权,请联系admin@php.cn删除

