shell 是操作系统中“提供使用者使用界面”的软件,它包在 linux 内核的外面,为用户和内核之间的交互提供了一个接口,系统中的命令用 shell 去解释,shell 接收系统回应的输出并显示其到屏幕中。
1.shell简介
- 解释性语言——shell脚本、python,运行效率低,基本只适用企业内部
shell——脚本,记录系统命令及命令执行的系统关系,充当解释器
gcc ——编译器
vim ——编辑器
#!/bin/bash 幻数,指定解释器#!/usr/bin/env bash 自动匹配解释器
描述性语言——C语言、java,执行效率高
1.脚本的调用
脚本(一般以.sh结尾):
[root@desktop5 mnt]# vim westos.sh#!/bin/bash echo hello westos
方法一:无执行权限,用sh调用
[root@desktop5 mnt]# sh westos.sh
方法二:有执行权限,用绝对路径调用
[root@desktop5 mnt]# chmod +x westos.sh [root@desktop5 mnt]# /mnt/westos.sh
2.脚本的检查
+ 表示:执行动作
无+表示:动作输出
方法一:
[root@desktop5 mnt]# sh -x /mnt/westos.sh

方法二:
[root@desktop5 mnt]# vim westos.sh#!/bin/bash -xecho hello westos

实验一:快捷键F4执行填充
方法一:
[root@desktop5 mnt]# vim /etc/vimrc map <F4> ms:call WESTOS()<cr>'s
##ms:执行命令时,不提示报错function WESTOS()
call append(0,"#################################")
call append(1,"# Author : Hao #")
call append(2,"# Mail : Hao@westos.com #")
call append(3,"# Version : 1.0 #")
call append(4,"# Create_Time: ".strftime("%Y-%m-%d")." #") ##时间更新
call append(5,"# Description: #")
call append(6,"#################################")
endfunction方法二:利用.来承接后面的#
map <F4> ms:call WESTOS()<cr>'sfunction WESTOS()
call append(0,"#################################")
call append(1,"# Author : Hao".(" #"))
call append(2,"# Mail : Hao@westos.com".(" #"))
call append(3,"# Version : 1.0 ".(" #"))
call append(4,"# Create_Time: ".strftime("%Y-%m-%d").(" #"))
call append(5,"# Description: ".(" #"))
call append(6,"#################################")
endfunction测试:
[root@desktop5 mnt]# vim westos.sh ##按‘F4’执行填充

实验二:执行新建以.sh结尾的vim文件时,自动填充
注意:旧文件不自动填充
方法一:
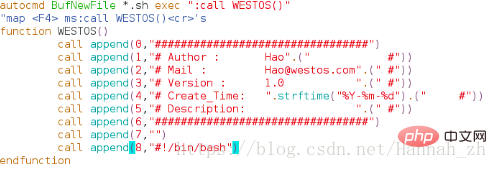
[root@desktop5 mnt]# vim /etc/vimrc autocmd BufNewFile *.sh exec ":call WESTOS()" ##新文件,以.sh结尾,执行,调用文件"map <F4> ms:call WESTOS()<cr>'s ##此行注释,在此"表注释function WESTOS()
call append(0,"#################################")
call append(1,"# Author : Hao #")
call append(2,"# Mail : Hao@westos.com #")
call append(3,"# Version : 1.0 #")
call append(4,"# Create_Time: ".strftime("%Y-%m-%d")." #")
call append(5,"# Description: #")
call append(6,"#################################")
call append(7,"")
call append(8,"#!/bin/bash")endfunction方法二:
[root@desktop5 mnt]# vim /etc/vimrc autocmd BufNewFile *.sh exec ":call WESTOS()""map <F4> ms:call WESTOS()<cr>'s
function WESTOS()
call append(0,"#################################")
call append(1,"# Author : Hao".(" #"))
call append(2,"# Mail : Hao@westos.com".(" #"))
call append(3,"# Version : 1.0 ".(" #"))
call append(4,"# Create_Time: ".strftime("%Y-%m-%d").(" #"))
call append(5,"# Description: ".(" #"))
call append(6,"#################################")
call append(7,"")
call append(8,"#!/bin/bash")
endfunction
测试:
[root@desktop5 mnt]# vim file1.sh ##新建以.sh结尾的文件,自动填充
2.shell脚本练习
练习一:显示当前主机ip地址
[root@desktop5 mnt]# vim ip_show.sh#!/bin/bashifconfig eth0 | awk -F " " '/inet /{print $2}' ##inet所在行,以空格间隔,第二个字符
测试:
[root@desktop5 mnt]# sh ip_show.sh

练习二:显示当前主机中能登陆系统的用户
[root@desktop5 mnt]# vim user_show.sh#!/bin/bashawk -F : '/bash$/{print $1}' /etc/passwd ##以bash结尾,打印出第一个字符
测试: 
练习三:执行命令后可清空日至
方法一:
[root@desktop5 mnt]# vim clear_log.sh#!/bin/bash> /var/log/messages
方法二:
[root@desktop5 mnt]# vim clear_log.sh#!/bin/bashecho "" > /var/log/messages
测试:
[root@desktop5 mnt]# chmod +x clear_log.sh [root@desktop5 mnt]# /mnt/clear_log.sh

【推荐课程:linux视频教程】
以上是【Linux学习】shell脚本语言的详细内容。更多信息请关注PHP中文网其他相关文章!
 掌握Linux操作:实用指南Apr 12, 2025 am 12:10 AM
掌握Linux操作的原因是其广泛的应用场景和强大的功能。1)Linux适合开发者、系统管理员和技术爱好者,应用于服务器管理、嵌入式系统和容器化技术。2)学习Linux可以从文件系统结构、Shell使用、用户权限管理和进程管理入手。3)Linux命令行是其核心工具,通过Shell执行命令,如ls、mkdir、cd等,支持重定向和管道操作。4)高级用法包括编写自动化脚本,如备份脚本,使用tar命令和条件判断。5)常见错误包括权限、路径和语法问题,可通过echo、set-x和$?调试。6)性能优化建议
 Linux的5支支柱:了解他们的角色Apr 11, 2025 am 12:07 AM
Linux系统的五大支柱是:1.内核,2.系统库,3.Shell,4.文件系统,5.系统工具。内核管理硬件资源并提供基本服务;系统库为应用程序提供预编译函数;Shell是用户与系统交互的接口;文件系统组织和存储数据;系统工具用于系统管理和维护。
 Linux维护模式:工具和技术Apr 10, 2025 am 09:42 AM
在Linux系统中,可以通过在启动时按特定键或使用命令如“sudosystemctlrescue”进入维护模式。维护模式允许管理员在不受干扰的情况下进行系统维护和故障排除,如修复文件系统、重置密码、修补安全漏洞等。
 关键Linux操作:初学者指南Apr 09, 2025 pm 04:09 PM
Linux初学者应掌握文件管理、用户管理和网络配置等基本操作。1)文件管理:使用mkdir、touch、ls、rm、mv、cp命令。2)用户管理:使用useradd、passwd、userdel、usermod命令。3)网络配置:使用ifconfig、echo、ufw命令。这些操作是Linux系统管理的基础,熟练掌握它们可以有效管理系统。
 如何使用sudo向Linux的用户授予高架特权?Mar 17, 2025 pm 05:32 PM
本文解释了如何管理Linux中的Sudo特权,包括授予,撤销和安全性最佳实践。关键重点是安全和sudoers安全和限制访问。Character数量:159
 如何在Linux中实现SSH的两因素身份验证(2FA)?Mar 17, 2025 pm 05:31 PM
本文提供了有关使用Google Authenticator在Linux上设置两因素身份验证(2FA)的指南,详细介绍了安装,配置和故障排除步骤。它突出了2FA的安全益处,例如增强的SEC
 如何使用TOP,HTOP和VMSTAT等工具来监视Linux中的系统性能?Mar 17, 2025 pm 05:28 PM
本文讨论了使用TOP,HTOP和VMSTAT监视Linux系统性能,并详细介绍其独特功能和自定义选项,以进行有效的系统管理。
 如何使用软件包管理器(APT,YUM,DNF)管理Linux中的软件包?Mar 17, 2025 pm 05:26 PM
文章讨论了使用APT,YUM和DNF在Linux中管理软件包,涵盖安装,更新和删除。它比较了它们对不同分布的功能和适用性。


热AI工具

Undresser.AI Undress
人工智能驱动的应用程序,用于创建逼真的裸体照片

AI Clothes Remover
用于从照片中去除衣服的在线人工智能工具。

Undress AI Tool
免费脱衣服图片

Clothoff.io
AI脱衣机

AI Hentai Generator
免费生成ai无尽的。

热门文章

热工具

记事本++7.3.1
好用且免费的代码编辑器

SecLists
SecLists是最终安全测试人员的伙伴。它是一个包含各种类型列表的集合,这些列表在安全评估过程中经常使用,都在一个地方。SecLists通过方便地提供安全测试人员可能需要的所有列表,帮助提高安全测试的效率和生产力。列表类型包括用户名、密码、URL、模糊测试有效载荷、敏感数据模式、Web shell等等。测试人员只需将此存储库拉到新的测试机上,他就可以访问到所需的每种类型的列表。

DVWA
Damn Vulnerable Web App (DVWA) 是一个PHP/MySQL的Web应用程序,非常容易受到攻击。它的主要目标是成为安全专业人员在合法环境中测试自己的技能和工具的辅助工具,帮助Web开发人员更好地理解保护Web应用程序的过程,并帮助教师/学生在课堂环境中教授/学习Web应用程序安全。DVWA的目标是通过简单直接的界面练习一些最常见的Web漏洞,难度各不相同。请注意,该软件中

Dreamweaver CS6
视觉化网页开发工具

WebStorm Mac版
好用的JavaScript开发工具


