Bootstrap中提供了三种类型的表单布局:垂直表单、横向表单以及内联表单;它们通过外部引入Bootstrap中的JavaScript和CSS文件以及在元素中添加类名来设置表单控件
HTML表单是网页和应用程序中不可或缺的一部分,但是仅使用CSS来逐个手动设置表单控件的方式通常很麻烦且枯燥乏味。如今随着bootstrap的出现大大简化了表单控件比如表单中的标签,输入字段,选择框以及提交框等样式和对齐过程。接下来在文章中将为大家详细介绍Bootstrap中的表单布局样式

【推荐课程:Bootstrap课程】
在Bootstrap中提供了三种不同类型的表单布局:
垂直表单(默认表格布局)
横向表单
内联表单
接下来在文章中将和大家逐一详细介绍这些表单布局以及各种与表单相关的Bootstrap组件
外部引入Bootstrap
<link rel="stylesheet" type="text/css" href=".\bootstrap-3.3.7-dist\css\bootstrap.css">
<script type="text/javascript" src=".\bootstrap-3.3.7-dist\js\bootstrap.min.js"></script>
创建垂直表单布局
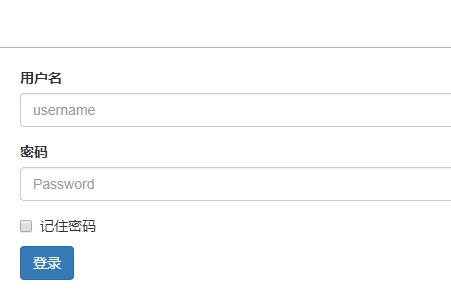
这是默认的Bootstrap表单布局,其中样式应用于表单控件,而不向ff9c23ada1bcecdd1a0fb5d5a0f18437元素添加任何基类或标记中的任何大的更改。
此布局中的表单控件在顶部堆叠有左对齐标签
例:
<div style="margin:20px;">
    <form action="#" method="post">
        <div class="form-group">
            <label for="inputName">用户名</label>
            <input type="username" class="form-control" id="inputName" placeholder="username" required>
        </div>
        <div class="form-group">
            <label for="inputPassword">密码</label>
            <input type="password" class="form-control" id="inputPassword" placeholder="Password" required>
        </div>
        <div class="checkbox">
            <label><input type="checkbox">记住密码</label>
        </div>
        <button type="submit" class="btn btn-primary">登录</button>
    </form>
</div>
效果图:

创建横向表格布局
在横向格式中,布局标签右对齐并向左浮动,使它们与表单控件显示在同一行上。横向表单布局需要在默认表单布局中进行各种标记更改。以下就是实现横向表单布局的具体操作步骤:
(1)为form元素添加.form-horizontal类
(2)在div元素中实现包装标签和表单控件并添加.form-group类
(3)使用Bootstrap的预定义网格类来对齐标签和表单控件
(4)在lable元素中添加.control-label到2e1cf0710519d5598b1f0f14c36ba674类
<div>
    <form class="form-horizontal" action="#" method="post">
        <div class="form-group">
            <label for="inputName" class="control-label col-xs-2">用户名</label>
            <div class="col-xs-10">
                <input type="username" class="form-control" id="inputName" placeholder="username" required>
            </div>
        </div>
        <div class="form-group">
            <label for="inputPassword" class="control-label col-xs-2">密码</label>
            <div class="col-xs-10">
                <input type="password" class="form-control" id="inputPassword" placeholder="Password" required>
            </div>
        </div>
        <div class="form-group">
            <div class="col-xs-offset-2 col-xs-10">
                <div class="checkbox">
                    <label><input type="checkbox">记住密码</label>
                </div>
            </div>
        </div>
        <div class="form-group">
            <div class="col-xs-offset-2 col-xs-10">
                <button type="submit" class="btn btn-primary">登录</button>
            </div>
        </div>
    </form>
</div>
效果图:

创建内联表单布局
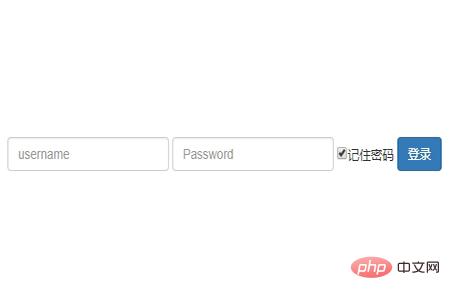
有时候在创建表单时需要并排放置表单控件用来压缩布局。如果你想实现这个效果可以向form元素中添加form-inline类。
<div style="margin: 30px;">
    <form class="form-inline" action="#" method="post">
        <div class="form-group">
            <label class="sr-only" for="inputName">用户名</label>
            <input type="username" class="form-control" id="inputName" placeholder="username" required>
        </div>
        <div class="form-group">
            <label class="sr-only" for="inputPassword">密码</label>
            <input type="password" class="form-control" id="inputPassword" placeholder="Password" required>
        </div>
        <div class="checkbox">
            <label><input type="checkbox">记住密码</label>
        </div>
        <button type="submit" class="btn btn-primary">登录</button>
    </form>
</div>
效果图:

总结:以上就是本篇文章的全部内容了,希望对大家学习Bootstrap中的表单布局样式有所帮助。
以上是如何使用Bootstrap创建表单布局的详细内容。更多信息请关注PHP中文网其他相关文章!
 JavaScript是用C编写的吗?检查证据Apr 25, 2025 am 12:15 AM
是的,JavaScript的引擎核心是用C语言编写的。1)C语言提供了高效性能和底层控制,适合JavaScript引擎的开发。2)以V8引擎为例,其核心用C 编写,结合了C的效率和面向对象特性。3)JavaScript引擎的工作原理包括解析、编译和执行,C语言在这些过程中发挥关键作用。
 JavaScript的角色:使网络交互和动态Apr 24, 2025 am 12:12 AM
JavaScript是现代网站的核心,因为它增强了网页的交互性和动态性。1)它允许在不刷新页面的情况下改变内容,2)通过DOMAPI操作网页,3)支持复杂的交互效果如动画和拖放,4)优化性能和最佳实践提高用户体验。
 C和JavaScript:连接解释Apr 23, 2025 am 12:07 AM
C 和JavaScript通过WebAssembly实现互操作性。1)C 代码编译成WebAssembly模块,引入到JavaScript环境中,增强计算能力。2)在游戏开发中,C 处理物理引擎和图形渲染,JavaScript负责游戏逻辑和用户界面。
 从网站到应用程序:JavaScript的不同应用Apr 22, 2025 am 12:02 AM
JavaScript在网站、移动应用、桌面应用和服务器端编程中均有广泛应用。1)在网站开发中,JavaScript与HTML、CSS一起操作DOM,实现动态效果,并支持如jQuery、React等框架。2)通过ReactNative和Ionic,JavaScript用于开发跨平台移动应用。3)Electron框架使JavaScript能构建桌面应用。4)Node.js让JavaScript在服务器端运行,支持高并发请求。
 Python vs. JavaScript:比较用例和应用程序Apr 21, 2025 am 12:01 AM
Python更适合数据科学和自动化,JavaScript更适合前端和全栈开发。1.Python在数据科学和机器学习中表现出色,使用NumPy、Pandas等库进行数据处理和建模。2.Python在自动化和脚本编写方面简洁高效。3.JavaScript在前端开发中不可或缺,用于构建动态网页和单页面应用。4.JavaScript通过Node.js在后端开发中发挥作用,支持全栈开发。
 C/C在JavaScript口译员和编译器中的作用Apr 20, 2025 am 12:01 AM
C和C 在JavaScript引擎中扮演了至关重要的角色,主要用于实现解释器和JIT编译器。 1)C 用于解析JavaScript源码并生成抽象语法树。 2)C 负责生成和执行字节码。 3)C 实现JIT编译器,在运行时优化和编译热点代码,显着提高JavaScript的执行效率。
 JavaScript在行动中:现实世界中的示例和项目Apr 19, 2025 am 12:13 AM
JavaScript在现实世界中的应用包括前端和后端开发。1)通过构建TODO列表应用展示前端应用,涉及DOM操作和事件处理。2)通过Node.js和Express构建RESTfulAPI展示后端应用。
 JavaScript和Web:核心功能和用例Apr 18, 2025 am 12:19 AM
JavaScript在Web开发中的主要用途包括客户端交互、表单验证和异步通信。1)通过DOM操作实现动态内容更新和用户交互;2)在用户提交数据前进行客户端验证,提高用户体验;3)通过AJAX技术实现与服务器的无刷新通信。


热AI工具

Undresser.AI Undress
人工智能驱动的应用程序,用于创建逼真的裸体照片

AI Clothes Remover
用于从照片中去除衣服的在线人工智能工具。

Undress AI Tool
免费脱衣服图片

Clothoff.io
AI脱衣机

Video Face Swap
使用我们完全免费的人工智能换脸工具轻松在任何视频中换脸!

热门文章

热工具

SecLists
SecLists是最终安全测试人员的伙伴。它是一个包含各种类型列表的集合,这些列表在安全评估过程中经常使用,都在一个地方。SecLists通过方便地提供安全测试人员可能需要的所有列表,帮助提高安全测试的效率和生产力。列表类型包括用户名、密码、URL、模糊测试有效载荷、敏感数据模式、Web shell等等。测试人员只需将此存储库拉到新的测试机上,他就可以访问到所需的每种类型的列表。

SublimeText3 Linux新版
SublimeText3 Linux最新版

DVWA
Damn Vulnerable Web App (DVWA) 是一个PHP/MySQL的Web应用程序,非常容易受到攻击。它的主要目标是成为安全专业人员在合法环境中测试自己的技能和工具的辅助工具,帮助Web开发人员更好地理解保护Web应用程序的过程,并帮助教师/学生在课堂环境中教授/学习Web应用程序安全。DVWA的目标是通过简单直接的界面练习一些最常见的Web漏洞,难度各不相同。请注意,该软件中

ZendStudio 13.5.1 Mac
功能强大的PHP集成开发环境

安全考试浏览器
Safe Exam Browser是一个安全的浏览器环境,用于安全地进行在线考试。该软件将任何计算机变成一个安全的工作站。它控制对任何实用工具的访问,并防止学生使用未经授权的资源。


