Bootstrap可以轻松创建经常看到的表单类型,编码非常的简单,所以本篇文章我们就来看看使用bootstrap创建表单的方法。

制作表单的方法
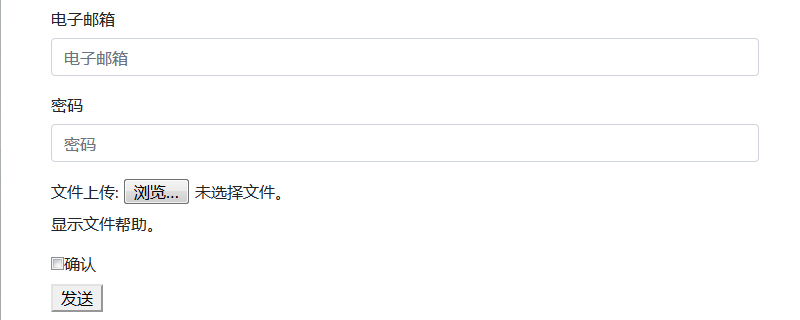
首先利用ff9c23ada1bcecdd1a0fb5d5a0f18437标签设置表单,然后为表单的每个元素设置class =”form - group“(用“dc6dce4a544fdca2df29d5ac0ea9906b”等标签设置你想要设置class =”form-group“的范围)。最后通过在d5fd7aea971a85678ba271703566ebfd标签中设置class =”form-control“来完成。
我们来看bootstrap创建表单的具体示例
代码如下
<!DOCTYPE html>
<html>
  <head>
  	<meta charset="utf-8">
    <title>sample</title>
    <script src="bootstrap-4.2.1-dist/js/bootstrap.min.js" type="text/javascript"></script>
    <link rel="stylesheet" type="text/css" href="bootstrap-4.2.1-dist/css/bootstrap.min.css" />
  </head>
  <body style="padding: 50px;">
    <form>
      <div class="form-group">
        <label for="email">电子邮箱</label>
        <input type="email" class="form-control" id="email" placeholder="电子邮箱">
      </div>
      <div class="form-group">
        <label for="pass">密码</label>
        <input type="password" class="form-control" id="pass" placeholder="密码">
      </div>
      <div>
      	<label for="file">文件上传:</label>

      	<input type="file" id="file">
      	<p class="help-block">显示文件帮助。</p>
      </div>
      <div class="check">
        <label>
          <input type="checkbox">确认
        </label>
      </div>
      <button type="submit" class="btu btn-default">发送</button>
    </form>
  </body>
</html>
运行效果如下:

此外,还可以创建内联表单。我们只要在ff9c23ada1bcecdd1a0fb5d5a0f18437标签中添加class =”form-inline“就可以了,在这里就不多说了,有兴趣的朋友可以自己试一试。
总结,以上就是本篇文章的全部内容了,更多精彩内容大家可以关注php中文网其他相关教程栏目!!!
以上是如何使用bootstrap制作form表单的详细内容。更多信息请关注PHP中文网其他相关文章!
 HTML与CSS vs. JavaScript:比较概述Apr 16, 2025 am 12:04 AM
HTML、CSS和JavaScript在网页开发中的角色分别是:HTML负责内容结构,CSS负责样式,JavaScript负责动态行为。1.HTML通过标签定义网页结构和内容,确保语义化。2.CSS通过选择器和属性控制网页样式,使其美观易读。3.JavaScript通过脚本控制网页行为,实现动态和交互功能。
 HTML:是编程语言还是其他?Apr 15, 2025 am 12:13 AM
HTMLISNOTAPROGRAMMENGUAGE; ITISAMARKUMARKUPLAGUAGE.1)htmlStructures andFormatSwebContentusingtags.2)itworkswithcsssforstylingandjavascript for Interactivity,增强WebevebDevelopment。
 HTML:建立网页的结构Apr 14, 2025 am 12:14 AM
HTML是构建网页结构的基石。1.HTML定义内容结构和语义,使用、、等标签。2.提供语义化标记,如、、等,提升SEO效果。3.通过标签实现用户交互,需注意表单验证。4.使用、等高级元素结合JavaScript实现动态效果。5.常见错误包括标签未闭合和属性值未加引号,需使用验证工具。6.优化策略包括减少HTTP请求、压缩HTML、使用语义化标签等。
 从文本到网站:HTML的力量Apr 13, 2025 am 12:07 AM
HTML是一种用于构建网页的语言,通过标签和属性定义网页结构和内容。1)HTML通过标签组织文档结构,如、。2)浏览器解析HTML构建DOM并渲染网页。3)HTML5的新特性如、、增强了多媒体功能。4)常见错误包括标签未闭合和属性值未加引号。5)优化建议包括使用语义化标签和减少文件大小。
 了解HTML,CSS和JavaScript:初学者指南Apr 12, 2025 am 12:02 AM
WebDevelovermentReliesonHtml,CSS和JavaScript:1)HTMLStructuresContent,2)CSSStyleSIT和3)JavaScriptAddSstractivity,形成thebasisofmodernWebemodernWebExexperiences。
 HTML的角色:构建Web内容Apr 11, 2025 am 12:12 AM
HTML的作用是通过标签和属性定义网页的结构和内容。1.HTML通过到、等标签组织内容,使其易于阅读和理解。2.使用语义化标签如、等增强可访问性和SEO。3.优化HTML代码可以提高网页加载速度和用户体验。
 HTML和代码:仔细观察术语Apr 10, 2025 am 09:28 AM
htmlisaspecifictypefodyfocusedonstructuringwebcontent,而“代码” badlyLyCludEslanguagesLikeLikejavascriptandPytyPythonForFunctionality.1)htmldefineswebpagertuctureduseTags.2)“代码”代码“ code” code code code codeSpassSesseseseseseseseAwiderRangeLangeLangeforLageforLogageforLogicIctInterract
 HTML,CSS和JavaScript:Web开发人员的基本工具Apr 09, 2025 am 12:12 AM
HTML、CSS和JavaScript是Web开发的三大支柱。1.HTML定义网页结构,使用标签如、等。2.CSS控制网页样式,使用选择器和属性如color、font-size等。3.JavaScript实现动态效果和交互,通过事件监听和DOM操作。


热AI工具

Undresser.AI Undress
人工智能驱动的应用程序,用于创建逼真的裸体照片

AI Clothes Remover
用于从照片中去除衣服的在线人工智能工具。

Undress AI Tool
免费脱衣服图片

Clothoff.io
AI脱衣机

AI Hentai Generator
免费生成ai无尽的。

热门文章

热工具

mPDF
mPDF是一个PHP库,可以从UTF-8编码的HTML生成PDF文件。原作者Ian Back编写mPDF以从他的网站上“即时”输出PDF文件,并处理不同的语言。与原始脚本如HTML2FPDF相比,它的速度较慢,并且在使用Unicode字体时生成的文件较大,但支持CSS样式等,并进行了大量增强。支持几乎所有语言,包括RTL(阿拉伯语和希伯来语)和CJK(中日韩)。支持嵌套的块级元素(如P、DIV),

Atom编辑器mac版下载
最流行的的开源编辑器

EditPlus 中文破解版
体积小,语法高亮,不支持代码提示功能

PhpStorm Mac 版本
最新(2018.2.1 )专业的PHP集成开发工具

WebStorm Mac版
好用的JavaScript开发工具


