分享HTML和CSS实现的炫酷登录页面代码
- yulia原创
- 2018-10-24 10:03:078756浏览
大家在浏览网站时有没有发现,几乎每个网站都会要求你注册或登录,那作为一个前端开发人员,你知道HTML登录页面怎么制作吗?这篇文章就给大家分享一个由HTML 和CSS实现的炫酷的登录页面代码,有一定的实用价值,感兴趣的朋友可以参考一下。
制作这个炫酷的登录页面需要用到很多CSS中的属性,比如box-shadow阴影,display属性,border-radius圆角,hover伪类等,如有不清楚的同学可以看看我之前的文章,或者访问CSS视频教程,希望可以帮助到你!
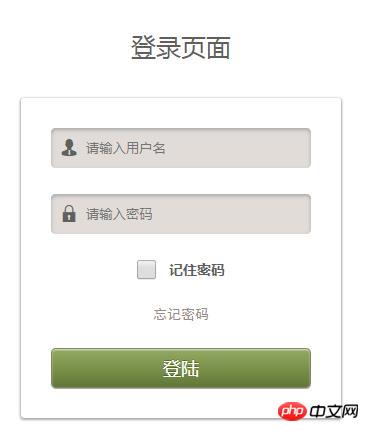
实例描述:制作一个炫酷的HTML和CSS登录页面,当在输入框输入信息时,输入框颜色变淡,同时具有记住密码、忘记密码、登录功能,具体代码如下:
HTML部分:
<div class="wrapper">
<div class="header">登录页面</div>
<form action="" method="post">
<ul>
<li>
<div class="text">
<span class="yonghu"></span><input type="text" placeholder="请输入用户名">
</div>
</li>
<li>
<div class="password">
<span class="mima"></span><input type="password" placeholder="请输入密码">
</div>
</li>
<li class="remember">
<input type="checkbox">记住密码
</li>
<li>
<a href="">忘记密码</a>
</li>
<li>
<input type="button" value="登陆">
</li>
</ul>
</form>
</div>CSS部分:
@font-face {
       font-family: 'iconfont';
       src: url('//at.alicdn.com/t/font_1463147324_946932.eot'); /* IE9*/
       src: url('//at.alicdn.com/t/font_1463147324_946932.eot?#iefix') format('embedded-opentype'), /* IE6-IE8 */
       url('http://at.alicdn.com/t/font_1463147324_946932.woff') format('woff'), /* chrome、firefox */
       url('http://at.alicdn.com/t/font_1463147324_946932.ttf') format('truetype'), /* chrome、firefox、opera、Safari, Android, iOS 4.2+*/
       url('//at.alicdn.com/t/font_1463147324_946932.svg#iconfont') format('svg'); /* iOS 4.1- */
   }
   *{margin: 0;padding: 0}
   li{list-style: none;}
   form a{text-decoration: none;}
   html,body {
       background: #fff;
       width: 100%;
       height: 100%;
       display: flex;
       flex-flow: column nowrap;
       justify-content: center;
   }
   .wrapper{text-align: center;}
   .header{
       font-size: 25px;
       font-family: 微软雅黑;
       color: rgb(98,94,91);
   }
   form{
       background: url(input-bg.png);
       width: 260px;
       height: 260px;
       margin: 35px auto;
       padding: 30px;
       box-shadow:0px 1px 2px 1px #aaaaaa,
       inset 0px 1px 1px rgba(255,255,255,0.7);
       border-radius: 3px;
   }
   form ul{
       width: 100%;
       height: 100%;
       text-align: left;
       display: flex;
       flex-flow: column nowrap;
       justify-content: space-between;
   }
   ul li div{
       width: 260px;
       height: 40px;
       background: #e1dcd8;
       color: rgb(98,94,91);
       box-shadow: inset 0px 2px 5px #aaaaaa;
       border-radius: 5px;
       position: relative;
   }
   ul li .yonghu{
       font-family: iconfont;
       position: absolute;
       top: 12px;
       left: 10px;
   }
   ul li .mima{
       font-family: iconfont;
       position: absolute;
       top: 12px;
       left: 10px;
   }
   ul li div input{
       height: 40px;
       width: 190px;
       padding: 0 35px;
       border: none;
       background: #e1dcd8;
       color: rgb(98,94,91);
       box-shadow:
               0px 1px 1px rgba(255,255,255,0.7),
               inset 0px 2px 5px #aaaaaa;
       border-radius: 5px;
   }
   ul li input:focus{
       outline: none;
       background: #f5f2ef;
   }
   ul .remember{
       font-size: 14px;
       font-family: 微软雅黑;
       font-weight: bold;
       color: rgb(98,94,91);
       position: relative;
       display: flex;
       justify-content: center;
   }
   ul .remember input[type*="checkbox"]{
       width: 20px;
       height: 20px;
       vertical-align: super;
       margin-right: 12px;
   }
   .remember label {
       cursor: pointer;
       position: absolute;
       width: 22px;
       height: 22px;
       top: 7px;
       left: 0;
       background: #eee;
       border:1px solid #cccccc;
       border-radius: 4px;

   }
   /*Display the tick inside the checkbox*/
   .remember label:after {
       opacity: 0.4;
       content: '';
       position: absolute;
       width: 12px;
       height: 5px;
       background: transparent;
       top: 6px;
       left: 4px;
       border: 3px solid #74884a;
       border-top: none;
       border-right: none;

       -webkit-transform: rotate(-45deg);
       -moz-transform: rotate(-45deg);
       -o-transform: rotate(-45deg);
       -ms-transform: rotate(-45deg);
       transform: rotate(-45deg);
   }
   /*Create the hover event of the tick*/
   .remember label:hover::after {
       opacity: 0.7;
   }
   /*Create the checkbox state for the tick*/
   .remember input[type=checkbox]:checked + label:after {
       opacity: 1;
       border-color: #74884a;
   }
   ul li a{
       font-size: 14px;
       font-family: 黑体;
       color: rgb(152,142,135);
       display: flex;
       justify-content: center;
   }
   ul li input[type*="button"]{
       width: 100%;
       height: 40px;
       font-family: Arial, Helvetica, sans-serif;
       font-size: 18px;
       color: #ffffff;
       background: -moz-linear-gradient(
               top,
               #94aa64 0%,
               #7a924a 50%,
               #607738);
       background: -webkit-gradient(
               linear, left top, left bottom,
               from(#94aa64),
               color-stop(0.50, #7a924a),
               to(#607738));
       -moz-border-radius: 5px;
       -webkit-border-radius: 5px;
       border-radius: 5px;
       border: 1px solid #7d8862;
       -moz-box-shadow:
               0px 1px 0px rgba(170,170,170,1),
               inset 0px 1px 1px rgba(255,255,255,0.7);
       -webkit-box-shadow:
               0px 1px 0px rgba(170,170,170,1),
               inset 0px 1px 1px rgba(255,255,255,0.7);
       box-shadow:
               0px 1px 0px rgba(170,170,170,1),
               inset 0px 1px 1px rgba(255,255,255,0.7);
       text-shadow:
               0px -1px 0px rgba(000,000,000,0.3),
               0px 0px 0px rgba(255,255,255,0);
   }
   ul li input[type*="button"]:hover{
       opacity: 0.8;
   }
   ul li input[type*="button"]:active{
       width: 100%;
       height: 40px;
       font-family: Arial, Helvetica, sans-serif;
       font-size: 18px;
       color: #ffffff;
       background: -moz-linear-gradient(
               top,
               #607738 0%,
               #7a924a 50%,
               #94aa64 );
       background: -webkit-gradient(
               linear, left top, left bottom,
               from(#607738),
               color-stop(0.50, #7a924a),
               to(#94aa64));
       -moz-border-radius: 5px;
       -webkit-border-radius: 5px;
       border-radius: 5px;
       border: 1px solid #7d8862;
       -moz-box-shadow:
               0px -1px 0px rgba(170,170,170,1),
               inset 0px -1px 1px rgba(255,255,255,0.7);
       -webkit-box-shadow:
               0px -1px 0px rgba(170,170,170,1),
               inset 0px -1px 1px rgba(255,255,255,0.7);
       box-shadow:
               0px -1px 0px rgba(170,170,170,1),
               inset 0px -1px 1px rgba(255,255,255,0.7);
       text-shadow:
               0px 1px 0px rgba(000,000,000,0.3),
               0px 0px 0px rgba(255,255,255,0);
   }
效果如图所示:

以上给大家分享了由HTML和CSS实现的炫酷的登录页面代码,对于初学者来说可能有一定的难度,这个实例是对HTML和CSS知识的综合运用,所以一定要把基础打牢,希望这个教程对你有所帮助!
【相关教程推荐】
1. HTML教程
2. CSS3教程
3. bootstrap教程
以上是分享HTML和CSS实现的炫酷登录页面代码的详细内容。更多信息请关注PHP中文网其他相关文章!
声明:
本文内容由网友自发贡献,版权归原作者所有,本站不承担相应法律责任。如您发现有涉嫌抄袭侵权的内容,请联系admin@php.cn

