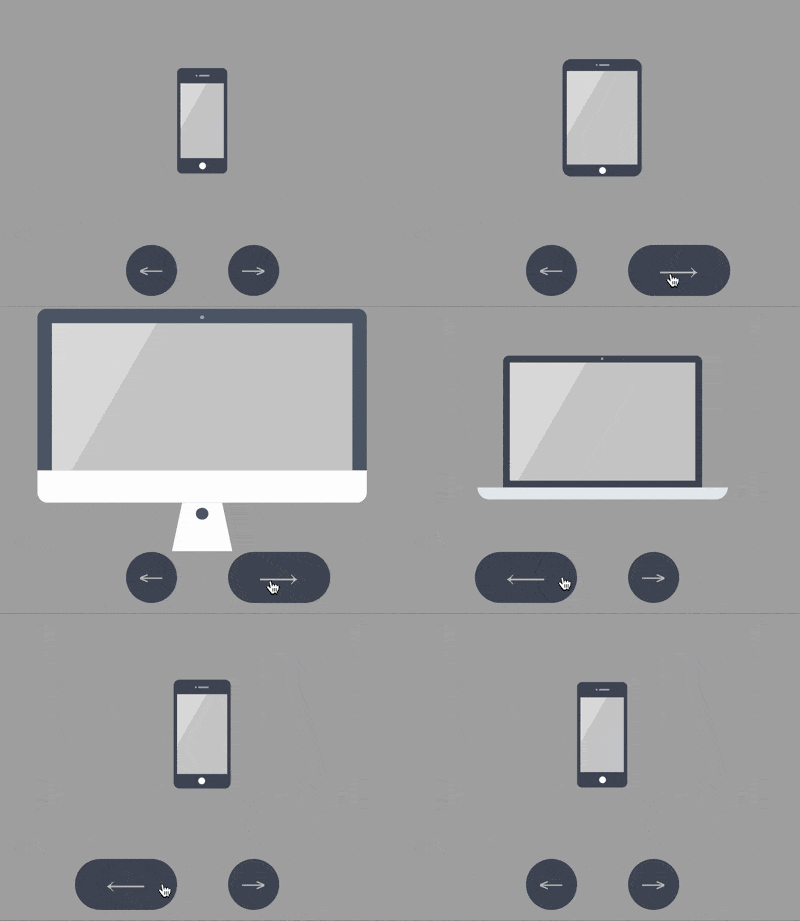
本篇文章给大家带来的内容是关于如何用CSS和Vanilla.js实现展示苹果设备的交互动画(附源码),有一定的参考价值,有需要的朋友可以参考一下,希望对你有所帮助。
效果预览

源代码下载
https://github.com/comehope/front-end-daily-challenges
代码解读
定义 dom,包含 5 个子元素,分别代表 iphone, mini, ipad, macbook, imac 这 5 种设备:
<div class="container">
    <div class="device iphone"></div>
    <div class="device mini"></div>
    <div class="device ipad"></div>
    <div class="device macbook"></div>
    <div class="device imac"></div>
</div>
居中显示:
body {
    margin: 0;
    height: 100vh;
    display: flex;
    align-items: center;
    justify-content: center;
    background-color: #aaa;
}
设置容器中子元素的布局方式:
.container {
    position: relative;
    display: flex;
    flex-direction: column;
    align-items: center;
}
设置设备的共有属性,线性渐变图案将作为屏幕的背景:
.device {
    box-sizing: border-box;
    position: relative;
    display: flex;
    justify-content: center;
    background: linear-gradient(120deg, #ddd 30%, #ccc 30%);
}

.device::before,
.device::after {
    content: '';
    position: absolute;
}
iphone, mini, ipad 的造型相似,都有顶部摄像头、传感器开口和底部按钮,所以这些共有属性可以一起设置,用 ::before 伪元素画出顶部细节,::after 伪元素画出底部按钮:
.iphone::before,
.mini::before,
.ipad::before {
    width: 2px;
    height: 2px;
    border-style: solid;
    border-color: #a5adbe;
    border-width: 0 12px 0 2px;
}

.iphone::after,
.mini::after,
.ipad::after {
    width: 8px;
    height: 8px;
    background-color: white;
    border-radius: 50%;
}
接下来逐个画出设备。先画出 iphone 的轮廓:
.iphone {
    width: 59px;
    height: 124px;
    border: #484f5e solid;
    border-width: 18px 4px;
    border-radius: 6px;
}
定位 iphone 的顶部和底部细节:
.iphone::before {
    top: -10px;
}

.iphone::after {
    bottom: -13px;
}
类似地,画出 mini:
.mini {
    width: 93px;
    height: 138px;
    border: #484f5e solid;
    border-width: 14px 5px;
    border-radius: 10px;
}

.mini::before {
    top: -8px;
}

.mini::after {
    bottom: -11px;
}
再画出 ipad:
.ipad {
    width: 134px;
    height: 176px;
    border: #484f5e solid;
    border-width: 18px 13px;
    border-radius: 12px;
}

.ipad::before {
    top: -10px;
}

.ipad::after {
    bottom: -13px;
}
接下来画 macbook,先画屏幕:
.macbook {
    width: 234px;
    height: 155px;
    border: 8px solid #484f5e;
    border-radius: 7px 7px 0 0;
}
用 ::before 伪元素画出摄像头:
.macbook::before {
    width: 294px;
    height: 14px;
    background-color: #e8ebf0;
    top: calc(100% + 8px);
    border-radius: 0 0 14px 14px;
}
用 ::after 伪元素画出主机:
.macbook::after {
    width: 3px;
    height: 3px;
    background-color: #a5adbe;
    top: -6px;
    border-radius: 50%;
}
接下来画 imac,先画屏幕,屏幕的左、上、右的黑色边框没有用 border 属性画,是因为 border 会在端点处遗留一个斜角,所以改用 box-shadow 实现:
.imac {
    width: 360px;
    height: 215px;
    border-radius: 10px;
    box-shadow:
        inset 0 14px #484f5e,
        inset 14px 0 #484f5e,
        inset -14px 0 #484f5e;
    border-bottom: 33px solid #e8ebf1;
    transform: translateY(14px);
}
用 ::before 伪元素画出梯形的底座:
.imac::before {
    width: 90px;
    height: 0;
    top: calc(100% + 33px);
    border: solid transparent;
    border-bottom-color: #e2e4e8;
    border-width: 0 10px 47px 10px;
}
用 ::after 伪元素画出顶部的摄像头和屏幕底部的按钮,注意按钮是用 box-shadow 实现的:
.imac::after {
    width: 4px;
    height: 4px;
    background-color: #a5adbe;
    top: 5px;
    border-radius: 50%;
    box-shadow: 0 191px 0 4px #464e5d;
}
至此,设备全部绘制完成。
删除除 iphone 之外的其他设备的 dom 元素,只保留 1 个 dom 元素,后面的动画效果都在这个 dom 元素上变化:
<div class="container">
        <div class="device iphone"></div>
        <!-- <div class="device mini"></div>
        <div class="device ipad"></div>
        <div class="device macbook"></div>
        <div class="device imac"></div> -->
    </div>
设置容器尺寸,子元素垂直居中,设备的高度占容器高度的 75%:
.container {
    width: 360px;
    height: 350px;
    justify-content: center;
}

.device {
    transform: translateY(-25%);
}
在 dom 中增加 2 个按钮元素,分别用 .left 和 .right 表示:
<div class="container">
    <div class="device iphone"></div>
    <div class="buttons">
        <span class="left"></span>
        <span class="right"></span>
    </div>
</div>
定位按钮的位置:
.buttons {
    position: absolute;
    width: inherit;
    font-size: 30px;
    height: 2em;
    bottom: 0;
    display: flex;
    justify-content: space-around;
}

.buttons > * {
    position: relative;
    width: 4em;
}
按钮为向左和向右的箭头:
.buttons > *::before {
    position: absolute;
}

.buttons .left::before {
    content: '←';
    right: 0;
}

.buttons .right::before {
    content: '→';
}
设置按钮样式为圆形:
.buttons > *t::before {
    position: absolute;
    width: 2em;
    height: 2em;
    background-color: #484f5e;
    color: silver;
    text-align: center;
    line-height: 2em;
    border-radius: 1em;
    cursor: pointer;
}
增加鼠标悬停效果:
.buttons > *::before {
    transition: 0.2s;
}

.buttons .left:hover::before {
    width: 4em;
    content: '⟵';
}

.buttons .right:hover::before {
    width: 4em;
    content: '⟶';
}
增加按钮点击效果:
.buttons > *:active {
    transform: scale(0.9);
    filter: brightness(0.8);
}
至此,按钮制作完毕,接下来创建交互脚本。
定义一个获取元素的函数 $:
const $ = (className) => document.getElementsByClassName(className)[0]
定义一个存放设备名称的数组:
let devices = ['iphone', 'mini', 'ipad', 'macbook', 'imac']
定义点击行为对数据的加工方法,当点击左侧按钮时,把数组最左边的 1 个元素移到最右边,相反地,当点击右侧按钮时,把数组最右边的 1 个元素移到最左边,这样就可以从 2 个方向循环遍历数组了:
let loop = {
    'left': () => devices.unshift(devices.pop()),
    'right': () => devices.push(devices.shift())
}
定义点击事件,根据数组的变化切换设备:
Array.from($('buttons').children).forEach(element =>
    element.addEventListener('click', function(e) {
        loop[e.target.className]()
        $('device').className = 'device ' + devices[0]
    })
)
最后,设置设备切换的缓动效果:
.device,
.device::before,
.device::after {
    transition: 0.4s cubic-bezier(0.5, 1.7, 0.5, 1.2);
}
大功告成!
以上是如何使用CSS和Vanilla.js实现展示苹果设备的交互动画(附源码)的详细内容。更多信息请关注PHP中文网其他相关文章!
 每周平台新闻:将导航升级到HTTPS,.org域的销售,新浏览器引擎Apr 14, 2025 am 09:15 AM
在本周的综述中:DuckDuckgo获得了更智能的加密,在Dot Org域的销售方面进行的战斗以及正在进行的新浏览器引擎。


热AI工具

Undresser.AI Undress
人工智能驱动的应用程序,用于创建逼真的裸体照片

AI Clothes Remover
用于从照片中去除衣服的在线人工智能工具。

Undress AI Tool
免费脱衣服图片

Clothoff.io
AI脱衣机

AI Hentai Generator
免费生成ai无尽的。

热门文章

热工具

DVWA
Damn Vulnerable Web App (DVWA) 是一个PHP/MySQL的Web应用程序,非常容易受到攻击。它的主要目标是成为安全专业人员在合法环境中测试自己的技能和工具的辅助工具,帮助Web开发人员更好地理解保护Web应用程序的过程,并帮助教师/学生在课堂环境中教授/学习Web应用程序安全。DVWA的目标是通过简单直接的界面练习一些最常见的Web漏洞,难度各不相同。请注意,该软件中

EditPlus 中文破解版
体积小,语法高亮,不支持代码提示功能

Dreamweaver CS6
视觉化网页开发工具

螳螂BT
Mantis是一个易于部署的基于Web的缺陷跟踪工具,用于帮助产品缺陷跟踪。它需要PHP、MySQL和一个Web服务器。请查看我们的演示和托管服务。

安全考试浏览器
Safe Exam Browser是一个安全的浏览器环境,用于安全地进行在线考试。该软件将任何计算机变成一个安全的工作站。它控制对任何实用工具的访问,并防止学生使用未经授权的资源。


