本篇文章给大家带来的内容是关于vue文件如何使用echarts.js?(两种方法介绍),有一定的参考价值,有需要的朋友可以参考一下,希望对你有所帮助。
最近工作中需要用到echarts,由于项目是用的vue-cli开发的。在网上搜到vue中合成了vue-echarts,但是不想使用vue中规定好的数据格式,于是就自己做了一个vue项目引用原生echarts的简单demo,实现过程如下:用了两种实现方式
准备工作
1、安装echarts依赖
控制台输入:npm install echarts --save
2、全局引入
main.js中引入
import echarts from 'echarts'
Vue.prototype.$echarts = echarts
创建图表
第一种创建方式
在一个.vue文件中引入多张图表
创建WelcomePage.vue
<template>
  <div>
    <h1>第一种在vue中使用echart的方式</h1>

    <div class="charts">
      <div id="barGraph" style="height: 350px;"></div>
    </div>

    <div class="charts">
      <div id="pieGraph" style="height: 350px;"></div>
    </div>

  </div>
</template>
<script>
// 引入基本模板,按需加载
  let echarts = require('echarts/lib/echarts');
  // 引入柱状图
  require('echarts/lib/chart/bar');
  // 引入柱状图
  require('echarts/lib/chart/pie');
  require('echarts/lib/component/tooltip');
  require('echarts/lib/component/title');


export default {
  name: "WelcomePage",
  data () {
    return {  }
  },
  mounted(){
    this.drawBar();
    this.drawPie();
  },
  methods:{
    drawBar(){
      // 基于dom,初始化echarts实例
      let barGraph = echarts.init(document.getElementById('barGraph'));
      // 绘制图表
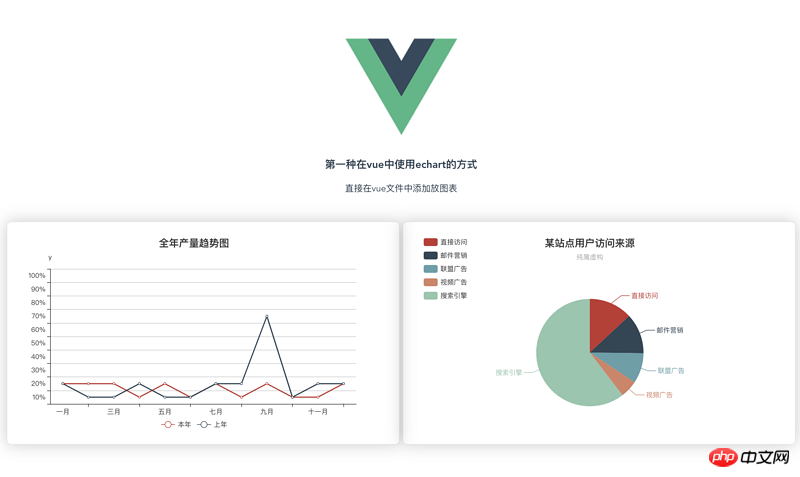
      barGraph.setOption({
        title: {
          text: '全年产量趋势图',
          left: 'center'
        },
        tooltip: {
          trigger: 'item',
          formatter: '{a} <br/>{b} : {c}'
        },
        legend: {
          left: 'center',
          data: ['本年', '上年'],
          bottom:0
        },
        xAxis: {
          type: 'category',
          name: 'x',
          splitLine: {show: false},
          data: ['一月', '二月', '三月', '四月', '五月', '六月', '七月', '八月', '九月', '十月', '十一月', '十二月']
        },
        grid: {
          left: '1%',
          right: '2%',
          bottom: '8%',
          containLabel: true
        },
        yAxis: {
          type: 'category',
          name: 'y',
          splitLine: {show: true},
          data:['10%','20%','30%','40%','50%','60%','70%','80%','90%','100%']
        },
        series: [
          {
            name: '本年',
            type: 'line',
            data: [0.8, 0.98, 0.96, 0.27, 0.81, 0.47, 0.74, 0.23, .69, 0.25, 0.36, 0.56]
          },
          {
            name: '上年',
            type: 'line',
            data: [1, 0.2, 0.4, 0.8, 0.16, 0.32, 0.64, 1.28, 5.6, 0.25, 0.63, 0.65, 0.12]
          },
        ]
      })
    },
    drawPie(){
      let pieGraph = echarts.init(document.getElementById('pieGraph'));
      pieGraph.setOption({
        title : {
          text: '某站点用户访问来源',
          subtext: '纯属虚构',
          x:'center'
        },
        tooltip : {
          trigger: 'item',
          formatter: "{a} <br/>{b} : {c} ({d}%)"
        },
        legend: {
          orient: 'vertical',
          left: 'left',
          data: ['直接访问','邮件营销','联盟广告','视频广告','搜索引擎']
        },
        series : [
          {
            name: '访问来源',
            type: 'pie',
            radius : '55%',
            center: ['50%', '60%'],
            data:[
              {value:335, name:'直接访问'},
              {value:310, name:'邮件营销'},
              {value:234, name:'联盟广告'},
              {value:135, name:'视频广告'},
              {value:1548, name:'搜索引擎'}
            ],
            itemStyle: {
              emphasis: {
                shadowBlur: 10,
                shadowOffsetX: 0,
                shadowColor: 'rgba(0, 0, 0, 0.5)'
              }
            }
          }
        ]
      })
    }
  }
}
</script>
实现效果如下图:

第二种实现方式(以组件的形式)
创建父组件 father.vue
  <div>
    <h1>{{ msg }}</h1>
    <p>第二种方式:通过组件的方式进行页面渲染</p>
    <div class="container" >
      <bar-graph></bar-graph>
    </div>

    <div class="container">
      <pie-graph></pie-graph>
    </div>

  </div>
<script>
// 引入两个子组件
  import BarGraph from "./bargraph";
  import PieGraph from "./piegraph";
  export default {
    name: "father",
    components:{
      BarGraph,
      PieGraph,
    },
    data(){
      return{
        msg: '我是爸爸,想看我的儿子,眼睛请往下移',
      }
    }
  }
</script>
创建子组件barGraph.vue
   <div>
    <p>{{ msg }}</p>
    <div class="charts">
      <div :id="id" style="min-height: 350px;"></div>
    </div>
  </div>
<script>
  let echarts = require('echarts/lib/echarts');
  // 引入柱状图
  require('echarts/lib/chart/bar');
  require('echarts/lib/component/tooltip');
  require('echarts/lib/component/title');

  // import echarts from 'echarts'

    export default {
      name: "bargraph",
      // props:['id'],  // 第一种接收父亲传过来的值的方式
      props: {
        id: {
          type: String,
          default: 'chart'
        }
      },
      data(){
          return {
            msg: "我是第一个子组件--bar",
            chart: null,
          }
      },
      mounted(){
        this.drawBar();
      },
      methods:{
        drawBar(){
          this.chart = echarts.init(document.getElementById(this.id));
          let colors = ['#5793f3', '#d14a61', '#675bba'];
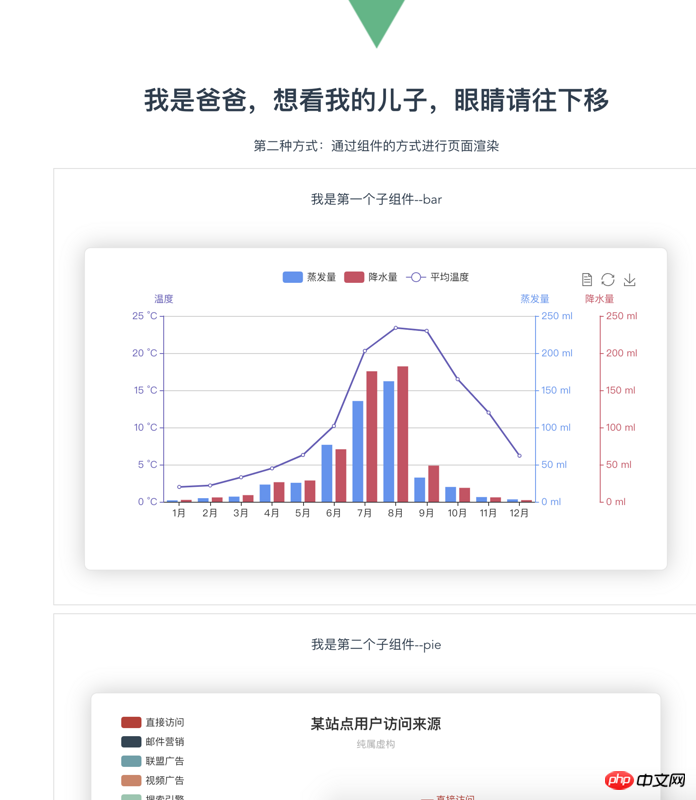
          this.chart.setOption(
            {
              color: colors,

              tooltip: {
                trigger: 'axis',
                axisPointer: {
                  type: 'cross'
                }
              },
              grid: {
                right: '20%'
              },
              toolbox: {
                feature: {
                  dataView: {show: true, readOnly: false},
                  restore: {show: true},
                  saveAsImage: {show: true}
                }
              },
              legend: {
                data:['蒸发量','降水量','平均温度']
              },
              xAxis: [
                {
                  type: 'category',
                  axisTick: {
                    alignWithLabel: true
                  },
                  data: ['1月','2月','3月','4月','5月','6月','7月','8月','9月','10月','11月','12月']
                }
              ],
              yAxis: [
                {
                  type: 'value',
                  name: '蒸发量',
                  min: 0,
                  max: 250,
                  position: 'right',
                  axisLine: {
                    lineStyle: {
                      color: colors[0]
                    }
                  },
                  axisLabel: {
                    formatter: '{value} ml'
                  }
                },
                {
                  type: 'value',
                  name: '降水量',
                  min: 0,
                  max: 250,
                  position: 'right',
                  offset: 80,
                  axisLine: {
                    lineStyle: {
                      color: colors[1]
                    }
                  },
                  axisLabel: {
                    formatter: '{value} ml'
                  }
                },
                {
                  type: 'value',
                  name: '温度',
                  min: 0,
                  max: 25,
                  position: 'left',
                  axisLine: {
                    lineStyle: {
                      color: colors[2]
                    }
                  },
                  axisLabel: {
                    formatter: '{value} °C'
                  }
                }
              ],
              series: [
                {
                  name:'蒸发量',
                  type:'bar',
                  data:[2.0, 4.9, 7.0, 23.2, 25.6, 76.7, 135.6, 162.2, 32.6, 20.0, 6.4, 3.3]
                },
                {
                  name:'降水量',
                  type:'bar',
                  yAxisIndex: 1,
                  data:[2.6, 5.9, 9.0, 26.4, 28.7, 70.7, 175.6, 182.2, 48.7, 18.8, 6.0, 2.3]
                },
                {
                  name:'平均温度',
                  type:'line',
                  yAxisIndex: 2,
                  data:[2.0, 2.2, 3.3, 4.5, 6.3, 10.2, 20.3, 23.4, 23.0, 16.5, 12.0, 6.2]
                }
              ]
            }
          )
        }
      }
    }
</script>
创建pieGraph.vue
<template>
    <div>
      <p>{{ msg }}</p>

      <div class="charts">
        <div :id="id" style="min-height: 350px;"></div>
      </div>
    </div>
</template>
<script>
  import echarts from 'echarts'

    export default {
      name: "piegraph",
      props:{
        id: {
          type: String,
          default: 'pieChart'
        }
      },
      data(){
          return{
            msg: '我是第二个子组件--pie',
            pieChart: null
          }
      },
      mounted(){
          this.drawPie();
      },
      methods: {
        drawPie () {
          this.pieChart = echarts.init(document.getElementById(this.id));
          this.pieChart.setOption(
            {
              title : {
                text: '某站点用户访问来源',
                subtext: '纯属虚构',
                x:'center'
              },
              tooltip : {
                trigger: 'item',
                formatter: "{a} <br/>{b} : {c} ({d}%)"
              },
              legend: {
                orient: 'vertical',
                left: 'left',
                data: ['直接访问','邮件营销','联盟广告','视频广告','搜索引擎']
              },
              series : [
                {
                  name: '访问来源',
                  type: 'pie',
                  radius : '55%',
                  center: ['50%', '60%'],
                  data:[
                    {value:335, name:'直接访问'},
                    {value:310, name:'邮件营销'},
                    {value:234, name:'联盟广告'},
                    {value:135, name:'视频广告'},
                    {value:1548, name:'搜索引擎'}
                  ],
                  itemStyle: {
                    emphasis: {
                      shadowBlur: 10,
                      shadowOffsetX: 0,
                      shadowColor: 'rgba(0, 0, 0, 0.5)'
                    }
                  }
                }
              ]
            }
          )
        }
      }
    }
</script>
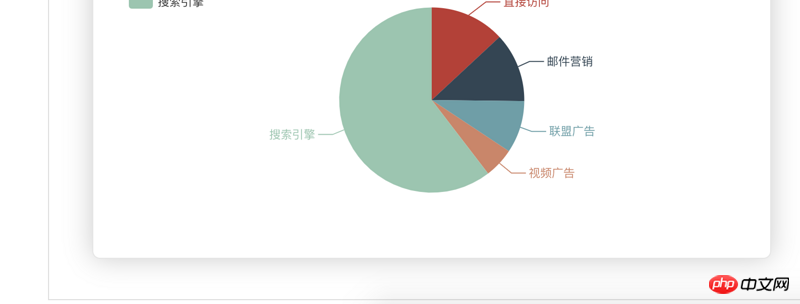
效果实现如下:


路由文件如下:
import WelcomePage from '@/components/WelcomePage'
import Father from '@/components/father'

import BarGraph from '@/components/bargraph'
import PieGraph from '@/components/piegraph'

export default new Router({
  routes: [
    {
      path: '/',
      name: 'WelcomePage',
      component: WelcomePage
    },
    {
      path: '/father',
      name: 'father',
      component: Father,
      children:[
        {
          path: '/bargraph',
          name: 'bargraph',
          component: BarGraph
        },
        {
          path: '/piegraph',
          name: 'piegraph',
          component: PieGraph
        }
      ]
    },
  ]
})
以上是vue文件如何使用echarts.js?(两种方法介绍)的详细内容。更多信息请关注PHP中文网其他相关文章!
 Python vs. JavaScript:社区,图书馆和资源Apr 15, 2025 am 12:16 AM
Python和JavaScript在社区、库和资源方面的对比各有优劣。1)Python社区友好,适合初学者,但前端开发资源不如JavaScript丰富。2)Python在数据科学和机器学习库方面强大,JavaScript则在前端开发库和框架上更胜一筹。3)两者的学习资源都丰富,但Python适合从官方文档开始,JavaScript则以MDNWebDocs为佳。选择应基于项目需求和个人兴趣。
 从C/C到JavaScript:所有工作方式Apr 14, 2025 am 12:05 AM
从C/C 转向JavaScript需要适应动态类型、垃圾回收和异步编程等特点。1)C/C 是静态类型语言,需手动管理内存,而JavaScript是动态类型,垃圾回收自动处理。2)C/C 需编译成机器码,JavaScript则为解释型语言。3)JavaScript引入闭包、原型链和Promise等概念,增强了灵活性和异步编程能力。
 JavaScript引擎:比较实施Apr 13, 2025 am 12:05 AM
不同JavaScript引擎在解析和执行JavaScript代码时,效果会有所不同,因为每个引擎的实现原理和优化策略各有差异。1.词法分析:将源码转换为词法单元。2.语法分析:生成抽象语法树。3.优化和编译:通过JIT编译器生成机器码。4.执行:运行机器码。V8引擎通过即时编译和隐藏类优化,SpiderMonkey使用类型推断系统,导致在相同代码上的性能表现不同。
 超越浏览器:现实世界中的JavaScriptApr 12, 2025 am 12:06 AM
JavaScript在现实世界中的应用包括服务器端编程、移动应用开发和物联网控制:1.通过Node.js实现服务器端编程,适用于高并发请求处理。2.通过ReactNative进行移动应用开发,支持跨平台部署。3.通过Johnny-Five库用于物联网设备控制,适用于硬件交互。
 使用Next.js(后端集成)构建多租户SaaS应用程序Apr 11, 2025 am 08:23 AM
我使用您的日常技术工具构建了功能性的多租户SaaS应用程序(一个Edtech应用程序),您可以做同样的事情。 首先,什么是多租户SaaS应用程序? 多租户SaaS应用程序可让您从唱歌中为多个客户提供服务
 如何使用Next.js(前端集成)构建多租户SaaS应用程序Apr 11, 2025 am 08:22 AM
本文展示了与许可证确保的后端的前端集成,并使用Next.js构建功能性Edtech SaaS应用程序。 前端获取用户权限以控制UI的可见性并确保API要求遵守角色库
 JavaScript:探索网络语言的多功能性Apr 11, 2025 am 12:01 AM
JavaScript是现代Web开发的核心语言,因其多样性和灵活性而广泛应用。1)前端开发:通过DOM操作和现代框架(如React、Vue.js、Angular)构建动态网页和单页面应用。2)服务器端开发:Node.js利用非阻塞I/O模型处理高并发和实时应用。3)移动和桌面应用开发:通过ReactNative和Electron实现跨平台开发,提高开发效率。
 JavaScript的演变:当前的趋势和未来前景Apr 10, 2025 am 09:33 AM
JavaScript的最新趋势包括TypeScript的崛起、现代框架和库的流行以及WebAssembly的应用。未来前景涵盖更强大的类型系统、服务器端JavaScript的发展、人工智能和机器学习的扩展以及物联网和边缘计算的潜力。


热AI工具

Undresser.AI Undress
人工智能驱动的应用程序,用于创建逼真的裸体照片

AI Clothes Remover
用于从照片中去除衣服的在线人工智能工具。

Undress AI Tool
免费脱衣服图片

Clothoff.io
AI脱衣机

AI Hentai Generator
免费生成ai无尽的。

热门文章

热工具

适用于 Eclipse 的 SAP NetWeaver 服务器适配器
将Eclipse与SAP NetWeaver应用服务器集成。

禅工作室 13.0.1
功能强大的PHP集成开发环境

SublimeText3 英文版
推荐:为Win版本,支持代码提示!

SublimeText3汉化版
中文版,非常好用

Dreamweaver Mac版
视觉化网页开发工具


