本篇文章给大家带来的内容是关于css中clip-path属性的用法讲解(附代码),有一定的参考价值,有需要的朋友可以参考一下,希望对你有所帮助。
clip-path的使用
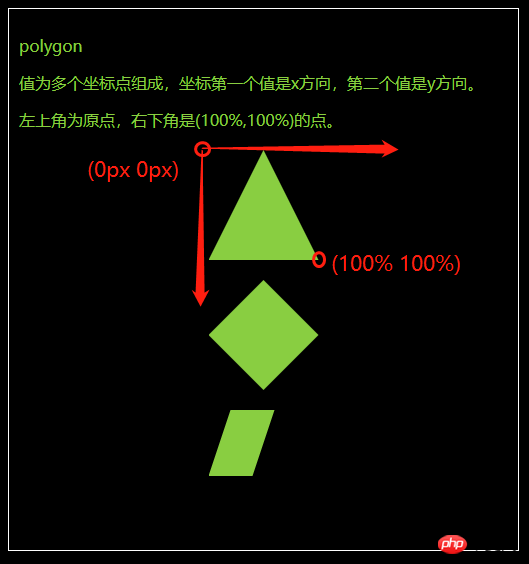
polygon
值为多个坐标点组成,坐标第一个值是x方向,第二个值是y方向。
左上角为原点,右下角是(100%,100%)的点。
body {
  background-color: #000;
}

.fa {
  border: 1px solid #fff;
  color: yellowgreen;
  padding: 10px;
  margin: 10px;
}

.fa>p {
  width: 110px;
  height: 110px;
  background-color: yellowgreen;
  margin: 20px auto;
}

.polygon1 {
  clip-path: polygon(50% 0px, 100% 100%, 0px 100%)
}

.polygon2 {
  clip-path: polygon(0px 50%, 50% 0, 100% 50%, 50% 100%)
}

.polygon3 {
  clip-path: polygon(0% 60%, 20% 0%, 60% 0%, 40% 60%)
}
<div class="fa">
  <p>polygon</p>
  <p>值为多个坐标点组成,坐标第一个值是x方向,第二个值是y方向。</p>
  <p>左上角为原点,右下角是(100%,100%)的点。</p>
  <div class="polygon1"></div>
  <div class="polygon2"></div>
  <div class="polygon3"></div>
</div>

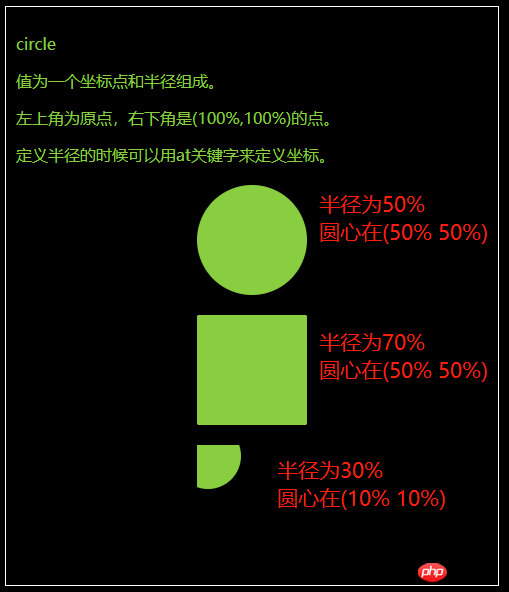
circle
值为一个坐标点和半径组成。
左上角为原点,右下角是(100%,100%)的点。
定义半径的时候可以用at关键字来定义坐标。
body {
  background-color: #000;
}

.fa {
  border: 1px solid #fff;
  color: yellowgreen;
  padding: 10px;
  margin: 10px;
}

.fa>p {
  width: 110px;
  height: 110px;
  background-color: yellowgreen;
  margin: 20px auto;
}

.circle1 {
  clip-path: circle(50% at 50% 50%)
}

.circle2 {
  clip-path: circle(70% at 50% 50%)
}

.circle3 {
  clip-path: circle(30% at 10% 10%)
}
<div class="fa">
  <p>circle</p>
  <p>值为一个坐标点和半径组成。</p>
  <p>左上角为原点,右下角是(100%,100%)的点。</p>
  <p>定义半径的时候可以用at关键字来定义坐标。</p>
  <div class="circle1"></div>
  <div class="circle2"></div>
  <div class="circle3"></div>
</div>

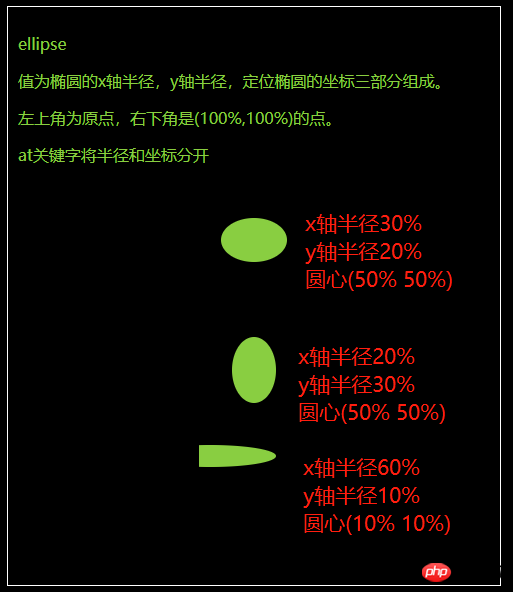
ellipse
值为椭圆的x轴半径,y轴半径,定位椭圆的坐标三部分组成。
左上角为原点,右下角是(100%,100%)的点。
at关键字将半径和坐标分开。
body {
  background-color: #000;
}

.fa {
  border: 1px solid #fff;
  color: yellowgreen;
  padding: 10px;
  margin: 10px;
}

.fa>p {
  width: 110px;
  height: 110px;
  background-color: yellowgreen;
  margin: 20px auto;
}

.ellipse1 {
  clip-path: ellipse(30% 20% at 50% 50%)
}

.ellipse2 {
  clip-path: ellipse(20% 30% at 50% 50%)
}

.ellipse3 {
  clip-path: ellipse(60% 10% at 10% 10%)
}
<div class="fa">
  <p>ellipse</p>
  <p>值为椭圆的x轴半径,y轴半径,定位椭圆的坐标三部分组成。</p>
  <p>左上角为原点,右下角是(100%,100%)的点。</p>
  <p>at关键字将半径和坐标分开</p>
  <div class="ellipse1"></div>
  <div class="ellipse2"></div>
  <div class="ellipse3"></div>
</div>

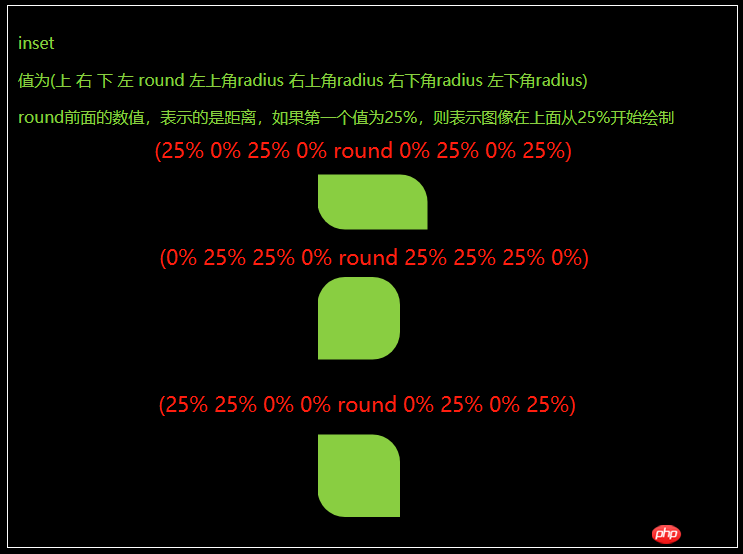
inset
值为(上 右 下 左 round 左上角radius 右上角radius 右下角radius 左下角radius)
round前面的数值,表示的是距离,如果第一个值为25%,则表示图像在上面从25%开始绘制。
body {
  background-color: #000;
}

.fa {
  border: 1px solid #fff;
  color: yellowgreen;
  padding: 10px;
  margin: 10px;
}

.fa>p {
  width: 110px;
  height: 110px;
  background-color: yellowgreen;
  margin: 20px auto;
}

.inset1 {
  clip-path: inset(25% 0% 25% 0% round 0% 25% 0% 25%)
}

.inset2 {
  clip-path: inset(0% 25% 25% 0% round 25% 25% 25% 0%)
}

.inset3 {
  clip-path: inset(25% 25% 0% 0% round 0% 25% 0% 25%)
}
<div class="fa">
  <p>inset</p>
  <p>值为(上 右 下 左 round 左上角radius 右上角radius 右下角radius 左下角radius)</p>
  <p>round前面的数值,表示的是距离,如果第一个值为25%,则表示图像在上面从25%开始绘制</p>
  <div class="inset1"></div>
  <div class="inset2"></div>
  <div class="inset3"></div>
</div>

以上是css中clip-path属性的用法讲解(附代码)的详细内容。更多信息请关注PHP中文网其他相关文章!
 HTML超文本标记语言--超在那里?(文档分析)Aug 02, 2022 pm 06:04 PM
本篇文章带大家了解一下HTML(超文本标记语言),介绍一下HTML的本质,HTML文档的结构、HTML文档的基本标签和图像标签、列表、表格标签、媒体元素、表单,希望对大家有所帮助!
 html和css算编程语言吗Sep 21, 2022 pm 04:09 PM
不算。html是一种用来告知浏览器如何组织页面的标记语言,而CSS是一种用来表现HTML或XML等文件样式的样式设计语言;html和css不具备很强的逻辑性和流程控制功能,缺乏灵活性,且html和css不能按照人类的设计对一件工作进行重复的循环,直至得到让人类满意的答案。
 web前端笔试题库之HTML篇Apr 21, 2022 am 11:56 AM
总结了一些web前端面试(笔试)题分享给大家,本篇文章就先给大家分享HTML部分的笔试题(附答案),大家可以自己做做,看看能答对几个!
 HTML5中画布标签是什么May 18, 2022 pm 04:55 PM
HTML5中画布标签是“<canvas>”。canvas标签用于图形的绘制,它只是一个矩形的图形容器,绘制图形必须通过脚本(通常是JavaScript)来完成;开发者可利用多种js方法来在canvas中绘制路径、盒、圆、字符以及添加图像等。
 html5废弃了哪个列表标签Jun 01, 2022 pm 06:32 PM
html5废弃了dir列表标签。dir标签被用来定义目录列表,一般和li标签配合使用,在dir标签对中通过li标签来设置列表项,语法“<dir><li>列表项值</li>...</dir>”。HTML5已经不支持dir,可使用ul标签取代。
 html中document是什么Jun 17, 2022 pm 04:18 PM
在html中,document是文档对象的意思,代表浏览器窗口的文档;document对象是window对象的子对象,所以可通过“window.document”属性对其进行访问,每个载入浏览器的HTML文档都会成为Document对象。
 html5支持boolean值属性吗Apr 22, 2022 pm 04:56 PM
html5支持boolean值属性;boolean值属性指是属性值为true或者false的属性,如input元素中的disabled属性,不使用该属性表示值为flase,不禁用元素,使用该属性可以不设置属性值表示值为true,禁用元素。


热AI工具

Undresser.AI Undress
人工智能驱动的应用程序,用于创建逼真的裸体照片

AI Clothes Remover
用于从照片中去除衣服的在线人工智能工具。

Undress AI Tool
免费脱衣服图片

Clothoff.io
AI脱衣机

AI Hentai Generator
免费生成ai无尽的。

热门文章

热工具

Dreamweaver Mac版
视觉化网页开发工具

SublimeText3汉化版
中文版,非常好用

SublimeText3 Mac版
神级代码编辑软件(SublimeText3)

SublimeText3 英文版
推荐:为Win版本,支持代码提示!

DVWA
Damn Vulnerable Web App (DVWA) 是一个PHP/MySQL的Web应用程序,非常容易受到攻击。它的主要目标是成为安全专业人员在合法环境中测试自己的技能和工具的辅助工具,帮助Web开发人员更好地理解保护Web应用程序的过程,并帮助教师/学生在课堂环境中教授/学习Web应用程序安全。DVWA的目标是通过简单直接的界面练习一些最常见的Web漏洞,难度各不相同。请注意,该软件中


