


本篇文章给大家带来的内容是关于springboot采用多数据源对JdbcTemplate进行配置的方法,有一定的参考价值,有需要的朋友可以参考一下,希望对你有所帮助。
springboot多数据源配置,代码如下
DataSourceConfig
package com.rookie.bigdata.config;

import org.springframework.beans.factory.annotation.Qualifier;
import org.springframework.boot.context.properties.ConfigurationProperties;
import org.springframework.boot.jdbc.DataSourceBuilder;
import org.springframework.context.annotation.Bean;
import org.springframework.context.annotation.Configuration;
import org.springframework.context.annotation.Primary;
import org.springframework.jdbc.core.JdbcTemplate;

import javax.sql.DataSource;

/**
 * @author
 * @date 2018/10/10
 */
@Configuration
public class DataSourceConfig {

    @Bean(name = "primaryDataSource")
    @Qualifier("primaryDataSource")
    @ConfigurationProperties(prefix="spring.datasource.primary")
    public DataSource primaryDataSource() {
        return DataSourceBuilder.create().build();
    }

    @Bean(name = "secondaryDataSource")
    @Qualifier("secondaryDataSource")
    @Primary
    @ConfigurationProperties(prefix="spring.datasource.secondary")
    public DataSource secondaryDataSource() {
        return DataSourceBuilder.create().build();
    }

    @Bean(name = "primaryJdbcTemplate")
    public JdbcTemplate primaryJdbcTemplate(
            @Qualifier("primaryDataSource") DataSource dataSource) {
        return new JdbcTemplate(dataSource);
    }

    @Bean(name = "secondaryJdbcTemplate")
    public JdbcTemplate secondaryJdbcTemplate(
            @Qualifier("secondaryDataSource") DataSource dataSource) {
        return new JdbcTemplate(dataSource);
    }

}
StudentServiceImpl
package com.rookie.bigdata.service;

import com.rookie.bigdata.domain.Student;
import org.springframework.beans.factory.annotation.Autowired;
import org.springframework.beans.factory.annotation.Qualifier;
import org.springframework.jdbc.core.JdbcTemplate;
import org.springframework.stereotype.Service;

/**
 * @author
 * @date 2018/10/9
 */
@Service
public class StudentServiceImpl implements StudentService {

    @Autowired
    @Qualifier("primaryJdbcTemplate")
    private JdbcTemplate jdbcTemplate;

    @Autowired
    @Qualifier("secondaryJdbcTemplate")
    private JdbcTemplate jdbcTemplate2;

    /**
     * 采用第一个暑假源进行插入数据
     * @param student
     */
    @Override
    public void create(Student student) {

        jdbcTemplate.update("INSERT INTO student(stu_no,name,age)VALUE (?,?,?)", student.getStuNo(), student.getName(), student.getAge());

    }

    /**
     * 第一个数据源进行插入数据
     * @param stuNo
     */
    @Override
    public void deleteByNo(Integer stuNo) {
        jdbcTemplate.update("DELETE  FROM  student WHERE stu_no=?", stuNo);
    }

    /**
     * 第二个数据源进行查询数据
     * @param stuNo
     * @return
     */
    @Override
    public Integer queryByStuNo(Integer stuNo) {
        return jdbcTemplate2.queryForObject("select count(1) from student", Integer.class);
    }
}
配置文件 application.properties
spring.datasource.primary.url=jdbc:mysql://localhost:3306/springboot
spring.datasource.primary.username=root
spring.datasource.primary.password=root
spring.datasource.primary.driver-class-name=com.mysql.jdbc.Driver

spring.datasource.secondary.url=jdbc:mysql://localhost:3306/springboot
spring.datasource.secondary.username=root
spring.datasource.secondary.password=root
spring.datasource.secondary.driver-class-name=com.mysql.jdbc.Driver
测试代码如下
package com.rookie.bigdata.service;

import com.rookie.bigdata.domain.Student;
import org.junit.Test;
import org.junit.runner.RunWith;
import org.springframework.beans.factory.annotation.Autowired;
import org.springframework.boot.test.context.SpringBootTest;
import org.springframework.test.context.junit4.SpringRunner;

/**
 * @author liuxili
 * @date 2018/10/10
 */

@RunWith(SpringRunner.class)
@SpringBootTest
public class StudentServiceImplTest {

    @Autowired
    private StudentServiceImpl studentService;

    @Test
    public void create1() throws Exception {
        Student student = new Student();
        student.setStuNo(1L);
        student.setName("张三");
        student.setAge(23);
        studentService.create(student);
    }
    @Test
    public void deleteByName1() throws Exception {
        studentService.deleteByNo(1);
    }
    @Test
    public void queryByStuNo1() throws Exception {
        System.out.println(studentService.queryByStuNo(1));

    }
}
在运行的时候会出现如下异常问题,运行失败,报出java.lang.IllegalArgumentException: jdbcUrl is required with driverClassName.异常
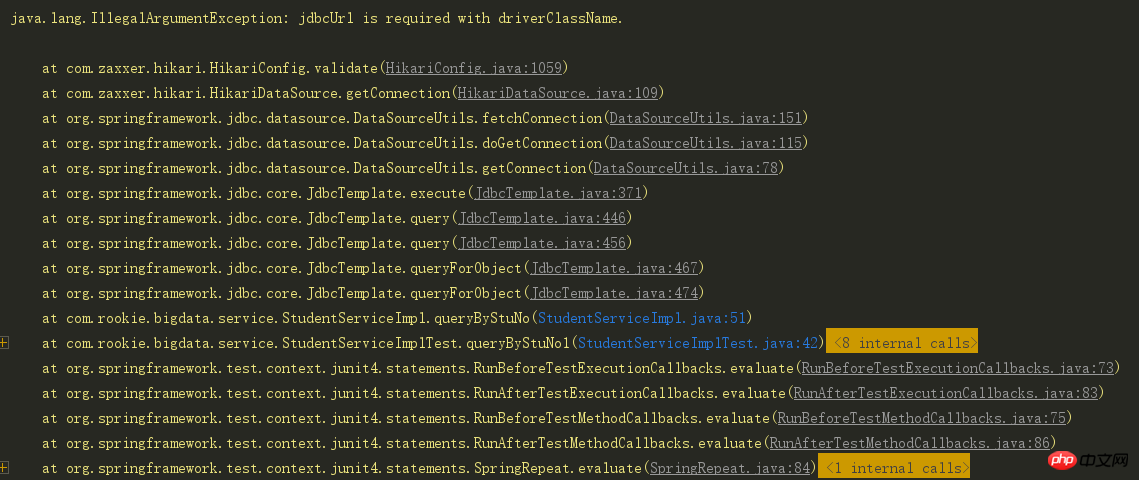
后来经过查资料,发现出现该问题的原因是由于springboot版本的问题,本实例采用的springboot版本为2.0.5,如果将版本改为1.5以前的版本就不会出现如上的问题,其实解决上面的异常主要有如下两种解决方案
方案一:
按照如下方案进行修改application.properties配置文件,如下:修改完成后,上面的异常不会再出现
spring.datasource.primary.jdbc-url=jdbc:mysql://localhost:3306/springboot
spring.datasource.primary.username=root
spring.datasource.primary.password=root
spring.datasource.primary.driver-class-name=com.mysql.jdbc.Driver
spring.datasource.secondary.jdbc-url=jdbc:mysql://localhost:3306/springboot
spring.datasource.secondary.username=root
spring.datasource.secondary.password=root
spring.datasource.secondary.driver-class-name=com.mysql.jdbc.Driver
方案二:
原有的application.properties配置文件不进行修改,修改DataSourceConfig类中的信息,如下:修改完成后,异常也不会再出现能够正常运行
application.properties
spring.datasource.primary.url=jdbc:mysql://localhost:3306/springboot
spring.datasource.primary.username=root
spring.datasource.primary.password=root
spring.datasource.primary.driver-class-name=com.mysql.jdbc.Driver
spring.datasource.secondary.url=jdbc:mysql://localhost:3306/springboot
spring.datasource.secondary.username=root
spring.datasource.secondary.password=root
spring.datasource.secondary.driver-class-name=com.mysql.jdbc.Driver
DataSourceConfig
package com.rookie.bigdata.config;
import org.springframework.beans.factory.annotation.Qualifier;
import org.springframework.boot.autoconfigure.jdbc.DataSourceProperties;
import org.springframework.boot.context.properties.ConfigurationProperties;
import org.springframework.context.annotation.Bean;
import org.springframework.context.annotation.Configuration;
import org.springframework.context.annotation.Primary;
import org.springframework.jdbc.core.JdbcTemplate;
import javax.sql.DataSource;
/**
 * @author
 * @date 2018/10/10
 */
@Configuration
public class DataSourceConfig {
    @Bean(name = "primaryJdbcTemplate")
    public JdbcTemplate primaryJdbcTemplate(
            @Qualifier("primaryDataSource") DataSource dataSource) {
        return new JdbcTemplate(dataSource);
    }
    @Bean(name = "secondaryJdbcTemplate")
    public JdbcTemplate secondaryJdbcTemplate(
            @Qualifier("primaryDataSource") DataSource dataSource) {
        return new JdbcTemplate(dataSource);
    }
    @Primary
    @Bean(name = "primaryDataSourceProperties")
    @Qualifier("primaryDataSourceProperties")
    @ConfigurationProperties(prefix = "spring.datasource.primary")
    public DataSourceProperties primaryDataSourceProperties() {
        return new DataSourceProperties();
    }
    @Bean(name = "secondaryDataSourceProperties")
    @Qualifier("secondaryDataSourceProperties")
    @ConfigurationProperties(prefix = "spring.datasource.secondary")
    public DataSourceProperties secondaryDataSourceProperties() {
        return new DataSourceProperties();
    }

    @Primary
    @Bean(name = "primaryDataSource")
    @Qualifier("primaryDataSource")
    @ConfigurationProperties(prefix = "spring.datasource.primary")
    public DataSource primaryDataSource() {

        return primaryDataSourceProperties().initializeDataSourceBuilder().build();
    }
    @Bean(name = "secondaryDataSource")
    @Qualifier("secondaryDataSource")
    @ConfigurationProperties(prefix = "spring.datasource.secondary")
    public DataSource secondaryDataSource() {

        return primaryDataSourceProperties().initializeDataSourceBuilder().build();
    }
}
至此,springboot 采用多数据源对JdbcTemplate进行配置完美解决
以上是springboot采用多数据源对JdbcTemplate进行配置的方法的详细内容。更多信息请关注PHP中文网其他相关文章!

 JVM性能与其他语言May 14, 2025 am 12:16 AM
JVM'SperformanceIsCompetitiveWithOtherRuntimes,operingabalanceOfspeed,安全性和生产性。1)JVMUSESJITCOMPILATIONFORDYNAMICOPTIMIZAIZATIONS.2)c提供NativePernativePerformanceButlanceButlactsjvm'ssafetyFeatures.3)
 Java平台独立性:使用示例May 14, 2025 am 12:14 AM
JavaachievesPlatFormIndependencEthroughTheJavavIrtualMachine(JVM),允许CodeTorunonAnyPlatFormWithAjvm.1)codeisscompiledIntobytecode,notmachine-specificodificcode.2)bytecodeisisteredbytheybytheybytheybythejvm,enablingcross-platerssectectectectectross-eenablingcrossectectectectectection.2)
 JVM架构:深入研究Java虚拟机May 14, 2025 am 12:12 AM
TheJVMisanabstractcomputingmachinecrucialforrunningJavaprogramsduetoitsplatform-independentarchitecture.Itincludes:1)ClassLoaderforloadingclasses,2)RuntimeDataAreafordatastorage,3)ExecutionEnginewithInterpreter,JITCompiler,andGarbageCollectorforbytec
 JVM:JVM与操作系统有关吗?May 14, 2025 am 12:11 AM
JVMhasacloserelationshipwiththeOSasittranslatesJavabytecodeintomachine-specificinstructions,managesmemory,andhandlesgarbagecollection.ThisrelationshipallowsJavatorunonvariousOSenvironments,butitalsopresentschallengeslikedifferentJVMbehaviorsandOS-spe
 Java:写一次,在任何地方跑步(WORA) - 深入了解平台独立性May 14, 2025 am 12:05 AM
Java实现“一次编写,到处运行”通过编译成字节码并在Java虚拟机(JVM)上运行。1)编写Java代码并编译成字节码。2)字节码在任何安装了JVM的平台上运行。3)使用Java原生接口(JNI)处理平台特定功能。尽管存在挑战,如JVM一致性和平台特定库的使用,但WORA大大提高了开发效率和部署灵活性。
 Java平台独立性:与不同的操作系统的兼容性May 13, 2025 am 12:11 AM
JavaachievesPlatFormIndependencethroughTheJavavIrtualMachine(JVM),允许Codetorunondifferentoperatingsystemsswithoutmodification.thejvmcompilesjavacodeintoplatform-interploplatform-interpectentbybyteentbytybyteentbybytecode,whatittheninternterninterpretsandectectececutesoneonthepecificos,atrafficteyos,Afferctinginginginginginginginginginginginginginginginginginginginginginginginginginginginginginginginginginginginginginginginginginginging
 什么功能使Java仍然强大May 13, 2025 am 12:05 AM
JavaispoperfulduetoitsplatFormitiondence,对象与偏见,RichstandardLibrary,PerformanceCapabilities和StrongsecurityFeatures.1)Platform-dimplighandependectionceallowsenceallowsenceallowsenceallowsencationSapplicationStornanyDevicesupportingJava.2)
 顶级Java功能:开发人员的综合指南May 13, 2025 am 12:04 AM
Java的顶级功能包括:1)面向对象编程,支持多态性,提升代码的灵活性和可维护性;2)异常处理机制,通过try-catch-finally块提高代码的鲁棒性;3)垃圾回收,简化内存管理;4)泛型,增强类型安全性;5)ambda表达式和函数式编程,使代码更简洁和表达性强;6)丰富的标准库,提供优化过的数据结构和算法。


热AI工具

Undresser.AI Undress
人工智能驱动的应用程序,用于创建逼真的裸体照片

AI Clothes Remover
用于从照片中去除衣服的在线人工智能工具。

Undress AI Tool
免费脱衣服图片

Clothoff.io
AI脱衣机

Video Face Swap
使用我们完全免费的人工智能换脸工具轻松在任何视频中换脸!

热门文章
热工具

SublimeText3 英文版
推荐:为Win版本,支持代码提示!

PhpStorm Mac 版本
最新(2018.2.1 )专业的PHP集成开发工具

适用于 Eclipse 的 SAP NetWeaver 服务器适配器
将Eclipse与SAP NetWeaver应用服务器集成。

安全考试浏览器
Safe Exam Browser是一个安全的浏览器环境,用于安全地进行在线考试。该软件将任何计算机变成一个安全的工作站。它控制对任何实用工具的访问,并防止学生使用未经授权的资源。

WebStorm Mac版
好用的JavaScript开发工具

