本篇文章给大家带来的内容是关于如何使用云助手自动化管理实例,有一定的参考价值,有需要的朋友可以参考一下,希望对你有所帮助。
使用云助手自动化管理实例
运维 ECS 实例的目的是保持 ECS 实例的最佳状态以及确保排错的效率,但是手动维护会花费您大量的时间和精力,因此阿里云研制了 云助手,用以解决如何自动化、批量处理日常维护任务。本文举例如何使用云助手 API,为 ECS 实例执行相应命令,达到自动化运维 ECS 实例的目的。
命令类型介绍
目前,云助手支持如下三种命令类型。

前提条件
您需要确保目标 ECS 实例的网络类型为 专有网络(VPC)。
目标 ECS 实例的状态必须为 运行中(Running)。
目标 ECS 实例必须预先安装云助手客户端。您可以参阅 阿里云助手 安装并使用云助手客户端。
执行类型为 PowerShell 的命令时,您需要确保目标 Windows 实例已经配置了 PowerShell 模块。
以下示例在命令行工具中完成,您需要确保您已经安装了阿里云命令行工具 CLI(Command-Line Interface)。
Windows 实例参阅 在线安装命令行工具和 SDK。
Linux 实例参阅 在线安装命令行工具和 SDK。
您需要 升级 SDK。
修改 CLI 配置:
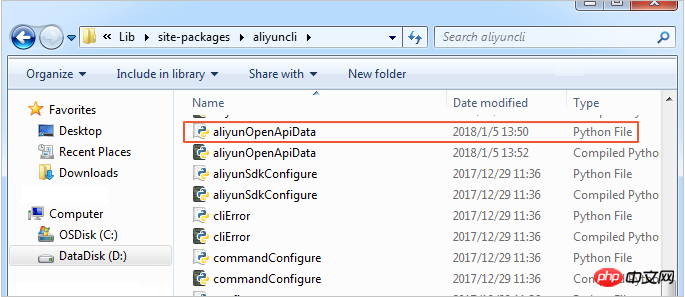
下载文件 aliyunOpenApiData.py。
使用下载的文件替换路径中 %python_install_path%\Lib\site-packages\aliyuncli 中的文件 aliyunOpenApiData.py。

关于如何配置阿里云 CLI,参阅文档 配置命令行工具和 SDK。
操作步骤
以下举例说明怎么在阿里云 CLI 中通过 API 使用云助手,为 ECS 实例执行相应命令。以执行一条 echo 123 命令为例。
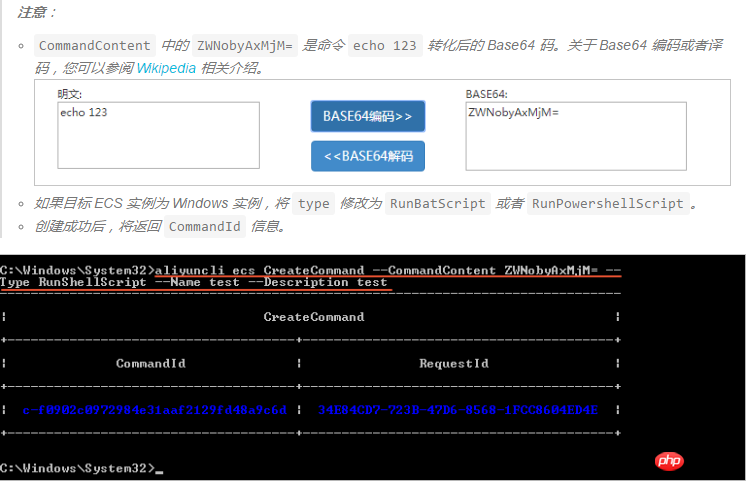
在本地计算机的 CMD、PowerShell 或者 Shell 中运行 aliyuncli ecs CreateCommand --CommandContent ZWNobyAxMjM= --Type RunShellScript --Name test --Description test 创建命令(CreateCommand)。

运行 aliyuncli ecs InvokeCommand --InstanceIds your-vm-instance-id1 instance-id2 --CommandId your-command-id --Timed false 执行命令(InvokeCommand)。
注意:
InstanceIds 为您的 ECS 实例 ID,支持多台 ECS 实例,最多 100 台。
Timed 表示是否为周期性任务,Timed True 表示是周期性任务,Timed False表示不是周期性任务。
当您的任务为周期性任务时,即参数 Timed 取值为 True 时,您需要通过参数 Frequency 指定周期,例如 0 */20 * * * * 表示周期为每 20 分钟。更多关于 Cron 表达式详情,请参阅 Cron 表达式取值说明。
返回结果为所有的目标 ECS 实例返回一个共同的 InvokeId。您可以使用该 InvokeId 查询命令的执行情况。
(可选)运行 aliyuncli ecs DescribeInvocations --InstanceId your-vm-instance-id --InvokeId your-invoke-id 查看命令执行状态(DescribeInvocations)。其中,InvokeId 是 第二步 为 ECS 实例执行命令时返回的执行 ID。
返回参数 InvokeStatus 为 Finished 时仅表示命令进程 执行完成,不代表一定有预期的命令效果,您需要通过 DescribeInvocationResults 中的参数 Output 查看实际的具体执行结果。
(可选)运行 aliyuncli ecs DescribeInvocationResults --InstanceId your-vm-instance-id --InvokeId your-invoke-id 查看指定 ECS 实例的命令的实际执行结果(DescribeInvocationResults)。其中,InvokeId 是 第二步 为 ECS 实例执行命令时返回的执行 ID。
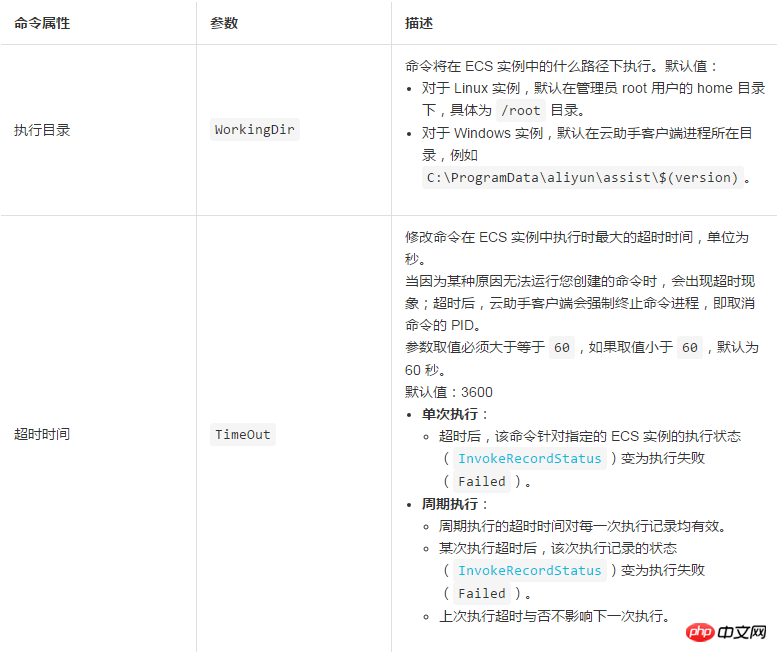
在 创建命令(CreateCommand) 时,您还可以为命令设置如下请求参数。

通过 Python SDK 使用云助手的完整代码示例
您也可以通过 阿里云 SDK 使用云助手。关于如何配置阿里云 SDK,参阅文档 配置命令行工具和 SDK。以下为通过 Python SDK 使用云助手的完整代码示例。
# coding=utf-8
# if the python sdk is not install using 'sudo pip install aliyun-python-sdk-ecs'
# if the python sdk is install using 'sudo pip install --upgrade aliyun-python-sdk-ecs'
# make sure the sdk version is 2.1.2, you can use command 'pip show aliyun-python-sdk-ecs' to check
import json
import logging
import os
import time
import datetime
import base64
from aliyunsdkcore import client
from aliyunsdkecs.request.v20140526.CreateCommandRequest import CreateCommandRequest
from aliyunsdkecs.request.v20140526.InvokeCommandRequest import InvokeCommandRequest
from aliyunsdkecs.request.v20140526.DescribeInvocationResultsRequest import DescribeInvocationResultsRequest
# configuration the log output formatter, if you want to save the output to file,
# append ",filename='ecs_invoke.log'" after datefmt.
logging.basicConfig(level=logging.INFO,
                    format='%(asctime)s %(filename)s[line:%(lineno)d] %(levelname)s %(message)s',
                    datefmt='%a, %d %b %Y %H:%M:%S',filename='aliyun_assist_openapi_test.log', filemode='w')
#access_key = 'Your Access Key Id'
#acess_key_secrect = 'Your Access Key Secrect'
#region_name = 'cn-shanghai'
#zone_id = 'cn-shanghai-b'
access_key = 'LTAIXXXXXXXXXXXX'
acess_key_secrect = '4dZXXXXXXXXXXXXXXXXXXXXXXXX'
region_name = 'cn-hangzhou'
zone_id = 'cn-hangzhou-f'
clt = client.AcsClient(access_key, acess_key_secrect, region_name)
def create_command(command_content, type, name, description):
    request = CreateCommandRequest()
    request.set_CommandContent(command_content)
    request.set_Type(type)
    request.set_Name(name)
    request.set_Description(description)
    response = _send_request(request)
    if response is None:
        return None
    command_id = response.get('CommandId')
    return command_id;
def invoke_command(instance_id, command_id, timed, cronat):
    request = InvokeCommandRequest()
    request.set_Timed(timed)
    InstanceIds = [instance_id]
    request.set_InstanceIds(InstanceIds)
    request.set_CommandId(command_id)
    request.set_Frequency(cronat)
    response = _send_request(request)
    invoke_id = response.get('InvokeId')
    return invoke_id;
def get_task_output_by_id(instance_id, invoke_id):
    logging.info("Check instance %s invoke_id is %s", instance_id, invoke_id)
    request = DescribeInvocationResultsRequest()
    request.set_InstanceId(instance_id)
    request.set_InvokeId(invoke_id)
    response = _send_request(request)
    invoke_detail = None
    output = None
    if response is not None:
        result_list = response.get('Invocation').get('InvocationResults').get('InvocationResult')
        for item in result_list:
            invoke_detail = item
            output = base64.b64decode(item.get('Output'))
            break;
        return output;
def execute_command(instance_id):
    command_str = 'yum check-update'
    command_id = create_command(base64.b64encode(command_str), 'RunShellScript', 'test', 'test')
    if(command_id is None):
        logging.info('create command failed')
        return
    invoke_id = invoke_command(instance_id, command_id, 'false', '')
    if(invoke_id is None):
        logging.info('invoke command failed')
        return
    time.sleep(15)
    output = get_task_output_by_id(instance_id, invoke_id)
    if(output is None):
        logging.info('get result failed')
        return
    logging.info("output: %s is \n", output)
# send open api request
def _send_request(request):
    request.set_accept_format('json')
    try:
        response_str = clt.do_action(request)
        logging.info(response_str)
        response_detail = json.loads(response_str)
        return response_detail
    except Exception as e:
        logging.error(e)
if __name__ == '__main__':
    execute_command('i-bp17zhpbXXXXXXXXXXXXX')
以上是如何使用云助手自动化管理实例的详细内容。更多信息请关注PHP中文网其他相关文章!
 什么是linux设备节点Apr 18, 2022 pm 08:10 PM
linux设备节点是应用程序和设备驱动程序沟通的一个桥梁;设备节点被创建在“/dev”,是连接内核与用户层的枢纽,相当于硬盘的inode一样的东西,记录了硬件设备的位置和信息。设备节点使用户可以与内核进行硬件的沟通,读写设备以及其他的操作。
 Linux中open和fopen的区别有哪些Apr 29, 2022 pm 06:57 PM
区别:1、open是UNIX系统调用函数,而fopen是ANSIC标准中的C语言库函数;2、open的移植性没fopen好;3、fopen只能操纵普通正规文件,而open可以操作普通文件、网络套接字等;4、open无缓冲,fopen有缓冲。
 linux怎么判断pcre是否安装May 09, 2022 pm 04:14 PM
在linux中,可以利用“rpm -qa pcre”命令判断pcre是否安装;rpm命令专门用于管理各项套件,使用该命令后,若结果中出现pcre的版本信息,则表示pcre已经安装,若没有出现版本信息,则表示没有安装pcre。
 linux中什么叫端口映射May 09, 2022 pm 01:49 PM
端口映射又称端口转发,是指将外部主机的IP地址的端口映射到Intranet中的一台计算机,当用户访问外网IP的这个端口时,服务器自动将请求映射到对应局域网内部的机器上;可以通过使用动态或固定的公共网络IP路由ADSL宽带路由器来实现。
 linux中eof是什么May 07, 2022 pm 04:26 PM
在linux中,eof是自定义终止符,是“END Of File”的缩写;因为是自定义的终止符,所以eof就不是固定的,可以随意的设置别名,linux中按“ctrl+d”就代表eof,eof一般会配合cat命令用于多行文本输出,指文件末尾。
 linux怎么查询mac地址Apr 24, 2022 pm 08:01 PM
linux查询mac地址的方法:1、打开系统,在桌面中点击鼠标右键,选择“打开终端”;2、在终端中,执行“ifconfig”命令,查看输出结果,在输出信息第四行中紧跟“ether”单词后的字符串就是mac地址。
 手机远程linux工具有哪些Apr 29, 2022 pm 05:30 PM
手机远程linux工具有:1、JuiceSSH,是一款功能强大的安卓SSH客户端应用,可直接对linux服务进行管理;2、Termius,可以利用手机来连接Linux服务器;3、Termux,一个强大的远程终端工具;4、向日葵远程控制等等。
 linux中lsb是什么意思May 07, 2022 pm 05:08 PM
linux中,lsb是linux标准基础的意思,是“Linux Standards Base”的缩写,是linux标准化领域中的标准;lsb制定了应用程序与运行环境之间的二进制接口,保证了linux发行版与linux应用程序之间的良好结合。


热AI工具

Undresser.AI Undress
人工智能驱动的应用程序,用于创建逼真的裸体照片

AI Clothes Remover
用于从照片中去除衣服的在线人工智能工具。

Undress AI Tool
免费脱衣服图片

Clothoff.io
AI脱衣机

AI Hentai Generator
免费生成ai无尽的。

热门文章

热工具

VSCode Windows 64位 下载
微软推出的免费、功能强大的一款IDE编辑器

SublimeText3 Mac版
神级代码编辑软件(SublimeText3)

螳螂BT
Mantis是一个易于部署的基于Web的缺陷跟踪工具,用于帮助产品缺陷跟踪。它需要PHP、MySQL和一个Web服务器。请查看我们的演示和托管服务。

记事本++7.3.1
好用且免费的代码编辑器

适用于 Eclipse 的 SAP NetWeaver 服务器适配器
将Eclipse与SAP NetWeaver应用服务器集成。


