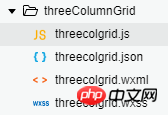
本篇文章给大家带来的内容是关于小程序自定义组件的实现方法(代码),有一定的参考价值,有需要的朋友可以参考一下,希望对你有所帮助。

File:threecolgrid.js
// components/threeColumnGrid/threecolgrid.js
Component({
  /**
   * 组件的属性列表
   */
  properties: {
    // 传入的数据
    booksData:{
      type: Array,
      value:[]
    },
    // grid的外边距
    mainMargin:{
      type: Number,
      value: 5
    },
    // grid的内边距
    mainPadding:{
      type:Number,
      value:10
    },
    // 行间距
    rowSpace:{
      type:Number,
      value:20
    },
    // 列间距
    colSpace:{
      type:Number,
      value:7
    }
  },

  /**
   * 组件的初始数据
   */
  data: {

  },

  /**
   * 组件的方法列表
   */
  methods: {
    checkIn:function(e){
      console.log(e.currentTarget.dataset)
      // 触发action事件,triggerEvent函数接受三个值:事件名称、数据、选项值
      this.triggerEvent('action', e.currentTarget.dataset, {})
    }
  }
})
<!--components/threeColumnGrid/threecolgrid.wxml-->
<!-- <view class='main-content'> -->
<view class='bookbox' style='padding:{{mainPadding}}rpx;margin:{{mainMargin}}rpx;'>
<block wx:for="{{booksData}}" wx:key="{{item.id}}">
<view class='bookinfo' style='margin-bottom: {{rowSpace}}rpx;'>
<image src='{{item.url}}' mode="widthFix" style='width:{{(740 - 2*mainPadding - 2*mainMargin)/3 - colSpace*3}}rpx;'></image>
<view class="title" style='width:{{(740 - 2*mainPadding - 2*mainMargin)/3 - colSpace*3}}rpx;'>{{item.title}}</view>
<view class='actionBar' style='width:{{(740 - 2*mainPadding - 2*mainMargin)/3 - colSpace*3}}rpx;'>
<block wx:if="{{item.status == 0}}">
<view class='bookstatus disable'>暂缺货</view>
<view bindtap='checkIn' data-bookid='{{item.id}}' data-status='{{item.status}}' class='iconfont icon-219-heart icon'></view>
</block>
<block wx:else>
<view class='bookstatus enable'>可借阅</view>
<view bindtap='checkIn' data-bookid='{{item.id}}' data-status='{{item.status}}' class='iconfont icon-059-cart icon'></view>
</block>
</view>
</view>
</block>
</view>
<!-- </view> -->
/* components/threeColumnGrid/threecolgrid.wxss */
@import "../../iconfont.wxss";
/* .main-content{
  background: #FFF;
  margin-top: 155rpx;
  padding:10rpx;
} */

.bookbox{
  display: flex;
  flex-direction: row;
  justify-content: space-between;
  flex-wrap:wrap;
  background: #FFF;
}
.bookbox .bookinfo{
  display: flex;
  flex-direction: column;
  justify-content: center;
  align-items: center;
  /* border: 1rpx solid #f5a32d; */
}
.bookbox .bookinfo image{
  display: flex;
  /* 调节图书列 */
  /* width:220rpx;  */
  border-top-left-radius: 10rpx;
  border-top-right-radius: 10rpx
}
.bookbox .bookinfo .title{
  display: flex;
  flex-wrap: wrap;
  font-size: small;
  margin-bottom: 5rpx;
  /* 调节图书列 */
  /* width:300rpx; */
  /* width:220rpx; */
  height: 70rpx;
}
.bookbox .bookinfo .actionBar{
  display: flex;
  justify-content: space-between;
  align-items: center;
  padding: 0rpx 5rpx 5rpx 5rpx;
  font-size: smaller;
  /* width:200rpx; */
}

.bookbox .bookinfo .actionBar .bookstatus{
  display: flex;
  border-radius: 10rpx;
  padding:0rpx 5rpx;
}

.bookbox .bookinfo .actionBar .enable{
  color: #FFF;
  background-color: #f5a32d;
}

.bookbox .bookinfo .actionBar .disable{
  color: #FFF;
  background-color: #727171;
}

.bookbox .bookinfo .actionBar .icon{
  font-size: 15pt;
  color: #facea7;
}

.bookinfo-empty{
  display: flex;
  flex-direction: column;
  align-items: center;
  padding: 5rpx;
  width:230rpx;
}
使用组件
  //事件处理函数
  getCheckValues: function(e){
    console.log('checkbox发生change事件,携带value值为:', e.detail)
  },
{

  "usingComponents": {
    "three-col-grid":"/components/threeColumnGrid/threecolgrid"
  },

}
<view class='test'>
<three-col-grid booksData="{{BookList}}" bind:action="getCheckValues"></three-col-grid>
</view>
.test{
  display: flex;
  justify-content: center;
  /* border: 1rpx #444 solid; */
}
相关推荐:
详解javascript实现自定义事件_javascript技巧
以上是小程序自定义组件的实现方法(代码)的详细内容。更多信息请关注PHP中文网其他相关文章!
声明
本文内容由网友自发贡献,版权归原作者所有,本站不承担相应法律责任。如您发现有涉嫌抄袭侵权的内容,请联系admin@php.cn

热AI工具

Undresser.AI Undress
人工智能驱动的应用程序,用于创建逼真的裸体照片

AI Clothes Remover
用于从照片中去除衣服的在线人工智能工具。

Undress AI Tool
免费脱衣服图片

Clothoff.io
AI脱衣机

Video Face Swap
使用我们完全免费的人工智能换脸工具轻松在任何视频中换脸!

热门文章
如何修复KB5055612无法在Windows 10中安装?
4 周前ByDDD
<🎜>:泡泡胶模拟器无穷大 - 如何获取和使用皇家钥匙
4 周前By尊渡假赌尊渡假赌尊渡假赌
<🎜>:种植花园 - 完整的突变指南
3 周前ByDDD
北端:融合系统,解释
4 周前By尊渡假赌尊渡假赌尊渡假赌
Mandragora:巫婆树的耳语 - 如何解锁抓钩
3 周前By尊渡假赌尊渡假赌尊渡假赌

热工具

螳螂BT
Mantis是一个易于部署的基于Web的缺陷跟踪工具,用于帮助产品缺陷跟踪。它需要PHP、MySQL和一个Web服务器。请查看我们的演示和托管服务。

SecLists
SecLists是最终安全测试人员的伙伴。它是一个包含各种类型列表的集合,这些列表在安全评估过程中经常使用,都在一个地方。SecLists通过方便地提供安全测试人员可能需要的所有列表,帮助提高安全测试的效率和生产力。列表类型包括用户名、密码、URL、模糊测试有效载荷、敏感数据模式、Web shell等等。测试人员只需将此存储库拉到新的测试机上,他就可以访问到所需的每种类型的列表。

SublimeText3汉化版
中文版,非常好用

EditPlus 中文破解版
体积小,语法高亮,不支持代码提示功能

Atom编辑器mac版下载
最流行的的开源编辑器


