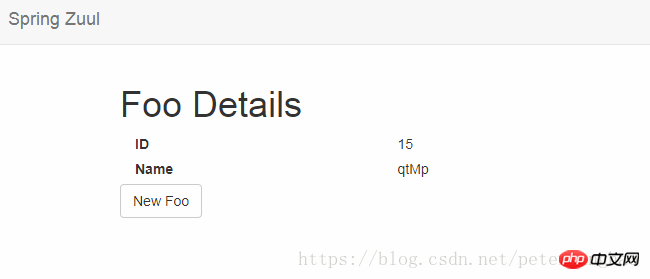
本篇文章给大家带来的内容是关于使用Spring Cloud Netflix Zuul代理网关访问后台REST服务的实现(代码),有一定的参考价值,有需要的朋友可以参考一下,希望对你有所帮助。
1.概述
在本文中,我们将探讨如何在互相单独部署的前端应用程序和后端REST API服务之间进行通信。目的是解决浏览器的跨域资源访问和同源策略限制,允许页面UI能够调用后台的API,即使它们不在同一个服务器中。
我们在这里创建了两个独立的应用程序 - 一个UI应用程序和一个简单的REST API,我们将在UI应用程序中使用Zuul代理来代理对REST API的调用。Zuul是Netflix基于JVM的路由器和服务器端负载均衡器。Spring Cloud与嵌入式Zuul代理有很好的集成。
2.REST应用
我们的REST API应用程序是一个简单的Spring Boot应用程序。在本文中将在端口8081上运行服务器中部署的API 。
配置文件
server.contextPath=/spring-zuul-foos-resourceserver.port=80
81
让我们首先为我们将要使用的资源定义基本DTO:
public class Foo {
    private long id;
    private String name;
    // standard getters and setters
    }
定义一个简单的控制器:
@Controllerpublic class FooController {

    @RequestMapping(method = RequestMethod.GET, value = "/foos/{id}")
    @ResponseBody
    public Foo findById(
      @PathVariable long id, HttpServletRequest req, HttpServletResponse res) {
      return new Foo(Long.parseLong(randomNumeric(2)), randomAlphabetic(4));
    }
}
3. 前端应用程序
我们的UI应用程序也是一个简单的Spring Boot应用程序。在本文中此应用运行在端口8080上。
首先,我们需要通过Spring Cloud向我们的UI应用程序的pom.xml添加对zuul支持的依赖:
<dependency>
    <groupId>org.springframework.cloud</groupId>
    <artifactId>spring-cloud-starter-netflix-zuul</artifactId></dependency>
接下来 - 我们需要配置Zuul,因为我们正在使用Spring Boot,所以我们将在application.yml中执行此操作:
zuul:
  routes:
    foos:
      path: /foos/**
      url: http://localhost:8081/spring-zuul-foos-resource/foos
注意:
我们代理我们的资源服务器Foos。
来自UI的所有以“ / foos / ”开头的请求将被路由到我们的Foos资源服务器,地址为:http:// loclahost:8081/spring-zuul-foos-resource / foos /
然后编写我们的主页面index.html — 这里使用一些AngularJS:
<html>
<body ng-app="myApp" ng-controller="mainCtrl">
<script src="angular.min.js"></script>
<script src="angular-resource.min.js"></script>
<script>
var app = angular.module('myApp', ["ngResource"]);
app.controller('mainCtrl', function($scope,$resource,$http) {
$scope.foo = {id:0 , name:"sample foo"};
$scope.foos = $resource("/foos/:fooId",{fooId:'@id'});
$scope.getFoo = function(){
$scope.foo = $scope.foos.get({fooId:$scope.foo.id});
}
});</script><p>
<h1>Foo Details</h1>
<span>{{foo.id}}</span>
<span>{{foo.name}}</span>
<a href="#" ng-click="getFoo()">New Foo</a>
</p>
</body>
</html>这里最重要的方面是我们如何使用相对URL访问API !
请记住,API应用程序未部署在与UI应用程序相同的服务器上,因此相对URL不起作用,并且在没有代理的情况下不起作用。
但是,通过代理,我们通过Zuul代理访问Foo资源,Zuul代理配置为将这些请求路由到实际部署API的位置。
最后,启用Boot的应用程序:
@EnableZuulProxy@SpringBootApplicationpublic class UiApplication extends SpringBootServletInitializer {

    public static void main(String[] args) {
        SpringApplication.run(UiApplication.class, args);
    }
}
这里使用@EnableZuulProxy注解来启动Zuul代理,这非常干净和简洁。
4.运行测试
分别启动2个应用系统,在浏览器中输入http://localhost:8080/index
每点击一次“New Foo”按钮就访问后台REST API一次。 
5.定制Zuul过滤器
有多个Zuul过滤器可用,我们也可以创建自己的定制过滤器:
@Componentpublic class CustomZuulFilter extends ZuulFilter {

    @Override
    public Object run() {
        RequestContext ctx = RequestContext.getCurrentContext();
        ctx.addZuulRequestHeader("Test", "TestSample");
        return null;
    }    @Override
    public boolean shouldFilter() {
    return true;
    }    // ...}
这个简单的过滤器只是在请求头中添加了一个名为“ Test ” 的属性- 当然,我们可以根据需要增加我们的请求。
6.测试自定义Zuul过滤器
最后,让我们测试一下,确保我们的自定义过滤器正常工作 - 首先我们将在Foos资源服务器上修改我们的FooController:
@Controllerpublic class FooController {

    @GetMapping("/foos/{id}")    @ResponseBody
    public Foo findById(
      @PathVariable long id, HttpServletRequest req, HttpServletResponse res) {
      if (req.getHeader("Test") != null) {
            res.addHeader("Test", req.getHeader("Test"));
        }        return new Foo(Long.parseLong(randomNumeric(2)), randomAlphabetic(4));
    }
}
现在 - 让我们测试一下:
@Testpublic void whenSendRequest_thenHeaderAdded() {
Response response = RestAssured.get("http://localhost:8080/foos/1");

    assertEquals(200, response.getStatusCode());
    assertEquals("TestSample", response.getHeader("Test"));
}
7.结论
在这篇文章中,我们专注于使用Zuul将请求从UI应用程序路由到REST API。我们成功地解决了CORS和同源策略,我们还设法定制和扩充了传输中的HTTP请求。
相关推荐:
spring cloud 之 Feign 使用HTTP请求远程服务
spring-cloud-sleuth+zipkin追踪服务实现(二)
以上是使用Spring Cloud Netflix Zuul代理网关访问后台REST服务的实现(代码)的详细内容。更多信息请关注PHP中文网其他相关文章!
 如何将Maven或Gradle用于高级Java项目管理,构建自动化和依赖性解决方案?Mar 17, 2025 pm 05:46 PM
本文讨论了使用Maven和Gradle进行Java项目管理,构建自动化和依赖性解决方案,以比较其方法和优化策略。
 如何使用适当的版本控制和依赖项管理创建和使用自定义Java库(JAR文件)?Mar 17, 2025 pm 05:45 PM
本文使用Maven和Gradle之类的工具讨论了具有适当的版本控制和依赖关系管理的自定义Java库(JAR文件)的创建和使用。
 如何使用咖啡因或Guava Cache等库在Java应用程序中实现多层缓存?Mar 17, 2025 pm 05:44 PM
本文讨论了使用咖啡因和Guava缓存在Java中实施多层缓存以提高应用程序性能。它涵盖设置,集成和绩效优势,以及配置和驱逐政策管理最佳PRA
 如何将JPA(Java持久性API)用于具有高级功能(例如缓存和懒惰加载)的对象相关映射?Mar 17, 2025 pm 05:43 PM
本文讨论了使用JPA进行对象相关映射,并具有高级功能,例如缓存和懒惰加载。它涵盖了设置,实体映射和优化性能的最佳实践,同时突出潜在的陷阱。[159个字符]
 Java的类负载机制如何起作用,包括不同的类载荷及其委托模型?Mar 17, 2025 pm 05:35 PM
Java的类上载涉及使用带有引导,扩展程序和应用程序类负载器的分层系统加载,链接和初始化类。父代授权模型确保首先加载核心类别,从而影响自定义类LOA


热AI工具

Undresser.AI Undress
人工智能驱动的应用程序,用于创建逼真的裸体照片

AI Clothes Remover
用于从照片中去除衣服的在线人工智能工具。

Undress AI Tool
免费脱衣服图片

Clothoff.io
AI脱衣机

AI Hentai Generator
免费生成ai无尽的。

热门文章

热工具

ZendStudio 13.5.1 Mac
功能强大的PHP集成开发环境

禅工作室 13.0.1
功能强大的PHP集成开发环境

EditPlus 中文破解版
体积小,语法高亮,不支持代码提示功能

安全考试浏览器
Safe Exam Browser是一个安全的浏览器环境,用于安全地进行在线考试。该软件将任何计算机变成一个安全的工作站。它控制对任何实用工具的访问,并防止学生使用未经授权的资源。

Dreamweaver CS6
视觉化网页开发工具


