本篇文章主要的介绍了关于angularjs的指令实例,第一个就是使用angularjs中的手风琴指令实例,还定义了指令,现在就让我们一起来看看这篇文章吧
关于angularjs的前言:
之前我们已经介绍了所有的AngularJS 基础知识,下面让我们通过实例来加深记忆,体验自定义指令的乐趣。
手风琴指令
我们展示的第一个例子是手风琴效果指令:
效果图如下:
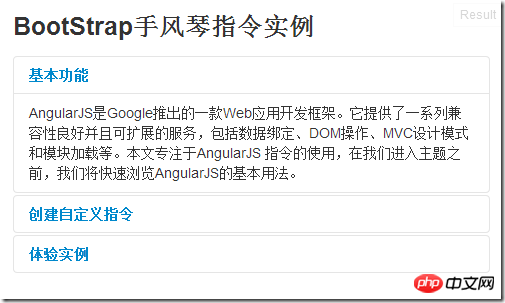
在线实例地址:手风琴指令
不使用AngularJS的纯HTML源码如下:
<p class="accordion" id="accordion2">
  <p class="accordion-group">
    <p class="accordion-heading">
      <a class="accordion-toggle" data-toggle="collapse"
         data-parent="#accordion2" href="#collapseOne">
        Collapsible Group Item #1      </a>
    </p>
    <p id="collapseOne" class="accordion-body collapse in">
      <p class="accordion-inner">
        Anim pariatur cliche...      </p>
    </p>
  </p>
  <p class="accordion-group">
    <p class="accordion-heading">
      <a class="accordion-toggle" data-toggle="collapse"
        data-parent="#accordion2" href="#collapseTwo">
        Collapsible Group Item #2      </a>
    </p>
    <p id="collapseTwo" class="accordion-body collapse">
      <p class="accordion-inner">
        Anim pariatur cliche...      </p>
    </p>
  </p></p>
以上纯 HTML源码也可以实现手风琴效果,但是它仅仅是一些标记,包含了大量的链接和id,不利于维护。
使用AngularJS自定义指令结合以下HTML源码同样可以得到预期效果:
<body ng-app="btst">
     <h3>BootStrap手风琴指令</h3>

    <btst-accordion>
        <btst-pane title="<b>基本功能</b>" category="{name:'test'}">
            <p>AngularJS......</p>
        </btst-pane>
        <btst-pane title="<b>创建自定义指令</b>">
            <p>使用过 AngularJS ......</p>
        </btst-pane>
        <btst-pane title="<b>体验实例</b>">
            <p>之前我们已经介绍了所有的AngularJS......</p>
        </btst-pane>
    </btst-accordion></body>
这一版使用的HTML标记更少,看起来清晰且易维护。
下面,让我们看下指令写法。
首先,我们定义模块"btstAccordion" 指令:
var btst = angular.module("btst", []);
btst.directive("btstAccordion", function () { return {
restrict: "E",
transclude: true,
replace: true,
scope: {},
template:
"<p class='accordion' ng-transclude></p>",
link: function (scope, element, attrs) { // 确保 accordion拥有id
var id = element.attr("id"); if (!id) {
id = "btst-acc" + scope.$id;
element.attr("id", id);
} // set data-parent and href attributes on accordion-toggle elements
var arr = element.find(".accordion-toggle"); for (var i = 0; i < arr.length; i++) {
$(arr[i]).attr("data-parent", "#" + id);
$(arr[i]).attr("href", "#" + id + "collapse" + i);
} // set collapse attribute on accordion-body elements
// and expand the first pane to start
arr = element.find(".accordion-body");
$(arr[0]).addClass("in"); // expand first pane
for (var i = 0; i < arr.length; i++) {
$(arr[i]).attr("id", id + "collapse" + i);
}
},
controller: function () {}
};
});由于拥有内部HTML内容,所以设置指令的transclude 属性为true。模板使用ng-transclude 指令来声明对应的显示内容。由于模板中只有一个元素,所以没有设置其他选项。
代码中最有趣的部分是link 方法。它在参数element具有id时启作用,如果没有,会依据指令的 Scope自动创建ID。一旦元素拥有了ID值,方法将通过jQuery来选择具有"accordion-toggle"类的子元素并且设置它的 "data-parent" 和 "href" 属性。最后,通过寻找“accordion-body” 元素,并且设置"collapse" 属性。
指令同时声明了一个拥有空方法的controller 。声明controller 是必要的,因为Accordion会包含子元素,子元素将检测父元素的类型和controller 。
下一步需要定义手风琴选项卡的指令。
这一步比较容易,大多数操作将在这个模板中发生,但是它仅仅需要少量的代码:
btst.directive('btstPane', function () { return {
require: "^btstAccordion",
restrict: "E",
transclude: true,
replace: true,
scope: {
title: "@"
},
template: "<p class='accordion-group'>" +
" <p class='accordion-heading'>" +
" <a class='accordion-toggle' data-toggle='collapse'>{{title}}</a>" +
" </p>" +
"<p class='accordion-body collapse'>" +
" <p class='accordion-inner' ng-transclude></p>" +
" </p>" +
"</p>",
link: function (scope, element, attrs) {
scope.$watch("title", function () { // NOTE: this requires jQuery (jQLite won't do html)
var hdr = element.find(".accordion-toggle");
hdr.html(scope.title);
});
}
};
});
require 属性值为"btstPane" ,所以该指令必须用于指令"btstAccordion"中。transclude 属性为true表明选项卡包含HTML标签。scope 下的 "title" 属性将会被实例所替代。
这个例子中的模板比较复杂。注意我们通过ng-transclude 指令来标记元素接收文本内容。
模板中"{{title}}" 属性将会显示标签名称。目前我们仅仅实现了纯文本显示,没有定义其样式。我们使用link 方法可以替换标题为HTML源码从而得到更丰富的样式。(想看更多就到PHP中文网AngularJS开发手册中学习)
就这样,我们完成了第一个具有实用价值的指令。它功能并不复杂但是足以展示一些AngularJS的重要知识点和技术细节:如何定义嵌套指令,如何生成唯一的元素ID,如何使用jQuery操作DOM以及如何使用$watch 方法监听scope变量的变化。
Google Maps 指令
下一个例子是创建Google地图的指令:
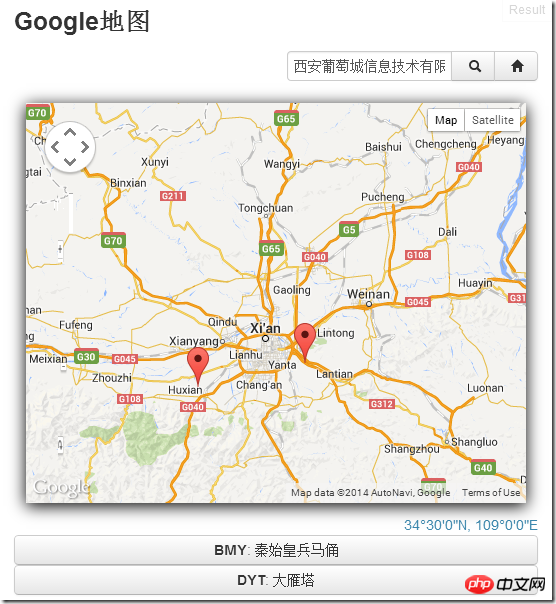
Google Maps 指令
在我们创建指令之前,我们需要添加Google APIs 引用到页面中:
<!-- required to use Google maps -->

<script type="text/javascript"src="https://maps.googleapis.com/maps/api/js?sensor=true">

</script>
接下来,我们创建指令:
var app = angular.module("app", []);
app.directive("appMap", function () {  return {
    restrict: "E",
    replace: true,
    template: "<p></p>",
    scope: {
      center: "=",        // Center point on the map
      markers: "=",       // Array of map markers
      width: "@",         // Map width in pixels.
      height: "@",        // Map height in pixels.
      zoom: "@",          // Zoom level (from 1 to 25).
      mapTypeId: "@"      // roadmap, satellite, hybrid, or terrain
    },
center 属性进行了双向绑定。这个应用可以改变地图中心和交互地图(当用户通过鼠标按钮选择地图位置时)。同时,地图也会在用户通过滚动选择地图位置时通知应用更新当前显示位置。
markers 属性被定义为引用因为它是数组形式,把它序列化为字符串比较耗时。link 方法可以实现以下功能:
1. 初始化地图
2. 在用户视图变量更改时更新地图
3. 监听事件
以下是实现代码:
link: function (scope, element, attrs) {  var toResize, toCenter;  var map;  var currentMarkers;  // listen to changes in scope variables and update the control
  var arr = ["width", "height", "markers", "mapTypeId"];  for (var i = 0, cnt = arr.length; i < arr.length; i++) {
    scope.$watch(arr[i], function () {      if (--cnt <= 0)
        updateControl();
    });
  }  // update zoom and center without re-creating the map
  scope.$watch("zoom", function () {    if (map && scope.zoom)
      map.setZoom(scope.zoom * 1);
  });
  scope.$watch("center", function () {    if (map && scope.center)
    map.setCenter(getLocation(scope.center));
  });
监测方法正如我们在文章开始时描述的,变量发生变化后,它将调用updateControl 方法。updateControl 方法实际上使用selected 选项创建了新的地图。
"zoom" 和 "center" 变量将被分别处理,因为我们不希望每次在用户选择或缩放地图时都重新创建地图。这两个方法检测地图是否重新创建还是仅仅是简单的更新。
以下是updateControl 方法的实现方法:
// update the controlfunction updateControl() {  // get map options
  var options = {
    center: new google.maps.LatLng(40, -73),
    zoom: 6,
    mapTypeId: "roadmap"
  };  if (scope.center) options.center = getLocation(scope.center);  if (scope.zoom) options.zoom = scope.zoom * 1;  if (scope.mapTypeId) options.mapTypeId = scope.mapTypeId;  // create the map and update the markers
  map = new google.maps.Map(element[0], options);
  updateMarkers();  // listen to changes in the center property and update the scope
  google.maps.event.addListener(map, 'center_changed', function () {    if (toCenter) clearTimeout(toCenter);
    toCenter = setTimeout(function () {    if (scope.center) {      if (map.center.lat() != scope.center.lat ||
          map.center.lng() != scope.center.lon) {
        scope.center = { lat: map.center.lat(), lon: map.center.lng() };        if (!scope.$$phase) scope.$apply("center");
      }
    }
  }, 500);
}
updateControl 方法首先需要接收Scope设置相关参数,接着使用options 创建和初始化地图。这是创建JavaScript指令的常见模式。
创建地图之后,方法会在更新标记的同时添加检测事件,以便监视地图中心位置的变化。该事件会监测当前的地图中心是否和Scope中的相同。如果不同,即会更新scope,调用$apply 方法通知AngularJS属性已经更改。这种绑定方式为双向绑定。
updateMarkers 方法十分的简单,几乎和AngularJS分离,所以我们在这里就不介绍了。
除了这个地图指令特有的功能,这个例子还展示了:
1. 两个过滤器转换坐标为常规数字到地理位置,例如33°38'24"N, 85°49'2"W。
2. 一个地理编码器,转换成地址的地理位置(也是基于谷歌的API)。
3. 使用HTML5的地理定位服务来获取用户当前位置的方法。
Wijmo Grid 指令
最后一个例子是可编辑的表格指令:
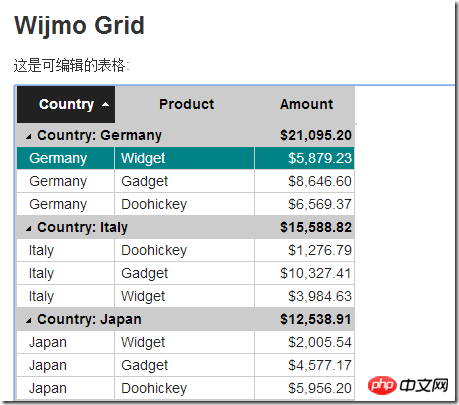
Wijmo Grid 指令
这里展示的图表插件是 Wijmo 前端插件套包中的一款插件 wijgrid 插件:
<wij-grid  data="data"
  allow-editing="true"
  after-cell-edit="cellEdited(e, args)" >
    <wij-grid-column      binding="country" width="100" group="true">
    </wij-grid-column>
    <wij-grid-column      binding="product" width="140" >
    </wij-grid-column>
    <wij-grid-column      binding="amount" width="100" format="c2" aggregate="sum" >
    </wij-grid-column></wij-grid>
"wij-grid" 指令定制表格的属性,"wij-grid-column" 指令定制特性表格列的属性。以上标记定义了一个拥有三列的可编辑表格,分别为:“country”, "product" 和 "amount"。并且,以country列分组并且计算每个分组的合计。
这个指令中最特别的一点是 “wij-grid”和“wij-grid-column”的连接。为了使这个连接起作用,父指令中定义了如下controller:
app.directive("wijGrid", [ "$rootScope", "wijUtil", function ($rootScope, wijUtil) {  return {
    restrict: "E",
    replace: true,
    transclude: true,
    template: "<table ng-transclude/>",
    scope: {
      data: "=",          // List of items to bind to.
      allowEditing: "@",  // Whether user can edit the grid.
      afterCellEdit: "&", // Event that fires after cell edits.
      allowWrapping: "@", // Whether text should wrap within cells.
      frozenColumns: "@"  // Number of non-scrollable columns    },
    controller: ["$scope", function ($scope) {
      $scope.columns = [];      this.addColumn = function (column) {
        $scope.columns.push(column);
      }
    }],
    link: function (scope, element, attrs) {      // omitted for brevity, see full source here:
      // http://jsfiddle.net/Wijmo/jmp47/    }
  }
}]);
关于controller 方法使用前文中提到的数组语法声明,在这个例子中,controller定义了addColumn 方法,它将会被"wij-grid-column" 指令调用。父指令会通过特定标记来访问列。
以下是"wij-grid-column" 指令的使用方法:
app.directive("wijGridColumn", function () {  return {
    require: "^wijGrid",
    restrict: "E",
    replace: true,
    template: "<p></p>",
    scope: {
      binding: "@",     // Property shown in this column.
      header: "@",      // Column header content.
      format: "@",      // Format used to display numeric values in this column.
      width: "@",       // Column width in pixels.
      aggregate: "@",   // Aggregate to display in group header rows.
      group: "@",       // Whether items should be grouped by the values in this column.
      groupHeader: "@"  // Text to display in the group header rows.    },
    link: function (scope, element, attrs, wijGrid) {
      wijGrid.addColumn(scope);
    }
  }
});
require 成员用于指定"wij-grid-column" 指令的父级指令"wij-grid"。link 方法接收父指令的引用 (controller) ,同时通过addColumn 方法传递自身的scope 给父指令。scope 包含了表格用于创建列的所有信息。
更多指令
链接为一些AngularJS 指令的在线实例: http://wijmo.gcpowertools.com.cn/demo/AngularExplorer/ ,你可以在例子的基础上进行练习。例子都是严格的安照本文中的描述制作的,所以你可以无障碍学习他们。
本篇文章到这就结束了(想看更多就到PHP中文网AngularJS使用手册中学习),有问题的可以在下方留言提问。
以上是AngularJS的指令怎么使用?angularjs的指令使用详情(附代码实例)的详细内容。更多信息请关注PHP中文网其他相关文章!
 2022年最新5款的angularjs教程从入门到精通Jun 15, 2017 pm 05:50 PM
Javascript 是一个非常有个性的语言. 无论是从代码的组织, 还是代码的编程范式, 还是面向对象理论都独具一格. 而很早就在争论的Javascript 是不是面向对象语言这个问题, 显然已有答案. 但是, 即使 Javascript 叱咤风云二十年, 如果想要看懂 jQuery, Angularjs, 甚至是 React 等流行框架, 观看《黑马云课堂JavaScript 高级框架设计视频教程》就对了。
 使用PHP和AngularJS搭建一个响应式网站,提供优质的用户体验Jun 27, 2023 pm 07:37 PM
在如今信息时代,网站已经成为人们获取信息和交流的重要工具。一个响应式的网站能够适应各种设备,为用户提供优质的体验,成为了现代网站开发的热点。本篇文章将介绍如何使用PHP和AngularJS搭建一个响应式网站,从而提供优质的用户体验。PHP介绍PHP是一种开源的服务器端编程语言,非常适用于Web开发。PHP具有很多优点,如易于学习、跨平台、丰富的工具库、开发效
 使用PHP和AngularJS构建Web应用May 27, 2023 pm 08:10 PM
随着互联网的不断发展,Web应用已成为企业信息化建设的重要组成部分,也是现代化工作的必要手段。为了使Web应用能够便于开发、维护和扩展,开发人员需要选择适合自己开发需求的技术框架和编程语言。PHP和AngularJS是两种非常流行的Web开发技术,它们分别是服务器端和客户端的解决方案,通过结合使用可以大大提高Web应用的开发效率和使用体验。PHP的优势PHP
 使用Flask和AngularJS构建单页Web应用程序Jun 17, 2023 am 08:49 AM
随着Web技术的飞速发展,单页Web应用程序(SinglePageApplication,SPA)已经成为一种越来越流行的Web应用程序模型。相比于传统的多页Web应用程序,SPA的最大优势在于用户感受更加流畅,同时服务器端的计算压力也大幅减少。在本文中,我们将介绍如何使用Flask和AngularJS构建一个简单的SPA。Flask是一款轻量级的Py
 如何使用PHP和AngularJS进行前端开发May 11, 2023 pm 05:18 PM
随着互联网的普及和发展,前端开发已变得越来越重要。作为前端开发人员,我们需要了解并掌握各种开发工具和技术。其中,PHP和AngularJS是两种非常有用和流行的工具。在本文中,我们将介绍如何使用这两种工具进行前端开发。一、PHP介绍PHP是一种流行的开源服务器端脚本语言,它适用于Web开发,可以在Web服务器和各种操作系统上运行。PHP的优点是简单、快速、便
 使用PHP和AngularJS开发一个在线文件管理平台,方便文件管理Jun 27, 2023 pm 01:34 PM
随着互联网的普及,越来越多的人在使用网络进行文件传输和共享。然而,由于各种原因,使用传统的FTP等方式进行文件管理无法满足现代用户的需求。因此,建立一个易用、高效、安全的在线文件管理平台已成为了一种趋势。本文介绍的在线文件管理平台,基于PHP和AngularJS,能够方便地进行文件上传、下载、编辑、删除等操作,并且提供了一系列强大的功能,例如文件共享、搜索、
 如何在PHP编程中使用AngularJS?Jun 12, 2023 am 09:40 AM
随着Web应用程序的普及,前端框架AngularJS变得越来越受欢迎。AngularJS是一个由Google开发的JavaScript框架,它可以帮助你构建具有动态Web应用程序功能的Web应用程序。另一方面,对于后端编程,PHP是非常受欢迎的编程语言。如果您正在使用PHP进行服务器端编程,那么结合AngularJS使用PHP将可以为您的网站带来更多的动态效


热AI工具

Undresser.AI Undress
人工智能驱动的应用程序,用于创建逼真的裸体照片

AI Clothes Remover
用于从照片中去除衣服的在线人工智能工具。

Undress AI Tool
免费脱衣服图片

Clothoff.io
AI脱衣机

AI Hentai Generator
免费生成ai无尽的。

热门文章

热工具

ZendStudio 13.5.1 Mac
功能强大的PHP集成开发环境

EditPlus 中文破解版
体积小,语法高亮,不支持代码提示功能

螳螂BT
Mantis是一个易于部署的基于Web的缺陷跟踪工具,用于帮助产品缺陷跟踪。它需要PHP、MySQL和一个Web服务器。请查看我们的演示和托管服务。

SublimeText3 Linux新版
SublimeText3 Linux最新版

mPDF
mPDF是一个PHP库,可以从UTF-8编码的HTML生成PDF文件。原作者Ian Back编写mPDF以从他的网站上“即时”输出PDF文件,并处理不同的语言。与原始脚本如HTML2FPDF相比,它的速度较慢,并且在使用Unicode字体时生成的文件较大,但支持CSS样式等,并进行了大量增强。支持几乎所有语言,包括RTL(阿拉伯语和希伯来语)和CJK(中日韩)。支持嵌套的块级元素(如P、DIV),


