本篇文章给大家带来的内容是关于Vue的生命周期及源码实现(代码) ,有一定的参考价值,有需要的朋友可以参考一下,希望对你有所帮助。
通过学习,我们已经学会了Vue的所有基础语法,包括:
1、{{Mustache}} 语法
2、v-if、v-else、v-else-if、v-show
3、v-for
4、v-bind
5、v-model
6、v-on
如果大家已经对这些语法牢记于心了,那么请继续往下看,如果大家对这些语法掌握的并不是很熟练的话,那么希望大家再去回顾一下前面的内容。
这一章我们学习Vue的生命周期,我们先来看一下Vue的生命周期的定义。
每个 Vue 实例在被创建时都要经过一系列的初始化过程——例如,需要设置数据监听、编译模板、将实例挂载到 DOM 并在数据变化时更新 DOM 等。同时在这个过程中也会运行一些叫做生命周期钩子的函数,这给了用户在不同阶段添加自己的代码的机会。
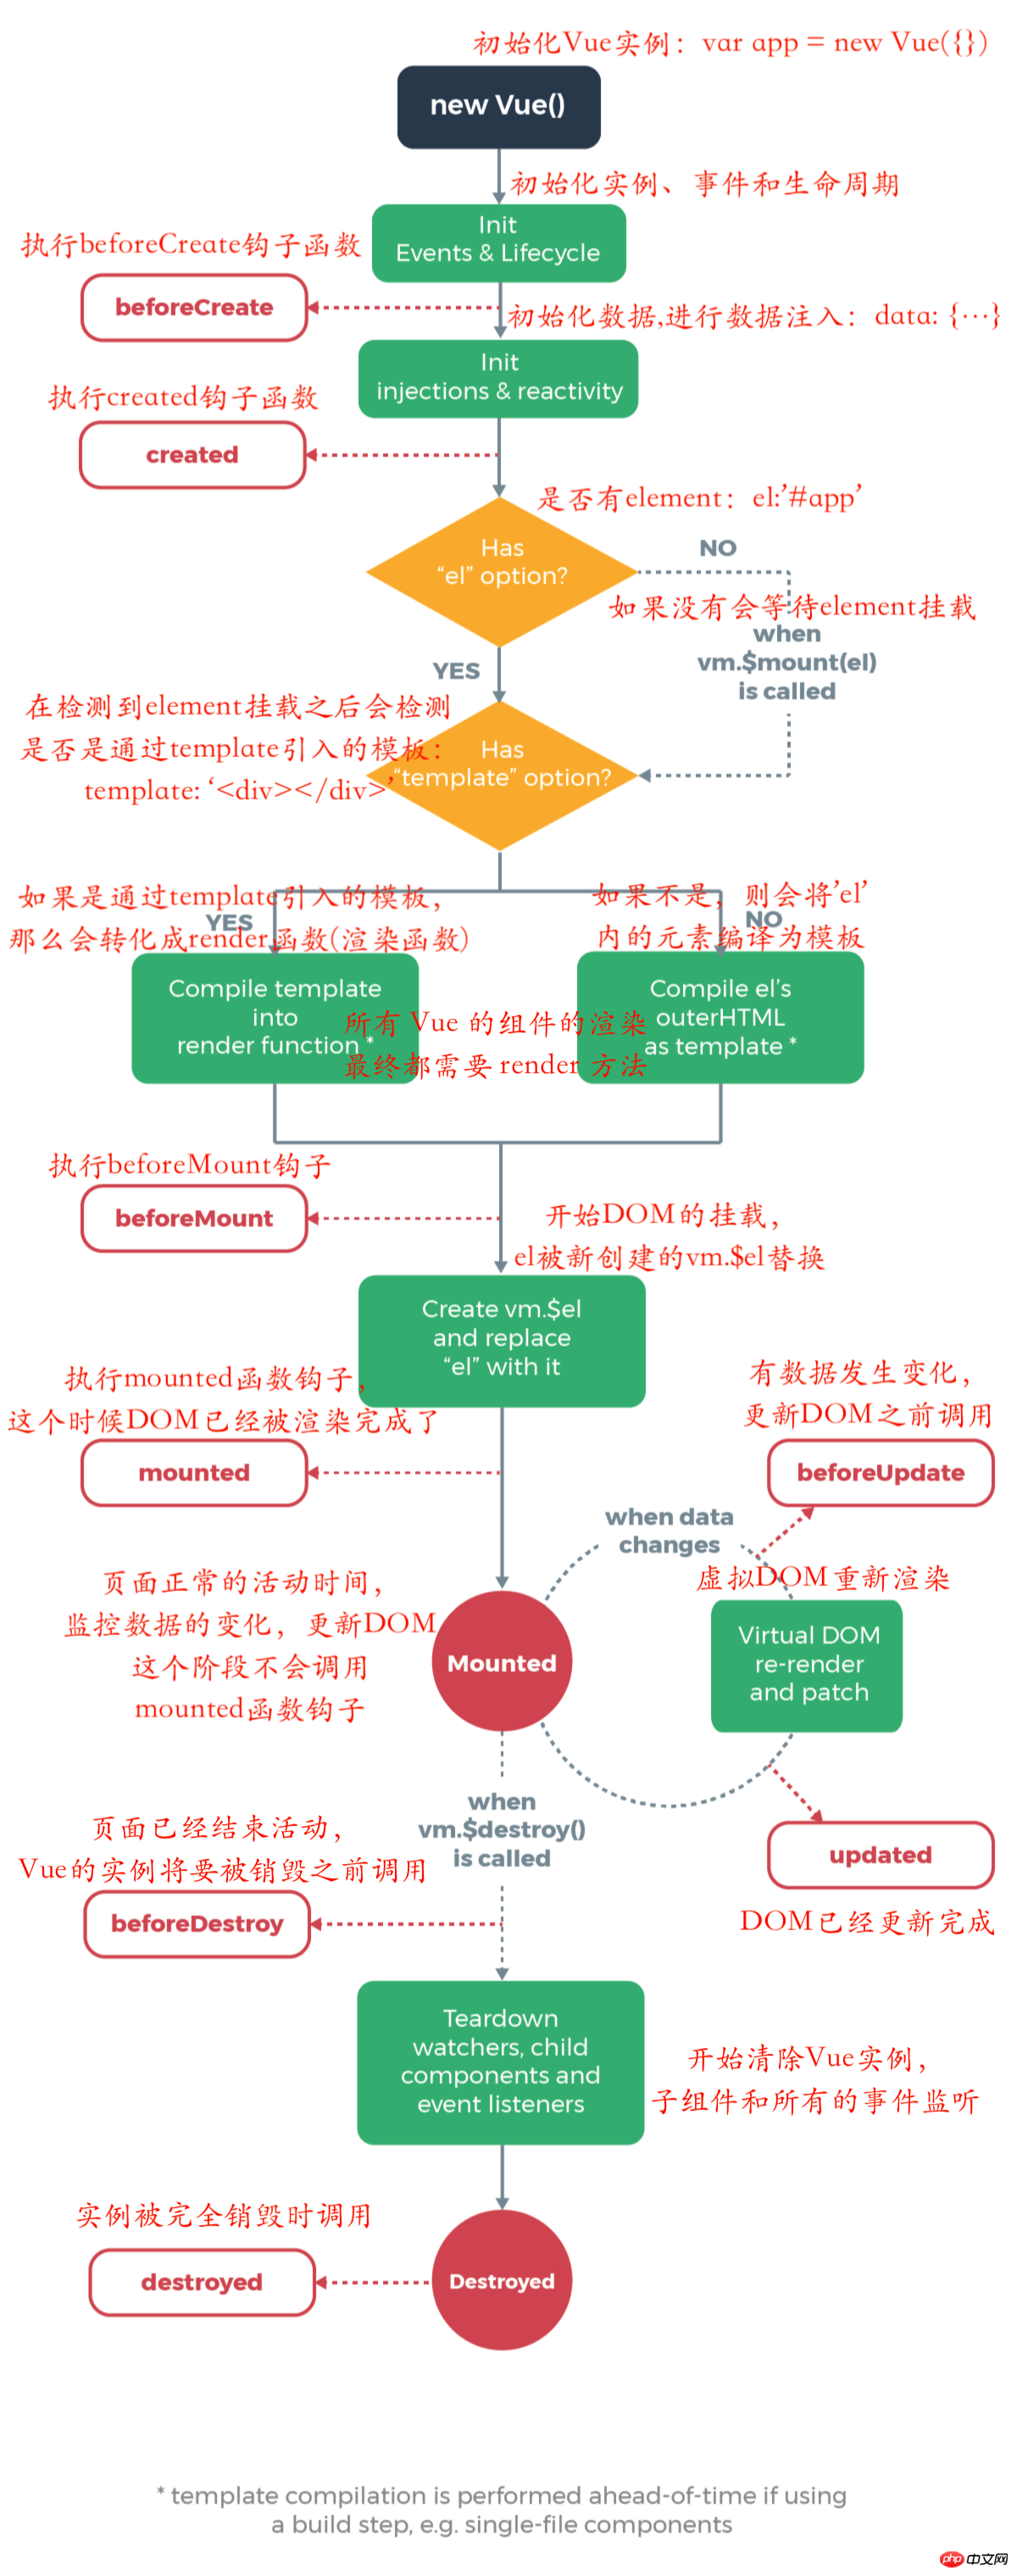
这是Vue官网上提供的描述信息,简单来说就是:在Vue从创建实例到最终完全消亡的过程中,会执行一系列的方法,用于对应当前Vue的状态,这些方法我们叫它:生命周期钩子。我们看一下下面的生命周期图示:

在上面的图示中,共展示出来8个生命周期钩子函数,这8个函数就描绘出来了Vue整个的运行周期。而截止到目前的Vue版本-2.5.16。Vue的声明周期钩子总共为11个,除去刚才的8个之外,还有3个关于组件的生命周期钩子。我们看一下所有的钩子函数解释,配合上面的图示,可以更好地理解Vue的运行周期。
1、beforeCreate:在实例初始化之后,数据观测 (data observer) 和 event/watcher 事件配置之前被调用。
2、created:在实例创建完成后被立即调用。在这一步,实例已完成以下的配置:数据观测 (data observer),属性和方法的运算,watch/event 事件回调。然而,挂载阶段还没开始,$el 属性目前不可见。
3、beforeMount:在挂载开始之前被调用:相关的 render 函数首次被调用。
4、mounted:el 被新创建的 vm.$el 替换,并挂载到实例上去之后调用该钩子。如果 root 实例挂载了一个文档内元素,当 mounted 被调用时 vm.$el 也在文档内(PS:注意 mounted 不会承诺所有的子组件也都一起被挂载。如果你希望等到整个视图都渲染完毕,可以用 vm.$nextTick 替换掉 mounted:)。vm.$nextTick会在后面的章节详细讲解,这里大家需要知道有这个东西。
5、beforeUpdate:数据更新时调用,发生在虚拟 DOM 打补丁之前。这里适合在更新之前访问现有的 DOM,比如手动移除已添加的事件监听器。
6、updated:由于数据更改导致的虚拟 DOM 重新渲染和打补丁,在这之后会调用该钩子。当这个钩子被调用时,组件 DOM 已经更新,所以你现在可以执行依赖于 DOM 的操作。然而在大多数情况下,你应该避免在此期间更改状态。如果要相应状态改变,通常最好使用计算属性或 watcher 取而代之(PS:计算属性与watcher会在后面的章节进行介绍)。
7、activated:keep-alive 组件激活时调用(PS:与组件相关,关于keep-alive会在讲解组件的时候为大家介绍)。
8、deactivated:keep-alive 组件停用时调用(PS:与组件相关,关于keep-alive会在讲解组件的时候为大家介绍)。
9、beforeDestroy:实例销毁之前调用。在这一步,实例仍然完全可用。
10、destroyed:Vue 实例销毁后调用。调用后,Vue 实例指示的所有东西都会解绑定,所有的事件监听器会被移除,所有的子实例也会被销毁。
11、errorCaptured(2.5.0+ 新增):当捕获一个来自子孙组件的错误时被调用。此钩子会收到三个参数:错误对象、发生错误的组件实例以及一个包含错误来源信息的字符串。此钩子可以返回 false 以阻止该错误继续向上传播。
这就是Vue(2.5.16)中所有的生命周期钩子,为了更方便大家的理解,我们来看一下,在Vue的代码中,从创建到销毁是如何在实现的。大家可以点击这里来下载Vue的最新代码。
我们先大致看一下Vue源代码的基础结构。
.
├── BACKERS.md ├── LICENSE
├── README.md├── benchmarks
├── dist
├── examples
├── flow
├── node_modules
├── package.json├── packages
├── scripts
├── src
├── test
├── types
└── yarn.lock
这是下载下来代码之后的一级目录,dist文件夹下为Vue编译之后的代码,我们平时引入的Vue.js文件都在这里,Vue使用了flow作为JavaScript静态类型检查工具,相关的代码都在flow文件夹下面,scripts文件夹下面是代码构建的相关配置,Vue主要使用Rollup进行的代码构建,src文件夹下面就是所有Vue的源代码。我们这里不对其他的内容进行过多的描述,还是专注于我们的主题,Vue的声明周期代码是如何实现,我们看一下src文件夹。
.
├── compiler :Vue编译相关
├── core    :Vue的核心代码
├── platforms   :web/weex平台支持,入口文件
├── server  :服务端
├── sfc :解析.vue文件
└── shared  :公共代码
这是我们src文件夹下的目录结构,而我们Vue生成的地方就在/src/core/instance/index.js中。
function Vue (options) {
  if (process.env.NODE_ENV !== 'production' &&
    !(this instanceof Vue)
  ) {
    warn('Vue is a constructor and should be called with the `new` keyword')
  }  this._init(options)
}我们可以看到:Vue是一个方法,是一个使用Function来实现的构造函数,所以我们只能通过 new 的方式来去创建Vue的实例。然后通过Vue实例的_init方法来进行Vue的初始化。_init是Vue通过prototype来实现的一个原型属性。我们来看一下他的_init方法实现。
在/src/core/instance/init.js文件夹下,Vue实现了_init方法
Vue.prototype._init = function (options?: Object) {    ...
    // expose real self
    vm._self = vm
    initLifecycle(vm)
    initEvents(vm)
    initRender(vm)
    callHook(vm, 'beforeCreate')
    initInjections(vm) // resolve injections before data/props
    initState(vm)
    initProvide(vm) // resolve provide after data/props
    callHook(vm, 'created')    ...
    if (vm.$options.el) {
      vm.$mount(vm.$options.el)
    }
}我主要看与它生命周期有关的代码,我们可以看到,Vue先调用了initLifecycle(vm)、initEvents(vm)、initRender(vm)这三个方法,用于初始化生命周期、事件、渲染函数,这些过程发生在Vue初始化的过程(_init方法)中,并在调用beforeCreate钩子之前。
然后Vue通过callHook (vm: Component, hook: string)方法来去调用钩子函数(hook),它接收vm(Vue实例对象),hook(钩子函数名称)来去执行生命周期函数。在Vue中几乎所有的钩子(errorCaptured除外)函数执行都是通过callHook (vm: Component, hook: string)来调用的。我们来看一下callHook的代码,在/src/core/instance/lifecycle.js下:
export function callHook (vm: Component, hook: string) {
// #7573 disable dep collection when invoking lifecycle hooks
pushTarget() const handlers = vm.$options[hook]
if (handlers) {
for (let i = 0, j = handlers.length; i < j; i++) {
try {
handlers[i].call(vm)
} catch (e) {
handleError(e, vm, `${hook} hook`)
}
}
} if (vm._hasHookEvent) {
vm.$emit('hook:' + hook)
}
popTarget()
}它的逻辑也非常简单,根据传入的hook从实例中拿到对应的回调函数数组(在/packages/vue-template-compiler/browser.js下的LIFECYCLE_HOOKS),然后便利执行。
然后在初始化生命周期、事件、渲染函数之后调用了beforeCreate钩子,在这个时候:我们还没有办法获取到data、props等数据。
在调用了beforeCreate钩子之后,Vue调用了initInjections(vm)、initState(vm)、initProvide(vm)这三个方法用于初始化data、props、watcher等等,在这些初始化执行完成之后,调用了created钩子函数,在这个时候:我们已经可以获取到data、props等数据了,但是Vue并没有开始渲染DOM,所以我们还不能够访问DOM(PS:我们可以通过vm.$nextTick来访问,在后面的章节我们会详细讲解)。
在调用了created钩子之后,Vue开始进行DOM的挂载,执行vm.$mount(vm.$options.el),在Vue中DOM的挂载就是通过Vue.prototype.$mount这个原型方法来去实现的。Vue.prototype.$mount原型方法的声明是在/src/platforms/web/entry-runtime-with-compiler.js,我们看一下这个代码的实现:
const mount = Vue.prototype.$mount
Vue.prototype.$mount = function (
el?: string | Element,
hydrating?: boolean
): Component {
el = el && query(el)
/* istanbul ignore if */
if (el === document.body || el === document.documentElement) {
process.env.NODE_ENV !== 'production' && warn(
`Do not mount Vue to <html> or <body> - mount to normal elements instead.`
) return this
} const options = this.$options
// resolve template/el and convert to render function
if (!options.render) {
let template = options.template
if (template) {
if (typeof template === 'string') {
if (template.charAt(0) === '#') {
template = idToTemplate(template)
/* istanbul ignore if */
if (process.env.NODE_ENV !== 'production' && !template) {
warn(
`Template element not found or is empty: ${options.template}`, this
)
}
}
} else if (template.nodeType) {
template = template.innerHTML
} else { if (process.env.NODE_ENV !== 'production') {
warn('invalid template option:' + template, this)
} return this
}
} else if (el) {
template = getOuterHTML(el)
} if (template) {
/* istanbul ignore if */
if (process.env.NODE_ENV !== 'production' && config.performance && mark) {
mark('compile')
}
const { render, staticRenderFns } = compileToFunctions(template, {
shouldDecodeNewlines,
shouldDecodeNewlinesForHref,
delimiters: options.delimiters,
comments: options.comments
}, this)
options.render = render
options.staticRenderFns = staticRenderFns
/* istanbul ignore if */
if (process.env.NODE_ENV !== 'production' && config.performance && mark) {
mark('compile end')
measure(`vue ${this._name} compile`, 'compile', 'compile end')
}
}
} return mount.call(this, el, hydrating)
}
/**
* Get outerHTML of elements, taking care
* of SVG elements in IE as well.
*/function getOuterHTML (el: Element): string {
if (el.outerHTML) {
return el.outerHTML
} else {
const container = document.createElement('p')
container.appendChild(el.cloneNode(true))
return container.innerHTML
}
}这一部分代码的主要作用:就是进行template模板的解析。从上面的代码中可以看出,el不允许被挂载到body和html这样的根标签上面。然后判断是否有render函数 -> if (!options.render) {...},然后判断有没有template,template可以是string类型的id、DOM节点。没有的话则解析el作为template。由上面的代码可以看出我们无论是使用单文件组件(.Vue)或是通过el、template属性,它最终都会通过render函数的形式来进行整个模板的解析。
由我们的图示可以看出模板解析完成之后,会调用beforeMount钩子,那么这个beforeMount钩子是在哪里被调用的呢?我们接着往下看。$mount原型方法有一个可复用的设计,在/src/platforms/web/runtime/index.js下,有这么一段代码
// public mount method
Vue.prototype.$mount = function (
  el?: string | Element,
  hydrating?: boolean
): Component {
  el = el && inBrowser ? query(el) : undefined
  return mountComponent(this, el, hydrating)
}这是一个公共的挂载方法,目的是为了被runtime only版本的Vue直接使用,它调用了mountComponent方法。我们看一下mountComponent方法的实现,实现在/src/core/instance/lifecycle.js下。
export function mountComponent (
  vm: Component,
  el: ?Element,
  hydrating?: boolean
): Component {
  vm.$el = el
  if (!vm.$options.render) {
    vm.$options.render = createEmptyVNode
    if (process.env.NODE_ENV !== 'production') {
    /* istanbul ignore if */
      if ((vm.$options.template && vm.$options.template.charAt(0) !== '#') ||
        vm.$options.el || el) {
        warn(
        'You are using the runtime-only build of Vue where the template ' +
        'compiler is not available. Either pre-compile the templates into ' +
        'render functions, or use the compiler-included build.',
          vm
        )
      } else {
        warn(
        'Failed to mount component: template or render function not defined.',
          vm
        )
      }
    }
  }
  callHook(vm, 'beforeMount')

  let updateComponent
  /* istanbul ignore if */
  if (process.env.NODE_ENV !== 'production' && config.performance && mark) {
    updateComponent = () => {
    const name = vm._name
    const id = vm._uid
    const startTag = `vue-perf-start:${id}`
    const endTag = `vue-perf-end:${id}`

      mark(startTag)
      const vnode = vm._render()
      mark(endTag)
      measure(`vue ${name} render`, startTag, endTag)

      mark(startTag)
      vm._update(vnode, hydrating)
      mark(endTag)
      measure(`vue ${name} patch`, startTag, endTag)
    }
  } else {
    updateComponent = () => {
      vm._update(vm._render(), hydrating)
    }
  }
  // we set this to vm._watcher inside the watcher's constructor
  // since the watcher's initial patch may call $forceUpdate (e.g. inside child
  // component's mounted hook), which relies on vm._watcher being already defined
  new Watcher(vm, updateComponent, noop, null, true /* isRenderWatcher */)
  hydrating = false

  // manually mounted instance, call mounted on self
  // mounted is called for render-created child components in its inserted hook
  if (vm.$vnode == null) {
    vm._isMounted = true
    callHook(vm, 'mounted')
  }
  return vm
}由上面的代码可以看出在执行vm._render()之前,调用了callHook(vm, 'beforeMount'),这个时候相关的 render 函数首次被调用,调用完成之后,执行了callHook(vm, 'mounted')方法,标记着el 被新创建的 vm.$el 替换,并被挂载到实例上。
然后就进入了我们页面正常交互的时间,也就是beforeUpdate和updated这两个回调钩子的执行时机。这两个钩子函数是在数据更新的时候进行回调的函数,Vue在/src/core/instance/lifecycle.js文件下有一个_update的原型声明:
Vue.prototype._update = function (vnode: VNode, hydrating?: boolean) {
    const vm: Component = this
    if (vm._isMounted) {
      callHook(vm, 'beforeUpdate')
    }    const prevEl = vm.$el
    const prevVnode = vm._vnode
    const prevActiveInstance = activeInstance
    activeInstance = vm
    vm._vnode = vnode
    // Vue.prototype.__patch__ is injected in entry points
    // based on the rendering backend used.
    if (!prevVnode) {
    // initial render
      vm.$el = vm.__patch__(
        vm.$el, vnode, hydrating, false
        /* removeOnly */,
        vm.$options._parentElm,
        vm.$options._refElm
      )
      // no need for the ref nodes after initial patch
      // this prevents keeping a detached DOM tree in memory (#5851)
      vm.$options._parentElm = vm.$options._refElm = null
    } else {
    // updates
      vm.$el = vm.__patch__(prevVnode, vnode)
    }
    activeInstance = prevActiveInstance
    // update __vue__ reference
    if (prevEl) {
      prevEl.__vue__ = null
    }    if (vm.$el) {
      vm.$el.__vue__ = vm
    }
    // if parent is an HOC, update its $el as well
    if (vm.$vnode && vm.$parent && vm.$vnode === vm.$parent._vnode) {
      vm.$parent.$el = vm.$el
    }
    // updated hook is called by the scheduler to ensure that children are
    // updated in a parent's updated hook.
}我们可以看到在如果_isMounted为ture的话(DOM已经被挂载)则会调用callHook(vm, 'beforeUpdate')方法,然后会对虚拟DOM进行重新渲染。然后在/src/core/observer/scheduler.js下的flushSchedulerQueue()函数中渲染DOM,在渲染完成调用callHook(vm, 'updated'),代码如下:。
/**
 * Flush both queues and run the watchers.
 */function flushSchedulerQueue () { ...
  callUpdatedHooks(updatedQueue) ...}function callUpdatedHooks (queue) {
  let i = queue.length  while (i--) {
    const watcher = queue[i]
    const vm = watcher.vm
    if (vm._watcher === watcher && vm._isMounted) {
      callHook(vm, 'updated')
    }
  }
}当Vue实例需要进行销毁的时候回调beforeDestroy 、destroyed这两个函数钩子,它们的实现是在/src/core/instance/lifecycle.js下的Vue.prototype.$destroy中:
  Vue.prototype.$destroy = function () {
    const vm: Component = this
    if (vm._isBeingDestroyed) {
    return
    }
    callHook(vm, 'beforeDestroy')
    vm._isBeingDestroyed = true
    // remove self from parent
    const parent = vm.$parent
    if (parent && !parent._isBeingDestroyed && !vm.$options.abstract) {
      remove(parent.$children, vm)
    }
    // teardown watchers
    if (vm._watcher) {
      vm._watcher.teardown()
    }
    let i = vm._watchers.length
    while (i--) {
      vm._watchers[i].teardown()
    }
    // remove reference from data ob
    // frozen object may not have observer.
    if (vm._data.__ob__) {
      vm._data.__ob__.vmCount--
    }
    // call the last hook...
    vm._isDestroyed = true
    // invoke destroy hooks on current rendered tree
    vm.__patch__(vm._vnode, null)
    // fire destroyed hook
    callHook(vm, 'destroyed')
    // turn off all instance listeners.
    vm.$off()
    // remove __vue__ reference
    if (vm.$el) {
      vm.$el.__vue__ = null
    }
    // release circular reference (#6759)
    if (vm.$vnode) {
      vm.$vnode.parent = null
    }
}在$destroy这个原型函数中,执行了Vue的销毁操作,我们可以看到在执行销毁操作之前调用了callHook(vm, 'beforeDestroy'),然后执行了一系列的销毁操作,包括删除掉所有的自身(self)、_watcher、数据引用等等,删除完成之后调用callHook(vm, 'destroyed')。
截止到这里,整个Vue生命周期图示中的所有生命周期钩子都已经被执行完成了。那么剩下的activated、deactivated、errorCaptured这三个钩子函数是在何时被执行的呢?我们知道这三个函数都是针对于组件(component)的钩子函数。其中activated、deactivated这两个钩子函数分别是在keep-alive 组件激活和停用之后回调的,它们不牵扯到整个Vue的生命周期之中,activated、deactivated这两个钩子函数的实现代码都在/src/core/instance/lifecycle.js下:
export function activateChildComponent (vm: Component, direct?: boolean) {
if (direct) {
vm._directInactive = false
if (isInInactiveTree(vm)) {
return
}
} else if (vm._directInactive) {
return
} if (vm._inactive || vm._inactive === null) {
vm._inactive = false
for (let i = 0; i < vm.$children.length; i++) {
activateChildComponent(vm.$children[i])
}
callHook(vm, 'activated')
}
}
export function deactivateChildComponent (vm: Component, direct?: boolean) {
if (direct) {
vm._directInactive = true
if (isInInactiveTree(vm)) { return
}
} if (!vm._inactive) {
vm._inactive = true
for (let i = 0; i < vm.$children.length; i++) {
deactivateChildComponent(vm.$children[i])
}
callHook(vm, 'deactivated')
}
}而对于errorCaptured来说,它是在2.5.0之后新增的一个钩子函数,它的代码在/src/core/util/error.js中:
export function handleError (err: Error, vm: any, info: string) {
if (vm) { let cur = vm while ((cur = cur.$parent)) {
const hooks = cur.$options.errorCaptured
if (hooks) {
for (let i = 0; i < hooks.length; i++) {
try {
const capture = hooks[i].call(cur, err, vm, info) === false
if (capture) return
} catch (e) {
globalHandleError(e, cur, 'errorCaptured hook')
}
}
}
}
}
globalHandleError(err, vm, info)
}function globalHandleError (err, vm, info) {
if (config.errorHandler) {
try {
return config.errorHandler.call(null, err, vm, info)
} catch (e) {
logError(e, null, 'config.errorHandler')
}
}
logError(err, vm, info)
}function logError (err, vm, info) {
if (process.env.NODE_ENV !== 'production') {
warn(`Error in ${info}: "${err.toString()}"`, vm)
} /* istanbul ignore else */
if ((inBrowser || inWeex) && typeof console !== 'undefined') {
console.error(err)
} else {
throw err
}
}他是唯一一个没有通过callHook方法来执行的钩子函数,而是直接通过遍历cur(vm).$options.errorCaptured,来执行config.errorHandler.call(null, err, vm, info)的钩子函数。整个逻辑的结构与callHook使非常类似的。
截止到目前Vue中所有的生命周期钩子我们都已经介绍完成了,其中涉及到了一些源码的基础,是因为我觉得配合源码来一起看的话,会对整个Vue的运行过程有个更好的理解。大家一定要下载下来Vue的源代码,对照着我们的讲解来走一遍这个流程。
相关推荐:
以上是Vue的生命周期及源码实现(代码)的详细内容。更多信息请关注PHP中文网其他相关文章!
 Web Speech API开发者指南:它是什么以及如何工作Apr 11, 2023 pm 07:22 PM
译者 | 李睿审校 | 孙淑娟Web Speech API是一种Web技术,允许用户将语音数据合并到应用程序中。它可以通过浏览器将语音转换为文本,反之亦然。Web Speech API于2012年由W3C社区引入。而在十年之后,这个API仍在开发中,这是因为浏览器兼容性有限。该API既支持短时输入片段,例如一个口头命令,也支持长时连续的输入。广泛的听写能力使它非常适合与Applause应用程序集成,而简短的输入很适合语言翻译。语音识别对可访问性产生了巨大的影响。残疾用户可以使用语音更轻松地浏览
 如何使用Docker部署Java Web应用程序Apr 25, 2023 pm 08:28 PM
docker部署javaweb系统1.在root目录下创建一个路径test/appmkdirtest&&cdtest&&mkdirapp&&cdapp2.将apache-tomcat-7.0.29.tar.gz及jdk-7u25-linux-x64.tar.gz拷贝到app目录下3.解压两个tar.gz文件tar-zxvfapache-tomcat-7.0.29.tar.gztar-zxvfjdk-7u25-linux-x64.tar.gz4.对解
 web端是什么意思Apr 17, 2019 pm 04:01 PM
web端指的是电脑端的网页版。在网页设计中我们称web为网页,它表现为三种形式,分别是超文本(hypertext)、超媒体(hypermedia)和超文本传输协议(HTTP)。
 web前端和后端开发有什么区别Jan 29, 2023 am 10:27 AM
区别:1、前端指的是用户可见的界面,后端是指用户看不见的东西,考虑的是底层业务逻辑的实现,平台的稳定性与性能等。2、前端开发用到的技术包括html5、css3、js、jquery、Bootstrap、Node.js、Vue等;而后端开发用到的是java、php、Http协议等服务器技术。3、从应用范围来看,前端开发不仅被常人所知,且应用场景也要比后端广泛的太多太多。
 深入探讨“高并发大流量”访问的解决思路和方案May 11, 2022 pm 02:18 PM
怎么解决高并发大流量问题?下面本篇文章就来给大家分享下高并发大流量web解决思路及方案,希望对大家有所帮助!
 web前端打包工具有哪些Aug 23, 2022 pm 05:31 PM
web前端打包工具有:1、Webpack,是一个模块化管理工具和打包工具可以将不同模块的文件打包整合在一起,并且保证它们之间的引用正确,执行有序;2、Grunt,一个前端打包构建工具;3、Gulp,用代码方式来写打包脚本;4、Rollup,ES6模块化打包工具;5、Parcel,一款速度极快、零配置的web应用程序打包器;6、equireJS,是一个JS文件和模块加载器。
 Python轻量级Web框架:Bottle库!Apr 13, 2023 pm 02:10 PM
和它本身的轻便一样,Bottle库的使用也十分简单。相信在看到本文前,读者对python也已经有了简单的了解。那么究竟何种神秘的操作,才能用百行代码完成一个服务器的功能?让我们拭目以待。1. Bottle库安装1)使用pip安装2)下载Bottle文件https://github.com/bottlepy/bottle/blob/master/bottle.py2.“HelloWorld!”所谓万事功成先HelloWorld,从这个简单的示例中,了解Bottle的基本机制。先上代码:首先我们从b
 ASGI解释:Python Web开发的未来Apr 12, 2023 pm 10:37 PM
译者 | 李睿审校 | 孙淑娟Python Web应用程序长期以来一直遵循Web服务器网关接口(WSGI)标准,该标准描述了它们如何与Web服务器通信。WSGI最初于2003年推出,并于2010年更新,仅依赖于Python2.2版本中原生可用的、易于实现的功能。因此, WSGI迅速融入了所有主要的Python Web框架,并成为Python Web开发的基石。快进到2022年。Python2已经过时,Python现在具有处理网络调用等异步操作的原生语法。WSGI和其他默认假定同步行为的标准无法


热AI工具

Undresser.AI Undress
人工智能驱动的应用程序,用于创建逼真的裸体照片

AI Clothes Remover
用于从照片中去除衣服的在线人工智能工具。

Undress AI Tool
免费脱衣服图片

Clothoff.io
AI脱衣机

AI Hentai Generator
免费生成ai无尽的。

热门文章

热工具

Dreamweaver CS6
视觉化网页开发工具

记事本++7.3.1
好用且免费的代码编辑器

安全考试浏览器
Safe Exam Browser是一个安全的浏览器环境,用于安全地进行在线考试。该软件将任何计算机变成一个安全的工作站。它控制对任何实用工具的访问,并防止学生使用未经授权的资源。

SublimeText3 英文版
推荐:为Win版本,支持代码提示!

ZendStudio 13.5.1 Mac
功能强大的PHP集成开发环境


