本篇文章给大家带来的内容是关于如何用纯CSS实现接扎啤的特效(附源码) ,有一定的参考价值,有需要的朋友可以参考一下,希望对你有所帮助。
效果预览
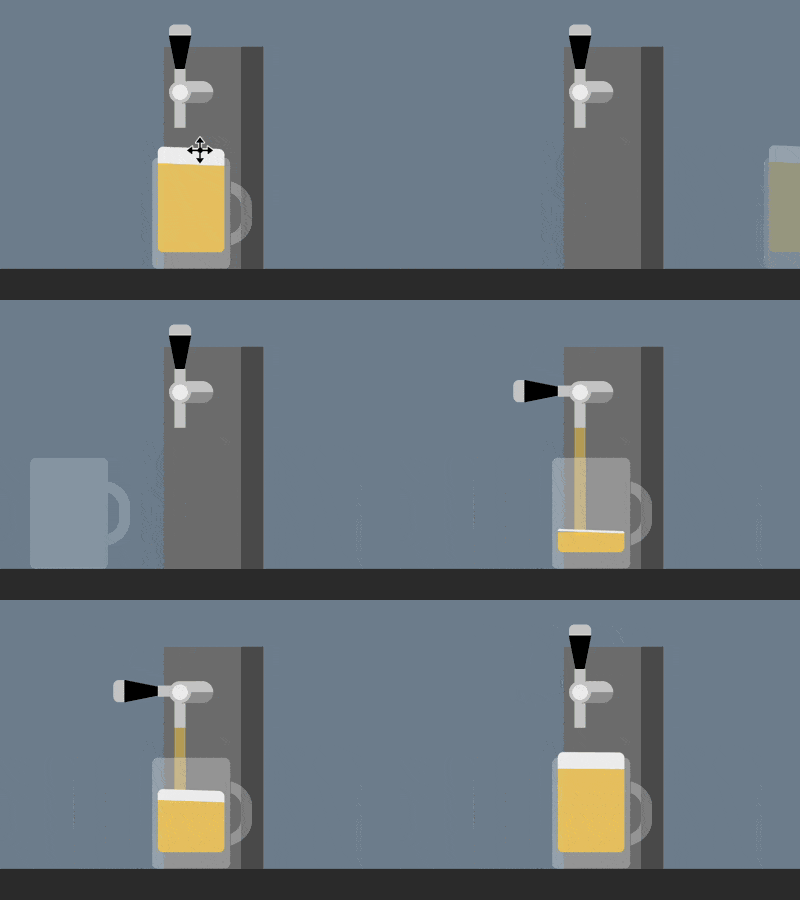
源代码下载
https://github.com/comehope/front-end-daily-challenges
代码解读
定义 dom,容器中包含一个表示酒桶的 .keg 元素和表示啤酒杯的 .glass 元素。酒桶有 2 个子元素,.handle 表示把手,.pipe 表示出水管,酒杯有 1 个表示啤酒的子元素 .beer:
<div class="container">
    <div class="keg">
        <span class="handle"></span>
        <span class="pipe"></span>
    </div>
    <div class="glass">
        <span class="beer"></span>
    </div>
</div>
居中显示:
body {
    margin: 0;
    height: 100vh;
    display: flex;
    justify-content: center;
    background: linear-gradient(
        lightslategray 300px,
        #333 300px
    );
}
定义容器尺寸和伪元素的共有属性:
.container {
    width: 700px;
    height: 300px;
    position: relative;
}

.container *::before,
.container *::after {
    content: '';
    position: absolute;
}
画出酒桶:
.keg {
    position: absolute;
    width: 90px;
    height: 200px;
    background: linear-gradient(
        to right,
        #777 70px,
        #555 70px
    );
    bottom: 0;
    left: 310px;
}
画出出水管和它的支架:
.keg .pipe {
    position: absolute;
    width: 10px;
    height: 40px;
    background-color: #ccc;
    top: 33px;
    left: 10px;
}

.keg .pipe::before {
    width: 40px;
    height: 20px;
    background:
        radial-gradient(
            circle at 10px 10px,
            #eee 7px,
            #ccc 7px, #ccc 10px,
            transparent 10px
        ),
        linear-gradient(
            #ccc 50%,
            #999 50%
        );
    border-radius: 10px;
    top: -2px;
    left: -5px;
}
画出把手:
.keg .handle {
    position: absolute;
    border-style: solid;
    border-width: 50px 10px 0 10px;
    border-color: black transparent transparent transparent;
    top: -10px;
    left: 5px;
}

.keg .handle::before {
    width: 20px;
    height: 10px;
    background-color: #ccc;
    top: -60px;
    left: -10px;
    border-radius: 5px 5px 0 0;
}

.keg .handle::after {
    width: 10px;
    height: 20px;
    background-color: #ccc;
    top: -20px;
    left: -5px;
}
画出酒杯:
.glass {
    position: absolute;
    width: 70px;
    height: 100px;
    color: rgba(255, 255, 255, 0.3);
    background-color: currentColor;
    bottom: 0;
    left: 300px;
    border-radius: 5px;
}

.glass::before {
    width: 50px;
    height: 40px;
    border: 10px solid;
    top: 20px;
    right: -20px;
    border-radius: 0 40% 40% 0;
    clip-path: inset(0 0 0 72%);
}
画出杯中的啤酒和泡沫:
.beer {
    position: absolute;
    width: 60px;
    height: 80px;
    background-color: rgba(255, 206, 84, 0.8);
    bottom: 15px;
    left: 5px;
    border-radius: 0 0 5px 5px;
    border-top: solid rgba(255, 206, 84, 0.8);
}

.beer::before {
    width: inherit;
    height: 15px;
    background-color: #eee;
    top: -15px;
    border-radius: 5px 5px 0 0;
}
接下来制作动画。
增加酒杯把手被压下的动画效果:
.keg .handle {
    transform-origin: center 50px;
    animation: handle 5s infinite;
}

@keyframes handle {
    10%, 60% {
        transform: rotate(0deg);
    }

    20%, 50% {
        transform: rotate(-90deg);
    }
}
增加啤酒被斟满的动画效果:
.beer {
    animation: fillup 5s infinite;
}

@keyframes fillup {
    0%, 20% {
        height: 0px;
        border-width: 0px;
    }

    40% {
        height: 40px;
    }

    80%, 100% {
        height: 80px;
        border-width: 5px;
    }
}
增加啤酒泡沫泛起的动画效果:
.beer::before {
    animation:
        wave 0.5s infinite alternate,
        fillup-foam 5s linear infinite;
}

@keyframes fillup-foam {
    0%, 20% {
        top: 0;
        height: 0;
    }

    60%, 100% {
        top: -15px;
        height: 15px;
    }
}

@keyframes wave {
    from {
        transform: skewY(-3deg);
    }

    to {
        transform: skewY(3deg);
    }
}
增加啤酒从出水口流出的效果:
.keg .pipe::after {
    width: 10px;
    background-color: rgba(255, 206, 84, 0.5);
    animation: flow 5s infinite;
}

@keyframes flow {
    0%, 15% {
        top: 40px;
        height: 0;
    }

    20% {
        height: 115px;
    }

    40% {
        height: 75px;
    }

    55% {
        top: 40px;
        height: 50px;
    }

    60%, 100% {
        top: 80px;
        height: 0;
    }
}
最后,增加酒杯滑动的效果:
.glass {
    animation: slide 5s ease infinite;
}

@keyframes slide {
    0% {
        left: 0;
        filter: opacity(0);
    }

    20%, 80% {
        left: 300px;
        filter: opacity(1);
    }

    100% {
        left: 600px;
        filter: opacity(0);
    }
}
大功告成!
相关推荐:
如何使用CSS和D3实现一组彩灯(附代码)以上是如何用纯CSS实现接扎啤的特效(附源码)的详细内容。更多信息请关注PHP中文网其他相关文章!
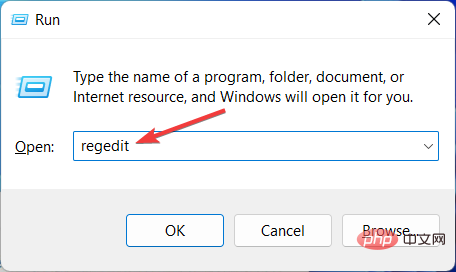 如何加速Windows 11中的动画效果:2种方法解析Apr 24, 2023 pm 04:55 PM
当微软推出Windows11时,它带来了许多变化。其中一项更改是增加了用户界面动画的数量。一些用户想要改变事物的出现方式,他们必须想办法去做。拥有动画让用户感觉更好、更友好。动画使用视觉效果使计算机看起来更具吸引力和响应能力。其中一些包括几秒钟或几分钟后的滑动菜单。计算机上有许多动画会影响PC性能、减慢速度并影响您的工作。在这种情况下,您必须关闭动画。本文将介绍用户可以提高其在PC上的动画速度的几种方法。您可以使用注册表编辑器或您运行的自定义文件来应用更改。如何提高Windows11动画的
 如何使用CSS实现元素的旋转背景图动画效果Nov 21, 2023 am 09:05 AM
如何使用CSS实现元素的旋转背景图动画效果背景图动画效果可以增加网页的视觉吸引力和用户体验。本文将介绍如何使用CSS实现元素的旋转背景图动画效果,并提供具体的代码示例。首先,我们需要准备一张背景图,可以是任何你喜欢的图片,例如一张太阳或者电风扇的图片。将该图片保存并命名为“bg.png”。接下来,创建一个HTML文件,并在文件中添加一个div元素,将其设置为
 css ul标签怎么去掉圆点Apr 25, 2022 pm 05:55 PM
在css中,可用list-style-type属性来去掉ul的圆点标记,语法为“ul{list-style-type:none}”;list-style-type属性可设置列表项标记的类型,当值为“none”可不定义标记,也可去除已有标记。
 css与xml的区别是什么Apr 24, 2022 am 11:21 AM
区别是:css是层叠样式表单,是将样式信息与网页内容分离的一种标记语言,主要用来设计网页的样式,还可以对网页各元素进行格式化;xml是可扩展标记语言,是一种数据存储语言,用于使用简单的标记描述数据,将文档分成许多部件并对这些部件加以标识。
 css3怎么实现鼠标隐藏效果Apr 27, 2022 pm 05:20 PM
在css中,可以利用cursor属性实现鼠标隐藏效果,该属性用于定义鼠标指针放在一个元素边界范围内时所用的光标形状,当属性值设置为none时,就可以实现鼠标隐藏效果,语法为“元素{cursor:none}”。
 rtl在css是什么意思Apr 24, 2022 am 11:07 AM
在css中,rtl是“right-to-left”的缩写,是从右往左的意思,指的是内联内容从右往左依次排布,是direction属性的一个属性值;该属性规定了文本的方向和书写方向,语法为“元素{direction:rtl}”。
 css怎么实现英文小写转为大写Apr 25, 2022 pm 06:35 PM
转换方法:1、给英文元素添加“text-transform: uppercase;”样式,可将所有的英文字母都变成大写;2、给英文元素添加“text-transform:capitalize;”样式,可将英文文本中每个单词的首字母变为大写。
 css怎么设置i不是斜体Apr 20, 2022 am 10:36 AM
在css中,可以利用“font-style”属性设置i元素不是斜体样式,该属性用于指定文本的字体样式,当属性值设置为“normal”时,会显示元素的标准字体样式,语法为“i元素{font-style:normal}”。


热AI工具

Undresser.AI Undress
人工智能驱动的应用程序,用于创建逼真的裸体照片

AI Clothes Remover
用于从照片中去除衣服的在线人工智能工具。

Undress AI Tool
免费脱衣服图片

Clothoff.io
AI脱衣机

AI Hentai Generator
免费生成ai无尽的。

热门文章

热工具

SublimeText3汉化版
中文版,非常好用

MinGW - 适用于 Windows 的极简 GNU
这个项目正在迁移到osdn.net/projects/mingw的过程中,你可以继续在那里关注我们。MinGW:GNU编译器集合(GCC)的本地Windows移植版本,可自由分发的导入库和用于构建本地Windows应用程序的头文件;包括对MSVC运行时的扩展,以支持C99功能。MinGW的所有软件都可以在64位Windows平台上运行。

Atom编辑器mac版下载
最流行的的开源编辑器

记事本++7.3.1
好用且免费的代码编辑器

mPDF
mPDF是一个PHP库,可以从UTF-8编码的HTML生成PDF文件。原作者Ian Back编写mPDF以从他的网站上“即时”输出PDF文件,并处理不同的语言。与原始脚本如HTML2FPDF相比,它的速度较慢,并且在使用Unicode字体时生成的文件较大,但支持CSS样式等,并进行了大量增强。支持几乎所有语言,包括RTL(阿拉伯语和希伯来语)和CJK(中日韩)。支持嵌套的块级元素(如P、DIV),


