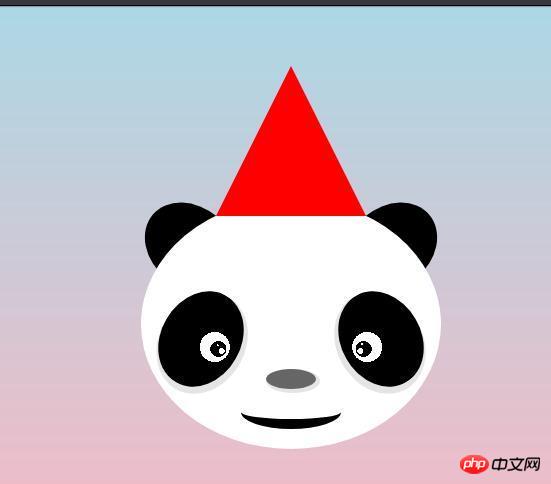
本篇文章给大家带来的内容是关于如何用CSS实现一只带帽子的大熊猫(附代码),有一定的参考价值,有需要的朋友可以参考一下,希望对你有所帮助。
黑眼圈的大熊猫可谓非常可爱,今天就用CSS实现以下萌萌哒的大熊猫一枚

代码在这儿:https://codepen.io/woshilyy/p...
body代码:
e89bd3666474a8e6fa84fbc5afd3710c
        6d2fed654645773fbec23489ca0378b954bdf357c58b8a65c66d7c19c8e4d114
        8a6ddf451afe0350e6dbb9c79d5e3af654bdf357c58b8a65c66d7c19c8e4d114
        bf09f84c470afb8c0305a53ee1acab5754bdf357c58b8a65c66d7c19c8e4d114
        03af423964da56deca822b47bd3c130b
            940a3e5d9ea2c3407b860d6f66616bdd54bdf357c58b8a65c66d7c19c8e4d114
        cf252be149d027a1077a005d6e412b7e54bdf357c58b8a65c66d7c19c8e4d114
        e6fb9fcda9d6ef18ac124c9f1ac9ad6154bdf357c58b8a65c66d7c19c8e4d114
        2080cd0597f9e0ea3636f2b95eb4b10254bdf357c58b8a65c66d7c19c8e4d114
        54bdf357c58b8a65c66d7c19c8e4d114
    16b28748ea4df4d9c2150843fecfba68
代码详解:
一、制作帽子
使用边框制作三角形,用伪类制作帽子上面的小球
.hat {
            position: absolute;
            border-bottom: 150px solid red;
            border-left: 75px solid transparent;
            border-right: 75px solid transparent;
            left: 75px;
            z-index: 2;
        }

        .hat::before {
            content: "";
            position: absolute;
            width: 30px;
            height: 30px;
            border-radius: 50%;
            background-color: #fff;
            left: -15px;
            top: -8px;
        }
二、制作熊猫脸哈哈哈
.face {
            position: absolute;
            width: 300px;
            height: 250px;
            background-color: #fff;
            border-radius: 50%;
            top: 133px;
        }
三、制作眼睛
使用径向渐变制作,因为两只眼睛旋转的对称的,所以使用了变量控制旋转,加了阴影使眼睛更逼真
.eyes {
            position: absolute;
            width: 100px;
            height: 80px;
            border-radius: 50%;
            transform: rotate(calc(-60deg * var(--n)));
        }

        .eyesLeft {
            left: 10px;
            top: 100px;
            --n: 1;
            background: radial-gradient(circle at 53% 72%, #fff 1px, transparent 1px), radial-gradient(circle at 50% 80%, #fff 3px, transparent 3px), radial-gradient(circle at 50% 75%, #000 8px, transparent 8px), radial-gradient(circle at 50% 70%, white 15px, transparent 15px), #000;
            box-shadow: -3px 3px 0 3px rgba(0, 0, 0, .1);
        }

        .eyesRight {
            right: 10px;
            top: 100px;
            --n: -1;
            background: radial-gradient(circle at 45% 74%, #fff 1px, transparent 1px), radial-gradient(circle at 50% 80%, #fff 3px, transparent 3px), radial-gradient(circle at 50% 75%, #000 8px, transparent 8px), radial-gradient(circle at 50% 70%, white 15px, transparent 15px), #000;
            box-shadow: 3px 3px 0 3px rgba(0, 0, 0, .1);
        }
四、制作鼻子
鼻子只是一个椭圆+阴影
.nose {
            position: absolute;
            width: 50px;
            height: 20px;
            background-color: #666;
            border-radius: 50%;
            left: calc((300px - 50px)/2);
            box-shadow: 2px 2px 0 2px rgba(0, 0, 0, .1);
            bottom: 60px;
        }
五、制作嘴巴
背景色为透明的圆角矩形+黑色的边框制作,去掉上边框
 .mouth {
            position: absolute;
            width: 100px;
            height: 20px;
            background-color: transparent;
            border-bottom: 10px solid #000;
            border-radius: 77% 77% 77%/60% 60% 90% 90%;
            bottom: 20px;
            left: calc((300px - 100px)/2);
        }
六:制作耳朵
两个黑色的椭圆,宽>高
 .ear {
            position: absolute;
            width: 100px;
            height: 80px;
            background-color: #000;
            border-radius: 50%;
            top: 141px;
            transform: rotate(calc(40deg * var(--e)));
        }

        .earL {
            --e: 1;
            left: 0;
        }

        .earR {
            --e: -1;
            right: 0;
        }
相关推荐:
以上是如何用CSS实现一只带帽子的大熊猫(附代码)的详细内容。更多信息请关注PHP中文网其他相关文章!
 两个图像和一个API:我们重新着色产品所需的一切Apr 15, 2025 am 11:27 AM
我最近找到了一种动态更新任何产品图像的颜色的解决方案。因此,只有一种产品之一,我们可以以不同的方式对其进行着色以显示
 每周平台新闻:第三方代码,被动混合内容,连接最慢的国家的影响Apr 15, 2025 am 11:19 AM
在本周的综述中,灯塔在第三方脚本上阐明了灯光,不安全的资源将在安全站点上被阻止,许多国家连接速度
 托管您自己的非JavaScript分析的选项Apr 15, 2025 am 11:09 AM
有很多分析平台可帮助您跟踪网站上的访问者和使用数据。也许最著名的是Google Analytics(广泛使用)
 它全部都在头上:管理带有React头盔的React Power Site的文档头Apr 15, 2025 am 11:01 AM
文档负责人可能不是网站上最迷人的部分,但是其中所处的内容对于您的网站的成功也一样重要
 JavaScript中的Super()是什么?Apr 15, 2025 am 10:59 AM
当您看到一些称为super()的JavaScript时,在子类中,您会使用super()调用其父母的构造函数和超级。访问它的


热AI工具

Undresser.AI Undress
人工智能驱动的应用程序,用于创建逼真的裸体照片

AI Clothes Remover
用于从照片中去除衣服的在线人工智能工具。

Undress AI Tool
免费脱衣服图片

Clothoff.io
AI脱衣机

AI Hentai Generator
免费生成ai无尽的。

热门文章

热工具

SublimeText3汉化版
中文版,非常好用

适用于 Eclipse 的 SAP NetWeaver 服务器适配器
将Eclipse与SAP NetWeaver应用服务器集成。

Dreamweaver Mac版
视觉化网页开发工具

安全考试浏览器
Safe Exam Browser是一个安全的浏览器环境,用于安全地进行在线考试。该软件将任何计算机变成一个安全的工作站。它控制对任何实用工具的访问,并防止学生使用未经授权的资源。

MinGW - 适用于 Windows 的极简 GNU
这个项目正在迁移到osdn.net/projects/mingw的过程中,你可以继续在那里关注我们。MinGW:GNU编译器集合(GCC)的本地Windows移植版本,可自由分发的导入库和用于构建本地Windows应用程序的头文件;包括对MSVC运行时的扩展,以支持C99功能。MinGW的所有软件都可以在64位Windows平台上运行。


