小程序不知从何时火起来的,很多人都入坑了吧,对于搞开发的小伙伴来说,不管是android,ios,还是很流行的微信小程序,
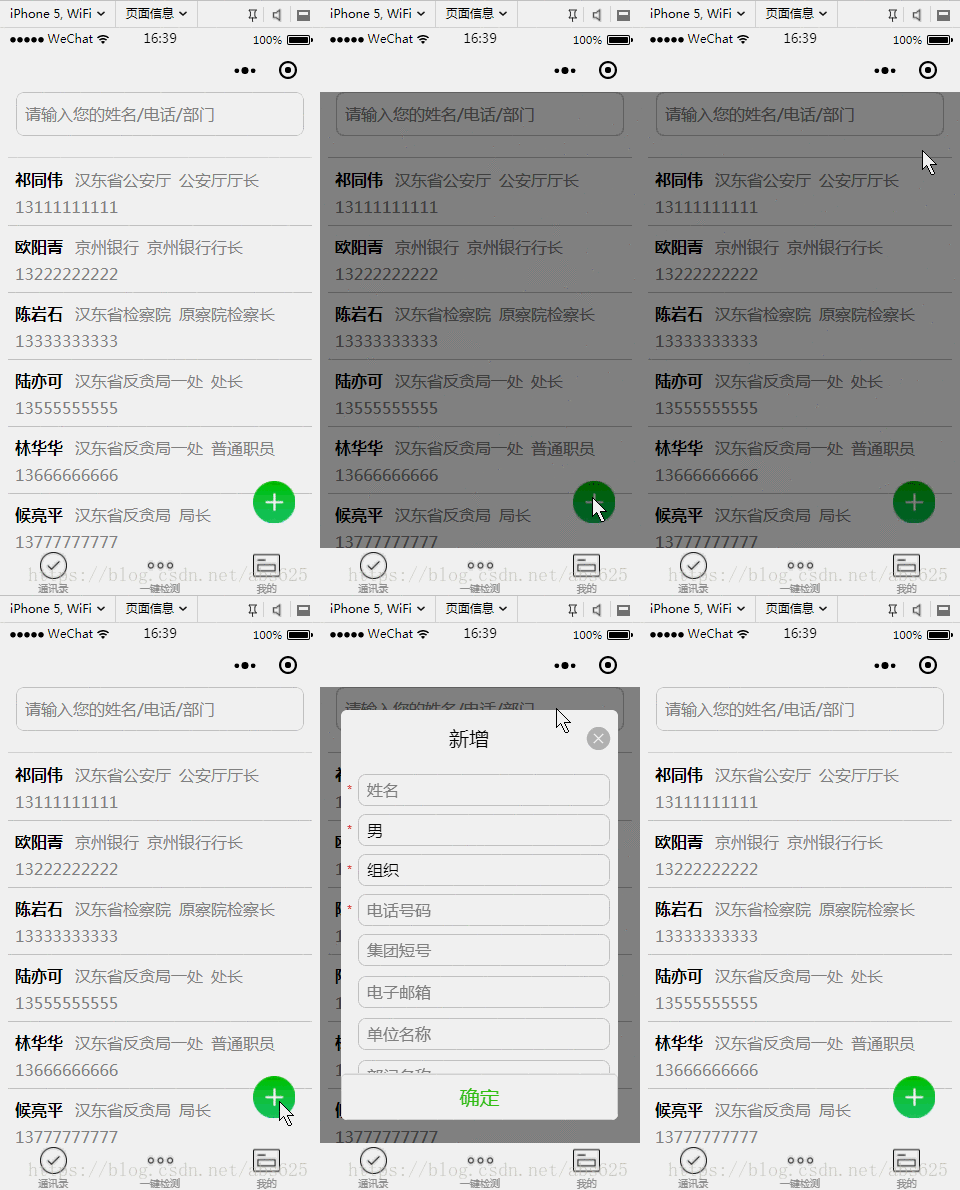
都会发现官方提供的原生控件已经不能完全满足我们的开发需求,所以本文介绍的就是一个自定义的微信小程序组件(modal弹窗组件),
先来一张图。

看到这里了,说明效果图还是对你有点吸引的么,哈哈,废话不多说了,开始上代码。。。
一共是四个文件js、json、xml,wxss,如果这个都还不清楚的童鞋请出门左拐,面壁思过5分钟。
先上布局dialog.xml文件
<!--mask dialog-->
<view class="drawer_screen" bindtap="hideDialog" wx:if="{{isShow}}" catchtouchmove="myCatchTouch"></view>
<!--content-->
<!--使用animation属性指定需要执行的动画-->
<view animation="{{animationData}}" class="drawer_box" wx:if="{{isShow}}">
<!--drawer content-->
<view class='row'>
<view class="drawer_title" style='width:100%;padding-left:60rpx'>{{title}}</view>
<icon type="clear" style='margin-top:40rpx;margin-right:20rpx;' bindtap="hideDialog"></icon>
</view>
<form bindsubmit="_formSubmit">
<scroll-view scroll-y>
<view class="drawer_content">
<view wx:for="{{dataObject}}" wx:key="{{id}}">
<view class="top grid">
<label class="title col-0" style="color:red" wx:if="{{item.must}}">*</label>
<label class="title col-0" wx:else> </label>
<input class="input_base input_h30 col-1" placeholder='{{item.placeholder}}' wx:if="{{item.type === type_input}}" name="{{item.id}}" value="{{bean[item.id]}}"></input>
<view class="input_base input_h30 col-1" wx:elif="{{item.id === id_sex}}" hover-class='btn_ok_hover' bindtap='{{item.event}}'>{{sexDefault}}</view>
<view class="input_base input_h30 col-1" wx:elif="{{item.id === id_group}}" hover-class='btn_ok_hover' bindtap='{{item.event}}'>{{groupDefault}}</view>
</view>
</view>
</view>
</scroll-view>
<button class="btn_ok" hover-class='btn_ok_hover' formType="submit">确定</button>
</form>
</view>然后是dialog.wxss文件
/*mask dialog start*/
.drawer_screen {
  width: 100%;
  height: 100%;
  position: fixed;
  top: 0;
  left: 0;
  right:0;
  bottom:0;
  z-index: 1000;
  background: #000;
  opacity: 0.5;
  overflow: hidden;
}

/*content*/

.drawer_box {
  width: 650rpx;
  overflow: hidden;
  position: fixed;
  top: 50%;
  left: 0;
  z-index: 1001;
  background: #fafafa;
  margin: -480rpx 50rpx 0 50rpx;
  border-radius: 6px;
}

.drawer_title {
  padding: 15px;
  font: 20px "microsoft yahei";
  text-align: center;
}

.drawer_content {
  height: 720rpx;
  /*overflow-y: scroll; 超出父盒子高度可滚动*/
}

.btn_ok {
  padding: 10px;
  font: 20px "microsoft yahei";
  text-align: center;
  border-top: 1rpx solid #e8e8ea;
  color: #3cc51f;
}

.btn_ok_hover {
  color: #aaa;
  background: #d9d9d9;
}

.top {
  padding-top: 8px;
}

.input_base {
  border: 2rpx solid #ccc;
  border-radius: 20rpx;
  padding-left: 20rpx;
  margin-right: 20rpx;
}

.input_h30 {
  height: 30px;
  line-height: 30px;
}

.title {
  height: 30px;
  line-height: 30px;
  width: 40rpx;
  text-align: center;
  display: inline-block;
  font: 300 28rpx/30px "microsoft yahei";
}

.grid {
  display: -webkit-box;
  display: box;
}

.col-0 {
  -webkit-box-flex: 0;
  box-flex: 0;
}

.col-1 {
  -webkit-box-flex: 1;
  box-flex: 1;
}

/*mask dialog end*/

.row {
  display: flex;
  flex-direction: row;
}
再然后就是dialog.js文件
// components/Dialog/dialog.js
Component({
  options: {
    multipleSlots: true // 在组件定义时的选项中启用多slot支持
  },
  /**
   * 组件的属性列表
   */
  properties: {
    title: { // 属性名
      type: String, // 类型(必填),目前接受的类型包括:String, Number, Boolean, Object, Array, null(表示任意类型)
      value: '标题' // 属性初始值(可选),如果未指定则会根据类型选择一个
    }

  },

  /**
   * 组件的初始数据
   */
  data: {
    // 弹窗显示控制
    isShow: false,
    type_input: "input",
    type_btn: "button",
    id_sex: "sex",
    id_group: "group",
    dataObject: [],
    sexDefault: "男",
    groupDefault: "组织",
    sexArray: ['男', '女'],
    groupArray: ['组织', '群众'],
    bean: {},
  },

  /**
   * 组件的方法列表
   */
  methods: {
    /*
     * 公有方法
     */
    setDataObj(dataObj,beanObj) {
      this.setData({
        dataObject: dataObj,
        bean: beanObj
      })
      if (beanObj.hasOwnProperty("sex") && beanObj.sex != ""){
        this.setData({
          sexDefault: beanObj.sex
        })
      }
      if (beanObj.hasOwnProperty("group") && beanObj.group != "") {
        this.setData({
          groupDefault: beanObj.group
        })
      }
    },
    //隐藏弹框
    hideDialog() {
      this._showOrCloseDialog("close")
    },
    //展示弹框
    showDialog() {
      this._showOrCloseDialog("open")
    },
    /*
     * 内部私有方法建议以下划线开头
     * triggerEvent 用于触发事件
     */

    _formSubmit(e) {
      if ("" === e.detail.value.name) {
        wx.showToast({
          title: '请填写姓名',
          icon: 'none'
        })
        return
      }
      if ("" === e.detail.value.phone) {
        wx.showToast({
          title: '请填写电话',
          icon: 'none'
        })
        return
      }
      this._showOrCloseDialog("close")
      //触发成功回调
      this.triggerEvent("confirmEvent", {
        e: e
      });
    },

    sexButton: function() {
      var that = this;
      wx.showActionSheet({
        itemList: this.data.sexArray,
        success: function(res) {
          console.log(res.tapIndex)
          that.setData({
            sexDefault: that.data.sexArray[res.tapIndex]
          })
        },
        fail: function(res) {
          console.log(res.errMsg)
        }
      })
    },
    groupButton: function() {
      var that = this;
      wx.showActionSheet({
        itemList: this.data.groupArray,
        success: function(res) {
          console.log(res.tapIndex)
          that.setData({
            groupDefault: that.data.groupArray[res.tapIndex]
          })
        },
        fail: function(res) {
          console.log(res.errMsg)
        }
      })
    },
    _showOrCloseDialog: function(currentStatu) {
      var that = this;
      /* 动画部分 */
      // 第1步:创建动画实例
      var animation = wx.createAnimation({
        duration: 200, //动画时长
        timingFunction: "linear", //线性
        delay: 0 //0则不延迟
      });

      // 第2步:这个动画实例赋给当前的动画实例
      this.animation = animation;

      // 第3步:执行第一组动画
      animation.opacity(0).rotateX(-100).step();

      // 第4步:导出动画对象赋给数据对象储存
      that.setData({
        animationData: animation.export()
      })

      // 第5步:设置定时器到指定时候后,执行第二组动画
      setTimeout(function() {
        // 执行第二组动画
        animation.opacity(1).rotateX(0).step();
        // 给数据对象储存的第一组动画,更替为执行完第二组动画的动画对象
        that.setData({
          animationData: animation
        })

        //关闭
        if (currentStatu == "close") {
          that.setData({
            isShow: false
          });
        }
      }.bind(this), 200)

      // 显示
      if (currentStatu == "open") {
        that.setData({
          isShow: true
        });
      }
    }
  },
  //解决滚动穿透问题
  myCatchTouch: function () {
    return
  }
})
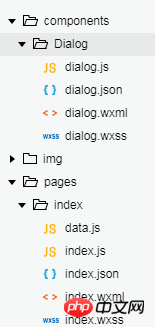
看到这里可能有些小伙伴就问了,你个水货,怎么js文件结构怎么跟我的不一样,是不是来忽悠我们的?客官别急么,请听我娓娓道来:其实这里为了方便调用,我把这个dialog封装成了一个组件了。你问我怎么封装组件?请移步官方教程:
https://developers.weixin.qq.com/miniprogram/dev/framework/custom-component/
封装完成之后项目结构如下:

这里误会就解释清楚了,麻烦给个面子继续往下看。。
已经展示了三大金刚了,还有一个dialog.json文件未展示,这个文件很简单
{
  "component": true,//作为组件
  "usingComponents": {}//引用别的组件
}
这个文件也和一般json文件有差异,主要是配置了作为组件让别人引用的,所以到这个,这个组件已经封装完成了
可能这个时候很多童鞋迫不及待的复制粘贴然后把代码放入项目中想一睹真容,发现运行结果跟效果图不一样,然后有一部分人可能又要说:娘希匹,果然是个水货,骗人的!!!到这里,我只能说:各位乡亲们,蛋定、蛋定。。。,因为到js中的dataObject和bean没有么,所以效果图跟我在文章开始展示的不一样。so,下面就告诉大家,怎么调用,并且实现和我一样的效果。
在引用的xml中添加如下代码
<image src="../../img/add.png" class="buttom" bindtap="bindAdd"></image> <dialog id='dialog' title='新增' bind:confirmEvent="_confirmEvent"></dialog>
buttom这个是个悬浮按钮,wxss也给你
.buttom{
  width: 100rpx;
  height: 100rpx;
  display: flex;
  flex-direction: row;
  position: fixed;
  bottom:60rpx;
  right: 60rpx;
}
然后引用页面的js文件中
onReady: function() {
    //获得dialog组件
    this.dialog = this.selectComponent("#dialog");
}


//响应button弹框
bindAdd: function(e) {
    this.dialog.setDataObj(addObject, {})
    this.dialog.showDialog();
}
到这里基本上点击悬浮按钮就可以实现弹框了。有的大胸dei又要说了:哎哎哎,等等,addObject,和那个add.png还没有给了。好吧,给给给,都给你们
const addObject = [{
  id: "name",
  must: true,
  placeholder: "姓名",
  type: "input",
  event: "nameInput"
},
{
  id: "sex",
  must: true,
  placeholder: "男",
  type: "button",
  event: "sexButton"
},
{
  id: "group",
  must: true,
  placeholder: "组织",
  type: "button",
  event: "groupButton"
},
{
  id: "phone",
  must: true,
  placeholder: "电话号码",
  type: "input",
  event: "phoneInput"
},
{
  id: "shortNum",
  must: false,
  placeholder: "集团短号",
  type: "input",
  event: "shortNumInput"
},
{
  id: "mail",
  must: false,
  placeholder: "电子邮箱",
  type: "input",
  event: "mailInput"
},
{
  id: "unit",
  must: false,
  placeholder: "单位名称",
  type: "input",
  event: "unitInput"
},
{
  id: "department",
  must: false,
  placeholder: "部门名称",
  type: "input",
  event: "departmentInput"
},
{
  id: "job",
  must: false,
  placeholder: "职务",
  type: "input",
  event: "jobInput"
},
{
  id: "function",
  must: false,
  placeholder: "涉及工作内容",
  type: "input",
  event: "functionInput"
},
{
  id: "comPhone",
  must: false,
  placeholder: "办公电话",
  type: "input",
  event: "comPhoneInput"
},
{
  id: "fax",
  must: false,
  placeholder: "传真",
  type: "input",
  event: "faxInput"
},
{
  id: "homePhone",
  must: false,
  placeholder: "家庭电话",
  type: "input",
  event: "homePhoneInput"
},
{
  id: "showOrder",
  must: false,
  placeholder: "显示顺序",
  type: "input",
  event: "showOrderInput"
},
{
  id: "departOrder",
  must: false,
  placeholder: "部门顺序",
  type: "input",
  event: "departOrderInput"
},
{
  id: "remark",
  must: false,
  placeholder: "备注",
  type: "input",
  event: "remarkInput"
}
]
图片

到这里应该可实现跟我一样的效果了吧,尽情去折腾吧。
相关文章:
相关视频:
以上是详解一个自定义的微信小程序组件(modal弹窗组件)的详细内容。更多信息请关注PHP中文网其他相关文章!

热AI工具

Undresser.AI Undress
人工智能驱动的应用程序,用于创建逼真的裸体照片

AI Clothes Remover
用于从照片中去除衣服的在线人工智能工具。

Undress AI Tool
免费脱衣服图片

Clothoff.io
AI脱衣机

Video Face Swap
使用我们完全免费的人工智能换脸工具轻松在任何视频中换脸!

热门文章

热工具

SecLists
SecLists是最终安全测试人员的伙伴。它是一个包含各种类型列表的集合,这些列表在安全评估过程中经常使用,都在一个地方。SecLists通过方便地提供安全测试人员可能需要的所有列表,帮助提高安全测试的效率和生产力。列表类型包括用户名、密码、URL、模糊测试有效载荷、敏感数据模式、Web shell等等。测试人员只需将此存储库拉到新的测试机上,他就可以访问到所需的每种类型的列表。

PhpStorm Mac 版本
最新(2018.2.1 )专业的PHP集成开发工具

SublimeText3 Mac版
神级代码编辑软件(SublimeText3)

记事本++7.3.1
好用且免费的代码编辑器

螳螂BT
Mantis是一个易于部署的基于Web的缺陷跟踪工具,用于帮助产品缺陷跟踪。它需要PHP、MySQL和一个Web服务器。请查看我们的演示和托管服务。


