


这篇文章主要介绍了基于cropper.js封装vue实现在线图片裁剪组件功能,非常不错,具有参考借鉴价值,需要的朋友可以参考下
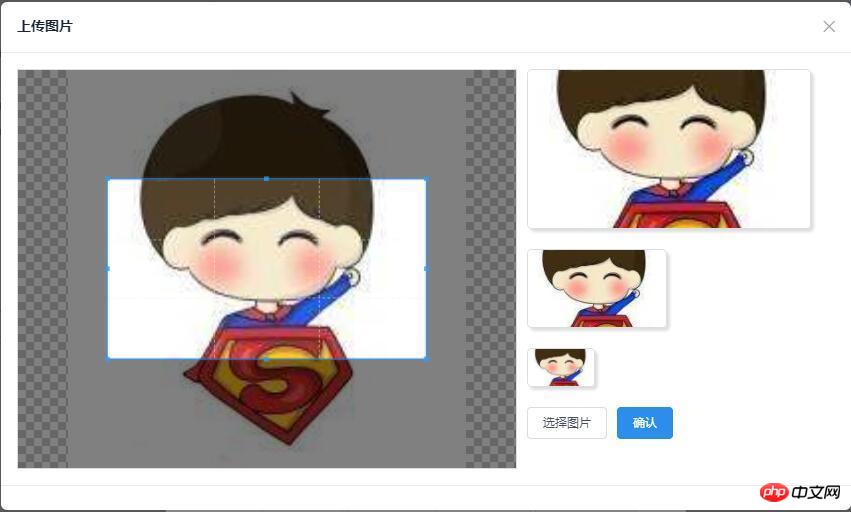
效果图如下所示,
github:demo下载
cropper.js
github:cropper.js
官网(demo)
cropper.js 安装
npm或bower安装
npm install cropper
# or
bower install cropper
clone下载:下载地址
git clone https://github.com/fengyuanchen/cropper.git
引用cropper.js
主要引用cropper.js跟cropper.css两个文件
<script src="/path/to/jquery.js"></script><!-- jQuery is required -->
<link href="/path/to/cropper.css" rel="external nofollow" rel="stylesheet">
<script src="/path/to/cropper.js"></script>
注意:必须先引入jquery文件,才能使用cropper.js插件
简单使用
构建截图所要用到的p容器
<!-- Wrap the image or canvas element with a block element (container) --> <p>  </p>
添加容器的样式,让img填充满整个容器(很重要)
/* Limit image width to avoid overflow the container */
img {
 max-width: 100%; /* This rule is very important, please do not ignore this! */
}
调用cropper.js方法,初始化截图控件
$('#image').cropper({
 aspectRatio: 16 / 9,
 crop: function(e) {
 // Output the result data for cropping image.
 console.log(e.x);
 console.log(e.y);
 console.log(e.width);
 console.log(e.height);
 console.log(e.rotate);
 console.log(e.scaleX);
 console.log(e.scaleY);
 }
});
其他详细api请参考:github:cropper.js
封装成vue组件
封装成vue组件中需解决的问题
cropper.js相关
模拟input框点击选择图片并对选择的图片进行格式、大小限制
重新选择图片裁剪
确认裁剪并获取base64格式的图片信息
vue相关
非父子组件之间的通信问题
模拟input框点击选择图片并对选择的图片进行格式、大小限制
构建一个隐藏的input标签,然后模拟点击此input,从而达到能选择图片的功能
<!-- input框 --> <input id="myCropper-input" type="file" :accept="imgCropperData.accept" ref="inputer" @change="handleFile"> //模拟点击 document.getElementById('myCropper-input').click();
给input绑定一个监听内容变化的方法,拿到上传的文件,并进行格式、大小校验
// imgCropperData: {
// accept: 'image/gif, image/jpeg, image/png, image/bmp',
// }
handleFile (e) {
 let _this = this;
 let inputDOM = this.$refs.inputer;
 // 通过DOM取文件数据
 _this.file = inputDOM.files[0];
 // 判断文件格式
 if (_this.imgCropperData.accept.indexOf(_this.file.type) == -1) {
 _this.$Modal.error({
  title: '格式错误',
  content: '您选择的图片格式不正确!'
 });
 return;
 }
 // 判断文件大小限制
 if (_this.file.size > 5242880) {
 _this.$Modal.error({
  title: '超出限制',
  content: '您选择的图片过大,请选择5MB以内的图片!'
 });
 return;
 }
 var reader = new FileReader();
 // 将图片将转成 base64 格式
 reader.readAsDataURL(_this.file);
 reader.onload = function () {
 _this.imgCropperData.imgSrc = this.result;
 _this.initCropper();
 }
}
重新选择图片裁剪
当第一次选择图片之后,肯定会面临需要重选图片的问题,那么就会面临如何替换掉裁剪框中的图片,上面的步骤选择了图片后通过FileRender()方法拿到了图片的主要信息,现在就需要重新构建裁剪框就可以解决问题了,查看cropper.js给出的官方demo,发现官方是使用动态添加裁剪容器的方法,进行操作的,这里我们仿照官方进行实现。
// 初始化剪切
initCropper () {
let _this = this;
// 初始化裁剪区域
_this.imgObj = $('');
let $avatarPreview = $('.avatar-preview');
$('#myCropper-workspace').empty().html(_this.imgObj);
_this.imgObj.cropper({
aspectRatio: _this.proportionX / _this.proportionY,
preview: $avatarPreview,
crop: function(e) {
}
});
}
确认裁剪并获取base64格式的图片信息
let $imgData = _this.imgObj.cropper('getCroppedCanvas')
imgBase64Data = $imgData.toDataURL('image/png');
构造用于上传的数据
// 构造上传图片的数据
let formData = new FormData();
// 截取字符串
let photoType = imgBase64Data.substring(imgBase64Data.indexOf(",") + 1);
//进制转换
const b64toBlob = (b64Data, contentType = '', sliceSize = 512) => {
const byteCharacters = atob(b64Data);
const byteArrays = [];
for(let offset = 0; offset < byteCharacters.length; offset += sliceSize) {
const slice = byteCharacters.slice(offset, offset + sliceSize);
const byteNumbers = new Array(slice.length);
for(let i = 0; i < slice.length; i++) {
byteNumbers[i] = slice.charCodeAt(i);
}
const byteArray = new Uint8Array(byteNumbers);
byteArrays.push(byteArray);
}
const blob = new Blob(byteArrays, {
type: contentType
});
return blob;
}
const contentType = 'image/jepg';
const b64Data2 = photoType;
const blob = b64toBlob(b64Data2, contentType);
formData.append("file", blob, "client-camera-photo.png")
formData.append("type", _this.imgType)
非父子组件之间的通信问题
在之前的项目中,常用到父子组件之间的通信传参,一般用两种方法
在router里面放置参数,然后通过调用route.params.xxx或者route.query.xxx进行获取
通过props进行通信
这里我们使用eventBus进行组件之间的通信
步骤
1.声明一个bus组件用于B组件把参数传递给A组件
//bus.js
import Vue from 'vue';
export default new Vue();
2.在A组件中引用bus组件,并实时监听其参数变化
// A.vue
import Bus from '../../components/bus/bus.js'
export default {
 components: { Bus },
 data () {},
 created: function () {
 Bus.$on('getTarget', imgToken => {
  var _this = this;
  console.log(imgToken);
  ...
 });
 }
}
3.B组件中同样引用bus组件,来把参数传给A组件
// B.vue
// 传参
Bus.$emit('getTarget', imgToken);
参考:
vue-$on
vue-$emit
vue.js之路(4)——vue2.0s中eventBus实现兄弟组件通信
vue选图截图插件完整代码
<template>
<p class="myCropper-container">
<p id="myCropper-workspace">
<p class="myCropper-words" v-show="!imgCropperData.imgSrc">请点击按钮选择图片进行裁剪</p>
</p>
<p class="myCropper-preview" :class="isShort ? 'myCropper-preview-short' : 'myCropper-preview-long'">
<p class="myCropper-preview-1 avatar-preview">

</p>
<p class="myCropper-preview-2 avatar-preview">

</p>
<p class="myCropper-preview-3 avatar-preview">

</p>
<input id="myCropper-input" type="file" :accept="imgCropperData.accept" ref="inputer" @change="handleFile">
<Button type="ghost" class="myCropper-btn" @click="btnClick">选择图片</Button>
<Button type="primary" class="myCropper-btn" :loading="cropperLoading" @click="crop_ok">确认</Button>
</p>
</p>
</template>
<script>
var ezjsUtil = Vue.ezjsUtil;
import Bus from './bus/bus.js'
export default {
components: { Bus },
props: {
imgType: {
type: String
},
proportionX: {
type: Number
},
proportionY: {
type: Number
}
},
data () {
return {
imgCropperData: {
accept: 'image/gif, image/jpeg, image/png, image/bmp',
maxSize: 5242880,
file: null, //上传的文件
imgSrc: '', //读取的img文件base64数据流
imgUploadSrc: '', //裁剪之后的img文件base64数据流
},
imgObj: null,
hasSelectImg: false,
cropperLoading: false,
isShort: false,
}
},
created: function () {
let _this = this;
},
mounted: function () {
let _this = this;
// 初始化预览区域
let maxWidthNum = Math.floor(300 / _this.proportionX);
let previewWidth = maxWidthNum * _this.proportionX;
let previewHeight = maxWidthNum * _this.proportionY;
if (previewWidth / previewHeight <= 1.7) {
previewWidth = previewWidth / 2;
previewHeight = previewHeight / 2;
_this.isShort = true;
}
// 设置最大预览容器的宽高
$('.myCropper-preview-1').css('width', previewWidth + 'px');
$('.myCropper-preview-1').css('height', previewHeight + 'px');
// 设置中等预览容器的宽高
$('.myCropper-container .myCropper-preview .myCropper-preview-2').css('width',( previewWidth / 2) + 'px');
$('.myCropper-container .myCropper-preview .myCropper-preview-2').css('height', (previewHeight / 2) + 'px');
// 设置最小预览容器的宽高
$('.myCropper-container .myCropper-preview .myCropper-preview-3').css('width',( previewWidth / 4) + 'px');
$('.myCropper-container .myCropper-preview .myCropper-preview-3').css('height', (previewHeight / 4) + 'px');
},
methods: {
// 点击选择图片
btnClick () {
let _this = this;
// 模拟input点击选择文件
document.getElementById('myCropper-input').click();
},
// 选择之后的回调
handleFile (e) {
let _this = this;
let inputDOM = this.$refs.inputer;
// 通过DOM取文件数据
_this.file = inputDOM.files[0];
// 判断文件格式
if (_this.imgCropperData.accept.indexOf(_this.file.type) == -1) {
_this.$Modal.error({
title: '格式错误',
content: '您选择的图片格式不正确!'
});
return;
}
// 判断文件大小限制
if (_this.file.size > 5242880) {
_this.$Modal.error({
title: '超出限制',
content: '您选择的图片过大,请选择5MB以内的图片!'
});
return;
}
var reader = new FileReader();
// 将图片将转成 base64 格式
reader.readAsDataURL(_this.file);
reader.onload = function () {
_this.imgCropperData.imgSrc = this.result;
_this.initCropper();
}
},
// 初始化剪切
initCropper () {
let _this = this;
// 初始化裁剪区域
_this.imgObj = $('');
let $avatarPreview = $('.avatar-preview');
$('#myCropper-workspace').empty().html(_this.imgObj);
_this.imgObj.cropper({
aspectRatio: _this.proportionX / _this.proportionY,
preview: $avatarPreview,
crop: function(e) {
}
});
_this.hasSelectImg = true;
},
// 确认
crop_ok () {
let _this = this, imgToken = null, imgBase64Data = null;
// 判断是否选择图片
if (_this.hasSelectImg == false) {
_this.$Modal.error({
title: '裁剪失败',
content: '请选择图片,然后进行裁剪操作!'
});
return false;
}
// 确认按钮不可用
_this.cropperLoading = true;
let $imgData = _this.imgObj.cropper('getCroppedCanvas')
imgBase64Data = $imgData.toDataURL('image/png');
// 构造上传图片的数据
let formData = new FormData();
// 截取字符串
let photoType = imgBase64Data.substring(imgBase64Data.indexOf(",") + 1);
//进制转换
const b64toBlob = (b64Data, contentType = '', sliceSize = 512) => {
const byteCharacters = atob(b64Data);
const byteArrays = [];
for(let offset = 0; offset < byteCharacters.length; offset += sliceSize) {
const slice = byteCharacters.slice(offset, offset + sliceSize);
const byteNumbers = new Array(slice.length);
for(let i = 0; i < slice.length; i++) {
byteNumbers[i] = slice.charCodeAt(i);
}
const byteArray = new Uint8Array(byteNumbers);
byteArrays.push(byteArray);
}
const blob = new Blob(byteArrays, {
type: contentType
});
return blob;
}
const contentType = 'image/jepg';
const b64Data2 = photoType;
const blob = b64toBlob(b64Data2, contentType);
formData.append("file", blob, "client-camera-photo.png")
formData.append("type", _this.imgType)
// ajax上传
$.ajax({
url: _this.$nfs.uploadUrl,
method: 'POST',
data: formData,
// 默认为true,设为false后直到ajax请求结束(调完回掉函数)后才会执行$.ajax(...)后面的代码
async: false,
// 下面三个,因为直接使用FormData作为数据,contentType会自动设置,也不需要jquery做进一步的数据处理(序列化)。
cache: false,
contentType: false,
processData: false,
type: _this.imgType,
success: function(res) {
let imgToken = res.data.token;
_this.cropperLoading = false;
// 传参
Bus.$emit('getTarget', imgToken);
},
error: function(error) {
_this.cropperLoading = false;
_this.$Modal.error({
title: '系统错误',
content: '请重新裁剪图片进行上传!'
});
}
});
},
}
}
</script>
<style lang="less" scoped>
.myCropper-container {
height: 400px;
}
.myCropper-container #myCropper-input {
width: 0px;
height: 0px;
}
.myCropper-container #myCropper-workspace {
width: 500px;
height: 400px;
border: 1px solid #dddee1;
float: left;
}
// 裁剪图片未选择图片的提示文字
.myCropper-container #myCropper-workspace .myCropper-words{
text-align: center;
font-size: 18px;
padding-top: 180px;
}
// 裁剪图片的预览区域
.myCropper-container .myCropper-preview-long {
width: 300px;
}
.myCropper-container .myCropper-preview-short {
width: 200px;
}
.myCropper-container .myCropper-preview {
float: left;
height: 400px;
margin-left: 10px;
}
.myCropper-container .myCropper-preview .myCropper-preview-1 {
border-radius: 5px;
overflow: hidden;
border: 1px solid #dddee1;
box-shadow: 3px 3px 3px #dddee1;
img {
width: 100%;
height: 100%;
}
}
.myCropper-container .myCropper-preview .myCropper-preview-2 {
margin-top: 20px;
border-radius: 5px;
overflow: hidden;
border: 1px solid #dddee1;
box-shadow: 3px 3px 3px #dddee1;
img {
width: 100%;
height: 100%;
}
}
.myCropper-container .myCropper-preview .myCropper-preview-3 {
margin-top: 20px;
border-radius: 5px;
overflow: hidden;
border: 1px solid #dddee1;
box-shadow: 3px 3px 3px #dddee1;
img {
width: 100%;
height: 100%;
}
}
// 按钮
.myCropper-btn {
float: left;
margin-top: 20px;
margin-right: 10px;
}
</style>
以上就是本文的全部内容,希望对大家的学习有所帮助,更多相关内容请关注PHP中文网!
相关推荐:
关于iview table render集成switch开关的介绍
Angular中使用better-scroll插件的方法介绍
以上是基于cropper.js封装vue实现在线图片裁剪组件的功能的详细内容。更多信息请关注PHP中文网其他相关文章!

 JavaScript应用程序:从前端到后端May 04, 2025 am 12:12 AM
JavaScript可用于前端和后端开发。前端通过DOM操作增强用户体验,后端通过Node.js处理服务器任务。1.前端示例:改变网页文本内容。2.后端示例:创建Node.js服务器。
 Python vs. JavaScript:您应该学到哪种语言?May 03, 2025 am 12:10 AM
选择Python还是JavaScript应基于职业发展、学习曲线和生态系统:1)职业发展:Python适合数据科学和后端开发,JavaScript适合前端和全栈开发。2)学习曲线:Python语法简洁,适合初学者;JavaScript语法灵活。3)生态系统:Python有丰富的科学计算库,JavaScript有强大的前端框架。
 JavaScript框架:为现代网络开发提供动力May 02, 2025 am 12:04 AM
JavaScript框架的强大之处在于简化开发、提升用户体验和应用性能。选择框架时应考虑:1.项目规模和复杂度,2.团队经验,3.生态系统和社区支持。
 JavaScript,C和浏览器之间的关系May 01, 2025 am 12:06 AM
引言我知道你可能会觉得奇怪,JavaScript、C 和浏览器之间到底有什么关系?它们之间看似毫无关联,但实际上,它们在现代网络开发中扮演着非常重要的角色。今天我们就来深入探讨一下这三者之间的紧密联系。通过这篇文章,你将了解到JavaScript如何在浏览器中运行,C 在浏览器引擎中的作用,以及它们如何共同推动网页的渲染和交互。JavaScript与浏览器的关系我们都知道,JavaScript是前端开发的核心语言,它直接在浏览器中运行,让网页变得生动有趣。你是否曾经想过,为什么JavaScr
 node.js流带打字稿Apr 30, 2025 am 08:22 AM
Node.js擅长于高效I/O,这在很大程度上要归功于流。 流媒体汇总处理数据,避免内存过载 - 大型文件,网络任务和实时应用程序的理想。将流与打字稿的类型安全结合起来创建POWE
 Python vs. JavaScript:性能和效率注意事项Apr 30, 2025 am 12:08 AM
Python和JavaScript在性能和效率方面的差异主要体现在:1)Python作为解释型语言,运行速度较慢,但开发效率高,适合快速原型开发;2)JavaScript在浏览器中受限于单线程,但在Node.js中可利用多线程和异步I/O提升性能,两者在实际项目中各有优势。
 JavaScript的起源:探索其实施语言Apr 29, 2025 am 12:51 AM
JavaScript起源于1995年,由布兰登·艾克创造,实现语言为C语言。1.C语言为JavaScript提供了高性能和系统级编程能力。2.JavaScript的内存管理和性能优化依赖于C语言。3.C语言的跨平台特性帮助JavaScript在不同操作系统上高效运行。
 幕后:什么语言能力JavaScript?Apr 28, 2025 am 12:01 AM
JavaScript在浏览器和Node.js环境中运行,依赖JavaScript引擎解析和执行代码。1)解析阶段生成抽象语法树(AST);2)编译阶段将AST转换为字节码或机器码;3)执行阶段执行编译后的代码。


热AI工具

Undresser.AI Undress
人工智能驱动的应用程序,用于创建逼真的裸体照片

AI Clothes Remover
用于从照片中去除衣服的在线人工智能工具。

Undress AI Tool
免费脱衣服图片

Clothoff.io
AI脱衣机

Video Face Swap
使用我们完全免费的人工智能换脸工具轻松在任何视频中换脸!

热门文章
热工具

SublimeText3汉化版
中文版,非常好用

WebStorm Mac版
好用的JavaScript开发工具

SublimeText3 英文版
推荐:为Win版本,支持代码提示!

记事本++7.3.1
好用且免费的代码编辑器

SublimeText3 Linux新版
SublimeText3 Linux最新版

