这篇文章主要介绍了关于PHP – EasyUI DataGrid 资料存的方法介绍,有着一定的参考价值,现在分享给大家,有需要的朋友可以参考一下
继上篇文章 PHP – EasyUI DataGrid 资料取的方式,本篇继续讲述,如何操作 DataGrid,把资料存入资料库,并实现 MVC 架构,将资料层分离、独立运作。
本篇文章主要是改良,原 EasyUI DataGrid 的范例 Build CRUD Application with jQuery EasyUI。
在官方范例中已经示范如何操作资料,但其中有个问题就是,你要操作资料的每个动作都需要一支对应的程式才能动作,像是新增、删除、修改以及取得资料,总共至少要有四支对应程式才能运作。
读者可以想想,这还只是一支单档 使用者的基本资料维护而已,一般系统光基本资料都有十几支甚至几十支程式在运作,所以这样的方式,势必要改良才能运作在实务上。
在来按造 多层次架构设计前言 的精神,大家可以发现这四支程式其实对每一个基本资料的操作来说,都是大同小异的,所以是可以把他标准化,用成一个固定框架,供后面类似程式来使用。
这部分,会分几篇文章来逐渐完成这各过程,藉由这逐渐演进的过程,来了解框架是如何成形的。
首先本篇,先来介绍,如何把分散的四支程式集中成为一支程式来呼叫,在读者往下阅读之前,可先在了解 PHP – EasyUI DataGrid 资料取的方式 以及官方范例 Build CRUD Application with jQuery EasyUI 的运作方式,至少要能把范例 Run 起来,run 这个动作是很重要的,不要光看而已,亲身去测试才能了解其中的问题点。
要能实现将四支程式改成一支程式来运作,其实关键很简单,就是去改每个操作动作时呼叫的 url,改成都呼叫 DAL 端的程式 dal_user.php,接下来在呼叫前,都要传递一个 type 参数告诉 dal 你要进行何种动作。
目前 type 定义了下面四个动作
add 新增
mod 修改
del 删除
data 取得资料
了解 想要 dal 作哪些动作后,就可以开始来撰写 dal 程式了,当然现在这各 dal 还是一个非标准化的程式,但是他已经做到 MVC 的精神,把资料存取层跟表现层 分离开了,后面的文章, 会再来介绍,如何把本篇介绍的程式来标准化 dal 以及 UI 表现层。
dal_user.php
<?php
$result = false;
if (!empty($_REQUEST['type']) )
{
require_once(".\..\db\DB_config.php");
require_once(".\..\db\DB_class.php");
$db = new DB();
$db->connect_db($_DB['host'], $_DB['username'], $_DB['password'], $_DB['dbname']);
$tablename = "STUser";
$type = $_REQUEST['type'];
if($type == "del")
{
$id = $_REQUEST['id'];
$sql = "delete from STUser where UNum=$id";
$result = $db->query($sql);
}else if($type == "data"){
$page = isset($_POST['page']) ? intval($_POST['page']) : 1;
$rows = isset($_POST['rows']) ? intval($_POST['rows']) : 10;
$offset = ($page-1)*$rows;
$result = array();
$db->query("select count(*) As Total from $tablename");
$row = $db->fetch_assoc();
$result["total"] = $row["Total"];
$db->query("select * from $tablename limit $offset,$rows");
$items = array();
while($row = $db->fetch_assoc()){
array_push($items, $row);
}
$result["rows"] = $items;
echo json_encode($result);
}else{
$STUID = $_REQUEST['STUID'];
$Password = $_REQUEST['Password'];
$Nickname = $_REQUEST['Nickname'];
$Birthday = $_REQUEST['Birthday'];
if (!empty($_REQUEST['id']) ) {
$id = $_REQUEST['id'];
$sql = "update $tablename set STUID='$STUID',Password='$Password',Nickname='$Nickname' where UNum=$id";
}else{ // is add
$sql = "insert into $tablename (STUID, Password, Nickname, DBSTS) values('$STUID','$Password','$Nickname', 'A')";
}
$result = $db->query($sql);
}
}
if($type != "data")
{
if ($result == "true"){
echo json_encode(array('success'=>true));
} else {
echo json_encode(array('msg'=>'had errors occured. ' . $result));
}
}
?>dal 资料存取层 定义完了以后,就可以来实现 UI 介面来呼叫 dal,因为是使用 AJAX 的方式 来存取资料,所以 MVC 中的控制层有一部分是放在 介面层中,这部分,后面可以在用 JavaScript 将这部分的控制层标准化,在藉由 php 后端来传递参数呼叫,如此一来,则还是将所有控制大权集中在一支程式中,这些后面文章会再来介绍,这边先暂时打住。
datagrid.php
<!DOCTYPE html PUBLIC "-//W3C//DTD HTML 4.01 Transitional//EN" "http://www.w3.org/TR/html4/loose.dtd">
<html>
<head>
<meta http-equiv="Content-Type" content="text/html; charset=UTF-8">
<title>easyUI datagrid</title>
<link rel="stylesheet" type="text/css" href="./../JS/EasyUI/themes/default/easyui.css">
<link rel="stylesheet" type="text/css" href="./../JS/EasyUI/themes/icon.css">
<script type="text/javascript" src="./../JS/jquery.js"></script>
<script type="text/javascript" src="./../JS/EasyUI/jquery.easyui.min.js"></script>
<script type="text/javascript" src="./../JS/EasyUI/easyui-lang-zh_CN.js"></script>
<style type="text/css">
#fm{
margin:0;
padding:10px 30px;
}
.ftitle{
font-size:14px;
font-weight:bold;
color:#666;
padding:5px 0;
margin-bottom:10px;
border-bottom:1px solid #ccc;
}
.fitem{
margin-bottom:5px;
}
.fitem label{
display:inline-block;
width:80px;
}
</style>
<script type="text/javascript">
var url;
function newUser(){
$('#dlg').dialog('open').dialog('setTitle','New User');
$('#fm').form('clear');
url = 'dal_user.php?type=add';
}
function editUser(){
var row = $('#myDG').datagrid('getSelected');
if (row){
if(typeof(row.UNum) !== 'undefined')
{
$('#dlg').dialog('open').dialog('setTitle','Edit User');
$('#fm').form('load',row);
url = 'dal_user.php?type=mod&id='+row.UNum;
}else{
alert("undefined");
}
}
}
function saveUser(){
$('#fm').form('submit',{
url: url,
onSubmit: function(){
//alert('sub :'+ url);
return $(this).form('validate');
},
success: function(result){
var result = eval('('+result+')');
//alert(result.success);
if (result.success){
$('#dlg').dialog('close'); // close the dialog
$('#myDG').datagrid('reload'); // reload the user data
} else {
$.messager.show({
title: 'Error',
msg: result.msg
});
}
}
});
}
function removeUser(){
var row = $('#myDG').datagrid('getSelected');
if (row){
$.messager.confirm('Confirm','Are you sure you want to remove this user?',function(r){
if (r){
//alert(row.UNum);
$.post('dal_user.php', {type:'del', id:row.UNum}, function(result){
if (result.success){
$('#myDG').datagrid('reload'); // reload the user data
} else {
$.messager.show({ // show error message
title: 'Error',
msg: result.msg
});
}
},'json');
}
});
}
}
</script>
</head>
<body>
<h2>easyUI datagrid url 存取測試</h2>
<table id="myDG" class="easyui-datagrid" style="width:700px;height:450px"
url="dal_user.php?type=data" toolbar="#toolbar"
title="Load Data" iconCls="icon-save" pagination="true"
toolbar="#toolbar" rownumbers="true" fitColumns="true" singleSelect="true">
<thead>
<tr>
<th field="STUID" width="120">User ID</th>
<th field="Password" width="80" align="right">Password</th>
<th field="Birthday" width="80" align="right">Birthday</th>
<th field="Nickname" width="200">Nickname</th>
<th field="DBSTS" width="60" align="center">DBSTS</th>
</tr>
</thead>
</table>
<p id="toolbar">
<a href="#" class="easyui-linkbutton" iconCls="icon-add" plain="true" onclick="newUser()">New User</a>
<a href="#" class="easyui-linkbutton" iconCls="icon-edit" plain="true" onclick="editUser()">Edit User</a>
<a href="#" class="easyui-linkbutton" iconCls="icon-remove" plain="true" onclick="removeUser()">Remove User</a>
</p>
<p id="dlg" class="easyui-dialog" style="width:400px;height:350px;padding:10px 20px"
closed="true" buttons="#dlg-buttons">
<p class="ftitle">User Information</p>
<form id="fm" method="post" novalidate>
<p class="fitem">
<label>User ID:</label>
<input name="STUID" class="easyui-validatebox" required="true">
</p>
<p class="fitem">
<label>Password:</label>
<input name="Password" class="easyui-validatebox" required="true">
</p>
<p class="fitem">
<label>Nickname:</label>
<input name="Nickname">
</p>
<p class="fitem">
<label>Birthday:</label>
<input name="Birthday" class="easyui-validatebox" validType="email">
</p>
</form>
</p>
<p id="dlg-buttons">
<a href="#" class="easyui-linkbutton" iconCls="icon-ok" onclick="saveUser()">Save</a>
<a href="#" class="easyui-linkbutton" iconCls="icon-cancel" onclick="javascript:$('#dlg').dialog('close')">Cancel</a>
</p>
</body>
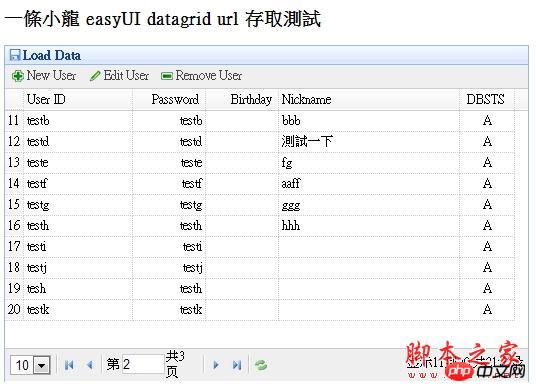
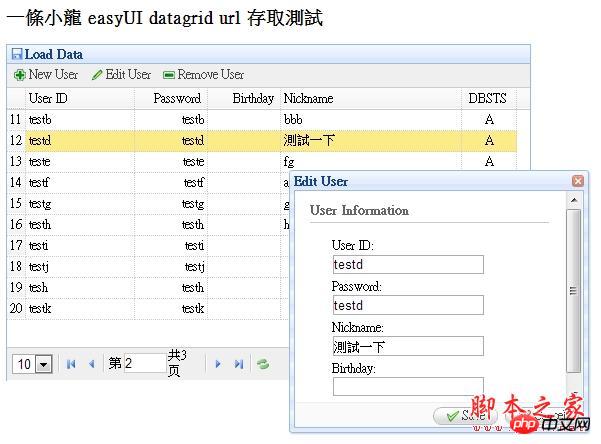
</html>运作结果画面如下所示:

以上就是本文的全部内容,希望对大家的学习有所帮助,更多相关内容请关注PHP中文网!
相关推荐:
以上是关于PHP – EasyUI DataGrid 资料存的方法介绍的详细内容。更多信息请关注PHP中文网其他相关文章!
 如何检查PHP会话是否已经开始?Apr 30, 2025 am 12:20 AM
在PHP中,可以使用session_status()或session_id()来检查会话是否已启动。1)使用session_status()函数,如果返回PHP_SESSION_ACTIVE,则会话已启动。2)使用session_id()函数,如果返回非空字符串,则会话已启动。这两种方法都能有效地检查会话状态,选择使用哪种方法取决于PHP版本和个人偏好。
 描述一个场景,其中使用会话在Web应用程序中至关重要。Apr 30, 2025 am 12:16 AM
sessionsarevitalinwebapplications,尤其是在commercePlatform之前。
 如何管理PHP中的并发会话访问?Apr 30, 2025 am 12:11 AM
在PHP中管理并发会话访问可以通过以下方法:1.使用数据库存储会话数据,2.采用Redis或Memcached,3.实施会话锁定策略。这些方法有助于确保数据一致性和提高并发性能。
 使用PHP会话的局限性是什么?Apr 30, 2025 am 12:04 AM
PHPsessionshaveseverallimitations:1)Storageconstraintscanleadtoperformanceissues;2)Securityvulnerabilitieslikesessionfixationattacksexist;3)Scalabilityischallengingduetoserver-specificstorage;4)Sessionexpirationmanagementcanbeproblematic;5)Datapersis
 解释负载平衡如何影响会话管理以及如何解决。Apr 29, 2025 am 12:42 AM
负载均衡会影响会话管理,但可以通过会话复制、会话粘性和集中式会话存储解决。1.会话复制在服务器间复制会话数据。2.会话粘性将用户请求定向到同一服务器。3.集中式会话存储使用独立服务器如Redis存储会话数据,确保数据共享。
 说明会话锁定的概念。Apr 29, 2025 am 12:39 AM
Sessionlockingisatechniqueusedtoensureauser'ssessionremainsexclusivetooneuseratatime.Itiscrucialforpreventingdatacorruptionandsecuritybreachesinmulti-userapplications.Sessionlockingisimplementedusingserver-sidelockingmechanisms,suchasReentrantLockinJ
 有其他PHP会议的选择吗?Apr 29, 2025 am 12:36 AM
PHP会话的替代方案包括Cookies、Token-basedAuthentication、Database-basedSessions和Redis/Memcached。1.Cookies通过在客户端存储数据来管理会话,简单但安全性低。2.Token-basedAuthentication使用令牌验证用户,安全性高但需额外逻辑。3.Database-basedSessions将数据存储在数据库中,扩展性好但可能影响性能。4.Redis/Memcached使用分布式缓存提高性能和扩展性,但需额外配
 在PHP的上下文中定义'会话劫持”一词。Apr 29, 2025 am 12:33 AM
Sessionhijacking是指攻击者通过获取用户的sessionID来冒充用户。防范方法包括:1)使用HTTPS加密通信;2)验证sessionID的来源;3)使用安全的sessionID生成算法;4)定期更新sessionID。


热AI工具

Undresser.AI Undress
人工智能驱动的应用程序,用于创建逼真的裸体照片

AI Clothes Remover
用于从照片中去除衣服的在线人工智能工具。

Undress AI Tool
免费脱衣服图片

Clothoff.io
AI脱衣机

Video Face Swap
使用我们完全免费的人工智能换脸工具轻松在任何视频中换脸!

热门文章

热工具

WebStorm Mac版
好用的JavaScript开发工具

SublimeText3 Mac版
神级代码编辑软件(SublimeText3)

PhpStorm Mac 版本
最新(2018.2.1 )专业的PHP集成开发工具

Dreamweaver CS6
视觉化网页开发工具

适用于 Eclipse 的 SAP NetWeaver 服务器适配器
将Eclipse与SAP NetWeaver应用服务器集成。


