

这次给大家带来vue的defineProperty属性使用,vue的defineProperty属性使用注意事项有哪些,下面就是实战案例,一起来看一下。
1.原理
vue的双向数据绑定的原理相信大家都十分了解;主要是通过ES5的Object对象的defineProperty属性;重写data的set和get函数来实现的
所以接下来不使用ES6进行实际的代码开发;过程中如果函数使用父级this的情况;还是使用显示缓存中间变量和闭包来处理;原因是箭头函数没有独立的执行上下文this;所以箭头函数内部出现this对象会直接访问父级;所以也能看出箭头函数是无法完全替代function的使用场景的;比如我们需要独立的this或者argument的时候
1.2 defineProperty是什么
语法:
Object.defineProperty(obj, prop, descriptor)
参数:
obj:必要的目标对象
prop:必要的需要定义或者修改的属性名
descriptor:必要的目标属性全部拥有的属性
返回值:
返回传入的第一个函数;即第一个参数obj
该方法允许精确的添加或者修改对象的属性;通过赋值来添加的普通属性会创建在属性枚举期间显示(fon...in;object.key);这些添加的值可以被改变也可以删除;也可以给这个属性设置一些特性;比如是否只读不可写;目前提供两种形式:数据描述(set;get;value;writable;enumerable;confingurable)和存取器描述(set;get)
数据描述
当修改或者定义对象的某个属性的时候;给这个属性添加一些特性
var obj = {
 name:'xiangha'
}
// 对象已有的属性添加特性描述
Object.defineProperty(obj,'name',{
 configurable:true | false, // 如果是false则不可以删除
 enumerable:true | false, // 如果为false则在枚举时候会忽略
 value:'任意类型的值,默认undefined'
 writable:true | false // 如果为false则不可采用数据运算符进行赋值
});
但是存在一个交叉;如果wrirable为true;而configurable为false的时候;所以需要枚举处理enumerable为false
--- 我是一个writable栗子 ---
var obj = {};
Object.defineProperty(obj,'val',{
 value:'xiangha',
 writable:false, // false
 enumerable:true,
 configurable:true
});
obj.val = '书记'; // 这个时候是更改不了a的
--- 我是一个configurable栗子 ---
var obj = {};
Object.defineProperty(obj,'val',{
 value:'xiangha',
 writable:true, // true
 enumerable:true,
 configurable:false // false
});
obj.val = '书记'; // 这个时候是val发生了改变
delete obj.val 会返回false;并且val没有删除
--- 我是一个enumerable栗子 ---
var obj = {};
Object.defineProperty(obj,'val',{
 value:'xiangha',
 writable:true,
 enumerable:false, // false
 configurable:true
});
for(var i in obj){
 console.log(obj[i]) // 没有具体值
}
综上:对于我们有影响主要是configurable控制是否可以删除;writable控制是否可以修改赋值;enumerable是否可以枚举
所以说一旦使用Object.defineProperty()给对象添加属性;那么如果不设置属性的特性;则默认值都为false
var obj = {};
Object.defineProperty(obj,'name',{}); // 定义了心属性name后;这个属性的特性的值都为false;这就导致name这个是不能重写不能枚举不能再次设置特性的
obj.name = '书记';
console.log(obj.name); // undefined
for(var i in obj){
 console.log(obj[i])
}
总结特性:
value:设置属性的值
writable ['raɪtəbl] :值是否可以重写
enumerable [ɪ'nju:mərəbəl]:目标属性是否可以被枚举
configurable [kən'fɪgərəbl]:目标属性是否可以被删除是否可以再次修改特性
存取器描述
var obj = {};
Object.defineProperty(obj,'name',{
 get:function(){} | undefined,
 set:function(){} | undefined,
 configuracble:true | false,
 enumerable:true | false
})
注意:当前使用了setter和getter方法;不允许使用writable和value两个属性
gettet&& setter
当设置获取对象的某个属性的时候;可以提供getter和setter方法
var obj = {};
var value = 'xiangha';
Object.defineProperty(obj,'name',{
 get:function(){
  // 获取值触发
  return value
 },
 set:function(val){
  // 设置值的时候触发;设置的新值通过参数val拿到
  value = val;
 }
});
console.log(obj.name); // xiangha
obj.name = '书记';
console,.log(obj.name); // 书记
get和set不是必须成对出现对;任写一个就行;如果不设置set和get方法;则为undefined
哈哈;前戏终于铺垫完成了
补充:如果使用vue开发项目;尝试去打印data对象的时候;会发现data内的每一个属性都有get和set属性方法;这里说明一下vue和angular的双向数据绑定不同
angular是用脏数据检测;Model发生改变的时候;会检测所有视图是否绑定了相关的数据;再更新视图
vue是使用的发布订阅模式;点对点的绑定数据
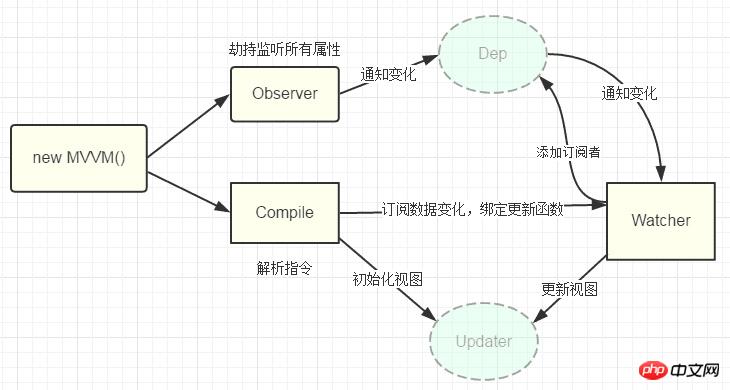
2.实现
<p id="app">
 <form>
  <input type="text" v-model="number">
  <button type="button" v-click="increment">增加</button>
 </form>
 <h3 v-bind="number"></h3>
 </p>
页面很简单;包含:
一个input,使用v-model指令
一个button,使用v-click指令
一个h3,使用v-bind指令。
我们最后也会类似vue对方式来实现双向数据绑定
var app = new xhVue({
  el:'#app',
  data: {
  number: 0
  },
  methods: {
  increment: function() {
   this.number ++;
  },
  }
 })
2.1 定义
首先我们需要定义一个xhVue的构造函数
function xhVue(options){

}
2.2 添加
为了初始化这个构造函数;给其添加一个_init属性
function xhVue(options){
 this._init(options);
}
xhVue.prototype._init = function(options){
 this.$options = options; // options为使用时传入的结构体;包括el,data,methods等
 this.$el = document.querySelector(options.el); // el就是#app,this.$el是id为app的Element元素
 this.$data = options.data; // this.$data = {number:0}
 this.$methods = options.methods; // increment
}
2.3 改造升级
改造_init函数;并且实现_xhob函数;对data进行处理;重写set和get函数
xhVue.prototype._xhob = function(obj){ // obj = {number:0}
 var value;
 for(key in obj){
  if(obj.hasOwnProperty(ket)){
   value = obj[key];
   if(typeof value === 'object'){
    this._xhob(value);
   }
   Object.defineProperty(this.$data,key,{
    enumerable:true,
    configurable:true,
    get:function(){
     return value;
    },
    set:function(newVal){
     if(value !== newVal){
      value = newVal;
     }
    }
   })
  }
 }
}
xhVue.prototype._init = function(options){
 this.$options = options;
 this.$el = document.querySelector(options.el);
 this.$data = options.data;
 this.$method = options.methods;
 this._xhob(this.$data);
}
2.4 xhWatcher
指令类watcher;用来绑定更新函数;实现对DOM更新
function xhWatcher(name,el,vm,exp,attr){
 this.name = name; // 指令名称;对于文本节点;例如text
 this.el = el; // 指令对应DOM元素
 this.vm = vm; // 指令所属vue实例
 this.exp = exp; // 指令对应的值;例如number
 this.attr = attr; // 绑定的属性值;例如innerHTML
 this.update();
}
xhWatcher.prototype.update = function(){
 this.el[this.attr] = this.vm.$data[this.exp];
 // 例如h3的innerHTML = this.data.number;当numner改变则会触发本update方法;保证对应的DOM实时更新
}
2.5 完善_init和_xhob
继续完善_init和_xhob函数
// 给init的时候增加一个对象来存储model和view的映射关系;也就是我们前面定义的xhWatcher的实例;当model发生变化时;我们会触发其中的指令另其更新;保证了view也同时更新
xhVue.prototype._init = function(options){
 this.$options = options;
 this.$el = document.querySelector(options.el);
 this.$data = options.data;
 this.$method = options.methods;

 this._binding = {}; // _binding
 this._xhob(this.$data);
}
// 通过init出来的_binding
xhVue.prototype._xhob = function(obj){ // obj = {number:0}
 var value;
 for(key in obj){
  if(obj.hasOwnProperty(ket)){
   this._binding[key] = {
    // _binding = {number:_directives:[]}
    _directives = []
   }
   value = obj[key];
   if(typeof value === 'object'){
    this._xhob(value);
   }
   var binding = this._binding[key];
   Object.defineProperty(this.$data,key,{
    enumerable:true,
    configurable:true,
    get:function(){
     return value;
    },
    set:function(newVal){
     if(value !== newVal){
      value = newVal;
      // 当number改变时;触发_binding[number]._directives中已绑定的xhWatcher更新
      binding._directives.forEach(function(item){
       item.update();
      });
     }
    }
   })
  }
 }
}
2.6 解析指令
怎么才能将view与model绑定;我们定义一个_xhcomplie函数来解析我们的指令(v-bind;v-model;v-clickde)并这这个过程中对view和model进行绑定
xhVue.prototype._xhcompile = function (root) {
// root是id为app的element的元素;也就是根元素
var _this = this;
var nodes = root.children;
for (var i = 0,len = nodes.length; i < len; i++) {
var node = nodes[i];
if (node.children.length) {
// 所有元素进行处理
this._xhcompile(node)
};
// 如果有v-click属性;我们监听他的click事件;触发increment事件,即number++
if (node.hasAttribute('v-click')) {
node.onclick = (function () {
var attrVal = nodes[i].getAttribute('v-click');
// bind让data的作用域与methods函数的作用域保持一致
return _this.$method[attrVal].bind(_this.$data);
})();
};
// 如果有v-model属性;并且元素是input或者textrea;我们监听他的input事件
if (node.hasAttribute('v-model') && (node.tagName = 'INPUT' || node.tagName == 'TEXTAREA')) {
node.addEventListener('input', (function (key) {
var attrVal = node.getAttribute('v-model');
_this._binding[attrVal]._directives.push(new xhWatcher(
'input',
node,
_this,
attrVal,
'value'
));
return function () {
// 让number的值和node的value保持一致;就实现了双向数据绑定
_this.$data[attrVal] = nodes[key].value
}
})(i));
};
// 如果有v-bind属性;我们要让node的值实时更新为data中number的值
if (node.hasAttribute('v-bind')) {
var attrVal = node.getAttribute('v-bind');
_this._binding[attrVal]._directives.push(new xhWatcher(
'text',
node,
_this,
attrVal,
'innerHTML'
))
}
}
}并且将解析函数也加到_init函数中
xhVue.prototype._init = function(options){
 this.$options = options;
 this.$el = document.querySelector(options.el);
 this.$data = options.data;
 this.$method = options.methods;

 this._binding = {}; // _binding
 this._xhob(this.$data);
 this._xhcompile(this.$el);
}
最后
<!DOCTYPE html>
<html lang="en">
<head>
<meta charset="UTF-8">
<title>Document</title>
</head>
<body>
<p id="app">
<form>
<input type="text" v-model="number">
<button type="button" v-click="increment">增加</button>
</form>
<h3 v-bind="number"></h3>
</p>
</body>
<script>
function xhVue(options) {
this._init(options);
}
xhVue.prototype._init = function (options) {
this.$options = options;
this.$el = document.querySelector(options.el);
this.$data = options.data;
this.$method = options.methods;
this._binding = {}; // _binding
this._xhob(this.$data);
this._xhcompile(this.$el);
}
xhVue.prototype._xhob = function (obj) {
var value;
for (key in obj) {
if (obj.hasOwnProperty(key)) {
this._binding[key] = {
_directives: []
}
value = obj[key];
if (typeof value === 'object') {
this._xhob(value);
}
var binding = this._binding[key];
Object.defineProperty(this.$data, key, {
enumerable: true,
configurable: true,
get: function () {
console.log(`get${value}`)
return value;
},
set: function (newVal) {
if (value !== newVal) {
value = newVal;
console.log(`set${newVal}`)
// 当number改变时;触发_binding[number]._directives中已绑定的xhWatcher更新
binding._directives.forEach(function (item) {
item.update();
});
}
}
})
}
}
}
xhVue.prototype._xhcompile = function (root) {
// root是id为app的element的元素;也就是根元素
var _this = this;
var nodes = root.children;
for (var i = 0, len = nodes.length; i < len; i++) {
var node = nodes[i];
if (node.children.length) {
// 所有元素进行处理
this._xhcompile(node)
};
// 如果有v-click属性;我们监听他的click事件;触发increment事件,即number++
if (node.hasAttribute('v-click')) {
node.onclick = (function () {
var attrVal = node.getAttribute('v-click');
console.log(attrVal);
// bind让data的作用域与method函数的作用域保持一致
return _this.$method[attrVal].bind(_this.$data);
})();
};
// 如果有v-model属性;并且元素是input或者textrea;我们监听他的input事件
if (node.hasAttribute('v-model') && (node.tagName = 'INPUT' || node.tagName == 'TEXTAREA')) {
node.addEventListener('input', (function (key) {
var attrVal = node.getAttribute('v-model');
_this._binding[attrVal]._directives.push(new xhWatcher(
'input',
node,
_this,
attrVal,
'value'
));
return function () {
// 让number的值和node的value保持一致;就实现了双向数据绑定
_this.$data[attrVal] = nodes[key].value
}
})(i));
};
// 如果有v-bind属性;我们要让node的值实时更新为data中number的值
if (node.hasAttribute('v-bind')) {
var attrVal = node.getAttribute('v-bind');
_this._binding[attrVal]._directives.push(new xhWatcher(
'text',
node,
_this,
attrVal,
'innerHTML'
))
}
}
}
function xhWatcher(name, el, vm, exp, attr) {
this.name = name; // 指令名称;对于文本节点;例如text
this.el = el; // 指令对应DOM元素
this.vm = vm; // 指令所属vue实例
this.exp = exp; // 指令对应的值;例如number
this.attr = attr; // 绑定的属性值;例如innerHTML
this.update();
}
xhWatcher.prototype.update = function () {
this.el[this.attr] = this.vm.$data[this.exp];
// 例如h3的innerHTML = this.data.number;当numner改变则会触发本update方法;保证对应的DOM实时更新
}
var app = new xhVue({
el: '#app',
data: {
number: 0
},
methods: {
increment: function () {
this.number++;
}
}
});
</script>
</html>
相信看了本文案例你已经掌握了方法,更多精彩请关注php中文网其它相关文章!
推荐阅读:
以上是vue的defineProperty属性使用的详细内容。更多信息请关注PHP中文网其他相关文章!

 JavaScript的起源:探索其实施语言Apr 29, 2025 am 12:51 AM
JavaScript起源于1995年,由布兰登·艾克创造,实现语言为C语言。1.C语言为JavaScript提供了高性能和系统级编程能力。2.JavaScript的内存管理和性能优化依赖于C语言。3.C语言的跨平台特性帮助JavaScript在不同操作系统上高效运行。
 幕后:什么语言能力JavaScript?Apr 28, 2025 am 12:01 AM
JavaScript在浏览器和Node.js环境中运行,依赖JavaScript引擎解析和执行代码。1)解析阶段生成抽象语法树(AST);2)编译阶段将AST转换为字节码或机器码;3)执行阶段执行编译后的代码。
 Python和JavaScript的未来:趋势和预测Apr 27, 2025 am 12:21 AM
Python和JavaScript的未来趋势包括:1.Python将巩固在科学计算和AI领域的地位,2.JavaScript将推动Web技术发展,3.跨平台开发将成为热门,4.性能优化将是重点。两者都将继续在各自领域扩展应用场景,并在性能上有更多突破。
 Python vs. JavaScript:开发环境和工具Apr 26, 2025 am 12:09 AM
Python和JavaScript在开发环境上的选择都很重要。1)Python的开发环境包括PyCharm、JupyterNotebook和Anaconda,适合数据科学和快速原型开发。2)JavaScript的开发环境包括Node.js、VSCode和Webpack,适用于前端和后端开发。根据项目需求选择合适的工具可以提高开发效率和项目成功率。
 JavaScript是用C编写的吗?检查证据Apr 25, 2025 am 12:15 AM
是的,JavaScript的引擎核心是用C语言编写的。1)C语言提供了高效性能和底层控制,适合JavaScript引擎的开发。2)以V8引擎为例,其核心用C 编写,结合了C的效率和面向对象特性。3)JavaScript引擎的工作原理包括解析、编译和执行,C语言在这些过程中发挥关键作用。
 JavaScript的角色:使网络交互和动态Apr 24, 2025 am 12:12 AM
JavaScript是现代网站的核心,因为它增强了网页的交互性和动态性。1)它允许在不刷新页面的情况下改变内容,2)通过DOMAPI操作网页,3)支持复杂的交互效果如动画和拖放,4)优化性能和最佳实践提高用户体验。
 C和JavaScript:连接解释Apr 23, 2025 am 12:07 AM
C 和JavaScript通过WebAssembly实现互操作性。1)C 代码编译成WebAssembly模块,引入到JavaScript环境中,增强计算能力。2)在游戏开发中,C 处理物理引擎和图形渲染,JavaScript负责游戏逻辑和用户界面。
 从网站到应用程序:JavaScript的不同应用Apr 22, 2025 am 12:02 AM
JavaScript在网站、移动应用、桌面应用和服务器端编程中均有广泛应用。1)在网站开发中,JavaScript与HTML、CSS一起操作DOM,实现动态效果,并支持如jQuery、React等框架。2)通过ReactNative和Ionic,JavaScript用于开发跨平台移动应用。3)Electron框架使JavaScript能构建桌面应用。4)Node.js让JavaScript在服务器端运行,支持高并发请求。


热AI工具

Undresser.AI Undress
人工智能驱动的应用程序,用于创建逼真的裸体照片

AI Clothes Remover
用于从照片中去除衣服的在线人工智能工具。

Undress AI Tool
免费脱衣服图片

Clothoff.io
AI脱衣机

Video Face Swap
使用我们完全免费的人工智能换脸工具轻松在任何视频中换脸!

热门文章
热工具

SublimeText3 Linux新版
SublimeText3 Linux最新版

SecLists
SecLists是最终安全测试人员的伙伴。它是一个包含各种类型列表的集合,这些列表在安全评估过程中经常使用,都在一个地方。SecLists通过方便地提供安全测试人员可能需要的所有列表,帮助提高安全测试的效率和生产力。列表类型包括用户名、密码、URL、模糊测试有效载荷、敏感数据模式、Web shell等等。测试人员只需将此存储库拉到新的测试机上,他就可以访问到所需的每种类型的列表。

SublimeText3汉化版
中文版,非常好用

VSCode Windows 64位 下载
微软推出的免费、功能强大的一款IDE编辑器

PhpStorm Mac 版本
最新(2018.2.1 )专业的PHP集成开发工具

