

本篇文章主要介绍了用vue写一个仿简书的轮播图的示例代码,现在分享给大家,也给大家做个参考。
1.先展示最终效果:

2.解决思路
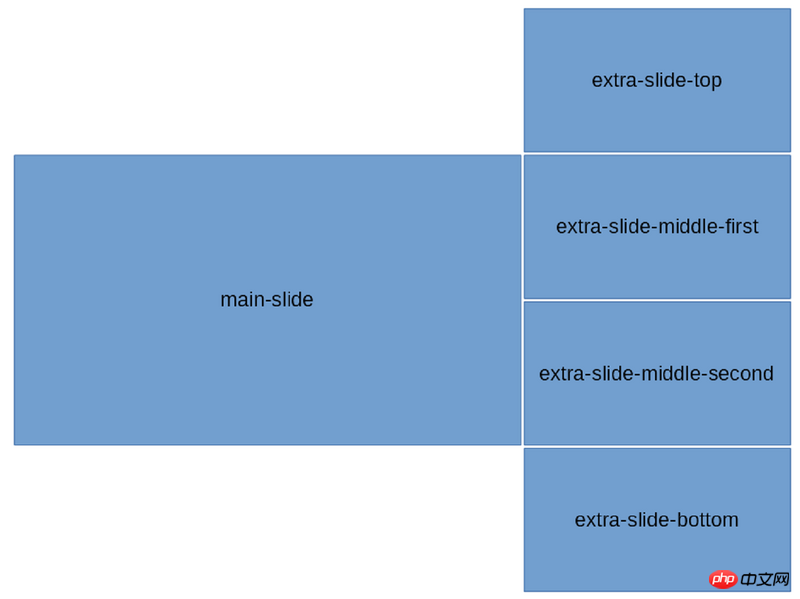
Vue的理念是以数据驱动视图,所以拒绝通过改变元素的margin-top来实现滚动效果。写好css样式,只需改变每张图片的class即可实现轮播效果。动画效果交给transition完成。可以将轮播图看成两个(mainSlide和extraSlide),各个图片的位置如图所示:
3.代码实现
各个slide的样式:
$width: 800px;   // 容器宽度
$height: 300px;   // 容器高度
$bWidth: 500px;   // 大图片宽度
$sWidth: $width - $bWidth; // 小图片宽度
$sHeight: $height / 2; // 小图片高度
#slider-wrapper{
  width: $width;
  height: $height;
  margin: 0 auto;
  cursor: pointer;
  background: #ddd;
  border-radius: 5px;
  box-shadow: 0 1px 6px rgba(0,0,0,0.117647), 0 1px 4px rgba(0,0,0,0.117647);
  display: flex;
  overflow: hidden;
  p{
    display: inline-block;
  }
}
.main-slide{
  width: $bWidth;
  height: $height;
  float: left;
  transition: all .4s ease;
}
.extra-slide{
  width: $sWidth;
  position: relative;
  .extra-slide-item{
    position: absolute;
    width: $sWidth;
    height: $sHeight;
    left: 0;
    transition: .4s ease-out;
  }
  .extra-slide-top{
    top: -$sHeight;
  }
  .extra-slide-middle-first{
    top: 0;
    z-index: 2
  }
  .extra-slide-middle-second{
    top: $sHeight;
    z-index: 2
  }
  .extra-slide-bottom{
    top: $height
  }
  .extra-slide-hide{
    display: none!important;
  }
}
模板包含两个轮播图:
<p id="slider-wrapper" @mouseover="stop" @mouseout="start">
  <!-- 轮播图1,mainSlide -->
  <p class="main-slide" :style="`background: url(${slideConfig[nowIndex].src})`"></p>
  <!-- 轮播图2,extraSlide -->
  <p class="extra-slide">
    <p class="extra-slide-item" :class="slideClass(i)" v-for="(v, i) in slideConfig" :key="i" :style="`background: url(${v.src}); background-size: cover`"></p>
  </p>
</p>
scripts部分,设置一个nowIndex,定时改变nowIndex。所有图片的class根据这个nowIndex来变化,这里使用了es6的map类型,详情点击:http://www.jb51.net/article/111734.htm
export default {
  name: 'slider',
  data: function() {
    return {
      slideInterval: null,
      nowIndex: 0,
      slideLength: this.slideConfig.length
    }
  },
  props: {
    slideConfig: {
      type: Array
    }
  },
  methods: {
    // 限制index不能超出图片列表长度
    resetIndex(i) {
      return i > this.slideLength - 1 ? i - this.slideLength : i
    },
    slideClass(i) {
      let nowIndex = this.nowIndex
      // Map就是key也可以是非字符串的对象,不用Map多写几个 if else 也可以
      let map = new Map([
        [this.resetIndex(nowIndex), 'extra-slide-top'],
        [this.resetIndex(nowIndex + 1), 'extra-slide-middle-first'],
        [this.resetIndex(nowIndex + 2), 'extra-slide-middle-second'],
        [this.resetIndex(nowIndex + 3), 'extra-slide-bottom']
      ])
      // 图片的class根据nowIndex的变化而变化
      return map.get(i) ? map.get(i) : 'extra-slide-hide'
    },
    start() {
      // 定时改变nowIndex
      this.slideInterval = setInterval(() => {
        this.nowIndex = this.nowIndex > this.slideLength - 2 ? 0 : this.nowIndex + 1
        console.log(this.nowIndex)
      }, 2000)
    },
    stop() {
      clearInterval(this.slideInterval)
      this.slideInterval = null
    }
  },
  mounted() {
    this.start()
  },
  destroyed() {
    this.stop()
  }
}
slideConfig,组件的props:
const prefix = '/src/assets/'
const slideConfig = [{
 src: prefix + 's1.jpg',
 title: '图1',
 desc: '说明1'
}, {
 src: prefix + 's2.jpg',
 title: '图2',
 desc: '说明2'
}, {
 src: prefix + 's3.jpg',
 title: '图3',
 desc: '说明3'
}, {
 src: prefix + 's4.jpg',
 title: '图4',
 desc: '说明4'
}, {
 src: prefix + 's5.jpg',
 title: '图5',
 desc: '说明5'
}, {
 src: prefix + 's6.jpg',
 title: '图6',
 desc: '说明6'
}]
export default slideConfig
使用:
<slider :slideConfig="slideConfig" />
上面是我整理给大家的,希望今后会对大家有帮助。
相关文章:
以上是用vue写一个仿简书的轮播图的示例代码的详细内容。更多信息请关注PHP中文网其他相关文章!

 Python vs. JavaScript:您应该学到哪种语言?May 03, 2025 am 12:10 AM
选择Python还是JavaScript应基于职业发展、学习曲线和生态系统:1)职业发展:Python适合数据科学和后端开发,JavaScript适合前端和全栈开发。2)学习曲线:Python语法简洁,适合初学者;JavaScript语法灵活。3)生态系统:Python有丰富的科学计算库,JavaScript有强大的前端框架。
 JavaScript框架:为现代网络开发提供动力May 02, 2025 am 12:04 AM
JavaScript框架的强大之处在于简化开发、提升用户体验和应用性能。选择框架时应考虑:1.项目规模和复杂度,2.团队经验,3.生态系统和社区支持。
 JavaScript,C和浏览器之间的关系May 01, 2025 am 12:06 AM
引言我知道你可能会觉得奇怪,JavaScript、C 和浏览器之间到底有什么关系?它们之间看似毫无关联,但实际上,它们在现代网络开发中扮演着非常重要的角色。今天我们就来深入探讨一下这三者之间的紧密联系。通过这篇文章,你将了解到JavaScript如何在浏览器中运行,C 在浏览器引擎中的作用,以及它们如何共同推动网页的渲染和交互。JavaScript与浏览器的关系我们都知道,JavaScript是前端开发的核心语言,它直接在浏览器中运行,让网页变得生动有趣。你是否曾经想过,为什么JavaScr
 node.js流带打字稿Apr 30, 2025 am 08:22 AM
Node.js擅长于高效I/O,这在很大程度上要归功于流。 流媒体汇总处理数据,避免内存过载 - 大型文件,网络任务和实时应用程序的理想。将流与打字稿的类型安全结合起来创建POWE
 Python vs. JavaScript:性能和效率注意事项Apr 30, 2025 am 12:08 AM
Python和JavaScript在性能和效率方面的差异主要体现在:1)Python作为解释型语言,运行速度较慢,但开发效率高,适合快速原型开发;2)JavaScript在浏览器中受限于单线程,但在Node.js中可利用多线程和异步I/O提升性能,两者在实际项目中各有优势。
 JavaScript的起源:探索其实施语言Apr 29, 2025 am 12:51 AM
JavaScript起源于1995年,由布兰登·艾克创造,实现语言为C语言。1.C语言为JavaScript提供了高性能和系统级编程能力。2.JavaScript的内存管理和性能优化依赖于C语言。3.C语言的跨平台特性帮助JavaScript在不同操作系统上高效运行。
 幕后:什么语言能力JavaScript?Apr 28, 2025 am 12:01 AM
JavaScript在浏览器和Node.js环境中运行,依赖JavaScript引擎解析和执行代码。1)解析阶段生成抽象语法树(AST);2)编译阶段将AST转换为字节码或机器码;3)执行阶段执行编译后的代码。
 Python和JavaScript的未来:趋势和预测Apr 27, 2025 am 12:21 AM
Python和JavaScript的未来趋势包括:1.Python将巩固在科学计算和AI领域的地位,2.JavaScript将推动Web技术发展,3.跨平台开发将成为热门,4.性能优化将是重点。两者都将继续在各自领域扩展应用场景,并在性能上有更多突破。


热AI工具

Undresser.AI Undress
人工智能驱动的应用程序,用于创建逼真的裸体照片

AI Clothes Remover
用于从照片中去除衣服的在线人工智能工具。

Undress AI Tool
免费脱衣服图片

Clothoff.io
AI脱衣机

Video Face Swap
使用我们完全免费的人工智能换脸工具轻松在任何视频中换脸!

热门文章
热工具

记事本++7.3.1
好用且免费的代码编辑器

SublimeText3 Linux新版
SublimeText3 Linux最新版

VSCode Windows 64位 下载
微软推出的免费、功能强大的一款IDE编辑器

适用于 Eclipse 的 SAP NetWeaver 服务器适配器
将Eclipse与SAP NetWeaver应用服务器集成。

mPDF
mPDF是一个PHP库,可以从UTF-8编码的HTML生成PDF文件。原作者Ian Back编写mPDF以从他的网站上“即时”输出PDF文件,并处理不同的语言。与原始脚本如HTML2FPDF相比,它的速度较慢,并且在使用Unicode字体时生成的文件较大,但支持CSS样式等,并进行了大量增强。支持几乎所有语言,包括RTL(阿拉伯语和希伯来语)和CJK(中日韩)。支持嵌套的块级元素(如P、DIV),

