

这次给大家带来重复使用Vue构建的分页组件,重复使用Vue构建分页组件的注意事项有哪些,下面就是实战案例,一起来看一下。
基本结构
分页组件应该允许用户访问第一个和最后一个页面,向前和向后移动,并直接切换到近距离的页面。
大多数应用程序在用户每次更改页面时都会发出API请求。我们需要确保组件允许这样做,但是我们不希望在组件内发出这样的请求。这样,我们将确保组件在整个应用程序中是可重用的,并且请求都是在操作或服务层中进行的。我们可以通过使用用户单击的页面的数字触发事件来实现此目的。
有几种可能的方法来实现API端点上的分页。对于这个例子,我们假设API告诉我们每个页面的结果数、页面总数和当前页面。这些将是我们的动态 props 。
相反,如果API只告诉记录的总数,那么我们可以通过将结果的数量除以每一页的结果数来计算页数: totalResults / resultsPerPage 。
我们想要渲染一个按钮到 第一页 、 上一页 、 页面数量范围 、 下一页 和 最后一页 :
[first] [next] [1] [2] [3] [previous] [last]
比如像下图这样的一个效果:

尽管我们希望渲染一个系列的页面,但并不希望渲染所有可用页面。让我们允许在我们的组件中设置一个最多可见按钮的 props 。
既然我们知道了我们想要的组件要做成什么,需要哪些数据,我们就可以设置HTML结构和所需要的 props 。
<template id="pagination">
  <ul class="pagination">
    <li>
      <button type="button">« First</button>
    </li>
    <li>
      <button type="button">«</button>
    </li>
    <!-- 页数的范围 -->
    <li>
      <button type="button">Next »</button>
    </li>
    <li>
      <button type="button">»</button>
    </li>
  </ul>
</template>
Vue.component('pagination', {
  template: '#pagination',
  props: {
    maxVisibleButtons: {
      type: Number,
      required: false,
      default: 3
    },
    totalPages: {
      type: Number,
      required: true
    },
    total: {
      type: Number,
      required: true
    },
    currentPage: {
      type: Number,
      required: true
    }
  }
})
上面的代码注册了一个 pagination 组件,如果调用这个组件:
<p id="app">
  <pagination></pagination>
</p>
这个时候看到的效果如下:

注意,为了能让组件看上去好看一点,给组件添加了一点样式。
事件监听
现在我们需要通知父组件,当用户单击按钮时,用户点击了哪个按钮。
我们需要为每个按钮添加一个事件监听器。 v-on 指令 允许侦听DOM事件。在本例中,我将使用 v-on 的快捷键 来侦听单击事件。
为了通知父节点,我们将使用 $emit 方法 来发出一个带有页面点击的事件。
我们还要确保分页按钮只有在页面可用时才唯一一个当前状态。为了这样做,将使用 v-bind 将 disabled 属性的值与当前页面绑定。我们还是使用 :v-bind 的快捷键 : 。
为了保持我们的 template 干净,将使用 computed 属性 来检查按钮是否被禁用。使用 computed 也会被缓存,这意味着只要 currentPage 不会更改,对相同计算属性的几个访问将返回先前计算的结果,而不必再次运行该函数。
<template id="pagination">
  <ul class="pagination">
    <li>
      <button type="button" @click="onClickFirstPage" :disabled="isInFirstPage">« First</button>
    </li>
    <li>
      <button type="button" @click="onClickPreviousPage" :disabled="isInFirstPage">«</button>
    </li>
    <li v-for="page in pages">
      <button type="button" @click="onClickPage(page.name)" :disabled="page.isDisabled"> {{ page.name }}</button>
    </li>
    <li>
      <button type="button" @click="onClickNextPage" :disabled="isInLastPage">Next »</button>
    </li>
    <li>
      <button type="button" @click="onClickLastPage" :disabled="isInLastPage">»</button>
    </li>
  </ul>
</template>
Vue.component('pagination', {
  template: '#pagination',
  props: {
    maxVisibleButtons: {
      type: Number,
      required: false,
      default: 3
    },
    totalPages: {
      type: Number,
      required: true
    },
    total: {
      type: Number,
      required: true
    },
    currentPage: {
      type: Number,
      required: true
    }
  },
  computed: {
    isInFirstPage: function () {
      return this.currentPage === 1
    },
    isInLastPage: function () {
      return this.currentPage === this.totalPages
    }
  },
  methods: {
    onClickFirstPage: function () {
      this.$emit('pagechanged', 1)
    },
    onClickPreviousPage: function () {
      this.$emit('pagechanged', this.currentPage - 1)
    },
    onClickPage: function (page) {
      this.$emit('pagechanged', page)
    },
    onClickNextPage: function () {
      this.$emit('pagechanged', this.currentPage + 1)
    },
    onClickLastPage: function () {
      this.$emit('pagechanged', this.totalPages)
    }
  }
})
在调用 pagination 组件时,将 totalPages 和 total 以及 currentPage 传到组件中:
<p id="app">
  <pagination :total-pages="11" :total="120" :current-page="currentPage"></pagination>
</p>
let app = new Vue({
  el: '#app',
  data () {
    return {
      currentPage: 2
    }
  }
})
运行上面的代码,将会报错:
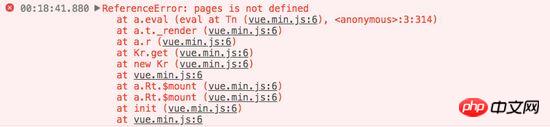
不难发现,在 pagination 组件中,咱们还少了 pages 。从前面介绍的内容,我们不难发现,需要计算出 pages 的值。
Vue.component('pagination', {
  template: '#pagination',
  props: {
    maxVisibleButtons: {
      type: Number,
      required: false,
      default: 3
    },
    totalPages: {
      type: Number,
      required: true
    },
    total: {
      type: Number,
      required: true
    },
    currentPage: {
      type: Number,
      required: true
    }
  },
  computed: {
    isInFirstPage: function () {
      return this.currentPage === 1
    },
    isInLastPage: function () {
      return this.currentPage === this.totalPages
    },
    startPage: function () {
      if (this.currentPage === 1) {
        return 1
      }
      if (this.currentPage === this.totalPages) {
        return this.totalPages - this.maxVisibleButtons + 1
      }
      return this.currentPage - 1
    },
    endPage: function () {
      return Math.min(this.startPage + this.maxVisibleButtons - 1, this.totalPages)
    },
    pages: function () {
      const range = []
      for (let i = this.startPage; i <= this.endPage; i+=1) {
        range.push({
          name: i,
          isDisabled: i === this.currentPage
        })
      }
      return range
    }
  },
  methods: {
    onClickFirstPage: function () {
      this.$emit('pagechanged', 1)
    },
    onClickPreviousPage: function () {
      this.$emit('pagechanged', this.currentPage - 1)
    },
    onClickPage: function (page) {
      this.$emit('pagechanged', page)
    },
    onClickNextPage: function () {
      this.$emit('pagechanged', this.currentPage + 1)
    },
    onClickLastPage: function () {
      this.$emit('pagechanged', this.totalPages)
    }
  }
})
这个时候得到的结果不再报错,你在浏览器中将看到下图这样的效果:

添加样式
现在我们的组件实现了最初想要的所有功能,而且添加了一些样式,让它看起来更像一个分页组件,而不仅像是一个列表。
我们还希望用户能够清楚地识别他们所在的页面。让我们改变表示当前页面的按钮的颜色。
为此,我们可以使用对象语法将HTML类绑定到当前页面按钮上。当使用对象语法绑定类名时,Vue将在值发生变化时自动切换类。
虽然 v-for 中的每个块都可以访问父作用域范围,但是我们将使用 method 来检查页面是否处于 active 状态,以便保持我们的 templage 干净。
Vue.component('pagination', {
  template: '#pagination',
  props: {
    maxVisibleButtons: {
      type: Number,
      required: false,
      default: 3
    },
    totalPages: {
      type: Number,
      required: true
    },
    total: {
      type: Number,
      required: true
    },
    currentPage: {
      type: Number,
      required: true
    }
  },
  computed: {
    isInFirstPage: function () {
      return this.currentPage === 1
    },
    isInLastPage: function () {
      return this.currentPage === this.totalPages
    },
    startPage: function () {
      if (this.currentPage === 1) {
        return 1
      }
      if (this.currentPage === this.totalPages) {
        return this.totalPages - this.maxVisibleButtons + 1
      }
      return this.currentPage - 1
    },
    endPage: function () {
      return Math.min(this.startPage + this.maxVisibleButtons - 1, this.totalPages)
    },
    pages: function () {
      const range = []
      for (let i = this.startPage; i <= this.endPage; i+=1) {
        range.push({
          name: i,
          isDisabled: i === this.currentPage
        })
      }
      return range
    }
  },
  methods: {
    onClickFirstPage: function () {
      this.$emit('pagechanged', 1)
    },
    onClickPreviousPage: function () {
      this.$emit('pagechanged', this.currentPage - 1)
    },
    onClickPage: function (page) {
      this.$emit('pagechanged', page)
    },
    onClickNextPage: function () {
      this.$emit('pagechanged', this.currentPage + 1)
    },
    onClickLastPage: function () {
      this.$emit('pagechanged', this.totalPages)
    },
    isPageActive: function (page) {
      return this.currentPage === page;
    }
  }
})
接下来,在 pages 中添加当前状态:
<li v-for="page in pages">
  <button type="button" @click="onClickPage(page.name)" :disabled="page.isDisabled" :class="{active: isPageActive(page.name)}"> {{ page.name }}</button>
</li>
这个时候你看到效果如下:

但依然还存在一点点小问题,当你在点击别的按钮时, active 状态并不会随着切换:

继续添加代码改变其中的效果:
let app = new Vue({
  el: '#app',
  data () {
    return {
      currentPage: 2
    }
  },
  methods: {
    onPageChange: function (page) {
      console.log(page)
      this.currentPage = page;
    }
  }
})
在调用组件时:
<p id="app">
  <pagination :total-pages="11" :total="120" :current-page="currentPage" @pagechanged="onPageChange"></pagination>
</p>
这个时候的效果如下了:

到这里,基本上实现了咱想要的分页组件效果。
无障碍化处理
熟悉Bootstrap的同学都应该知道,Bootstrap中的组件都做了无障碍化的处理,就是在组件中添加了WAI-ARIA相关的设计。比如在分页按钮上添加 aria-label 相关属性:
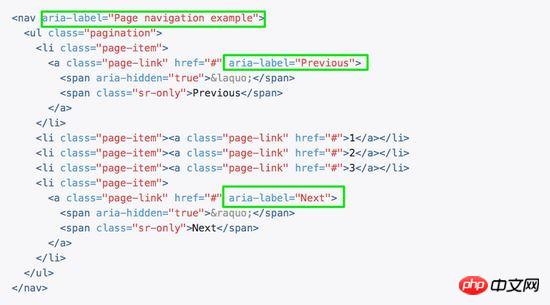
在我们这个组件中,也相应的添加有关于WAI-ARIA相关的处理:
<template id="pagination">
  <ul class="pagination" aria-label="Page navigation">
    <li>
      <button type="button" @click="onClickFirstPage" :disabled="isInFirstPage" aria-label="Go to the first page">« First</button>
    </li>
    <li>
      <button type="button" @click="onClickPreviousPage" :disabled="isInFirstPage" aria-label="Previous">«</button>
    </li>
    <li v-for="page in pages">
      <button type="button" @click="onClickPage(page.name)" :disabled="page.isDisabled" :aria-label="`Go to page number ${page.name}`"> {{ page.name }}</button>
    </li>
    <li>
      <button type="button" @click="onClickNextPage" :disabled="isInLastPage" aria-label="Next">Next »</button>
    </li>
    <li>
      <button type="button" @click="onClickLastPage" :disabled="isInLastPage" aria-label="Go to the last page">»</button>
    </li>
  </ul>
</template>
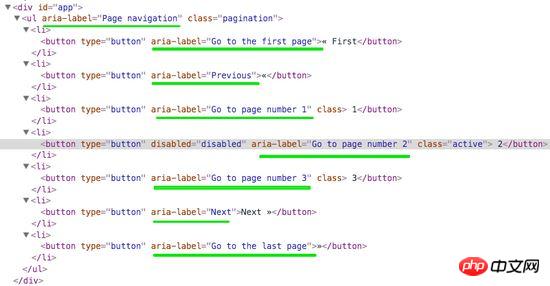
这样有关于 aria 相关的属性就加上了:
相信看了本文案例你已经掌握了方法,更多精彩请关注php中文网其它相关文章!
推荐阅读:
以上是重复使用Vue构建的分页组件的详细内容。更多信息请关注PHP中文网其他相关文章!

 JavaScript的角色:使网络交互和动态Apr 24, 2025 am 12:12 AM
JavaScript是现代网站的核心,因为它增强了网页的交互性和动态性。1)它允许在不刷新页面的情况下改变内容,2)通过DOMAPI操作网页,3)支持复杂的交互效果如动画和拖放,4)优化性能和最佳实践提高用户体验。
 C和JavaScript:连接解释Apr 23, 2025 am 12:07 AM
C 和JavaScript通过WebAssembly实现互操作性。1)C 代码编译成WebAssembly模块,引入到JavaScript环境中,增强计算能力。2)在游戏开发中,C 处理物理引擎和图形渲染,JavaScript负责游戏逻辑和用户界面。
 从网站到应用程序:JavaScript的不同应用Apr 22, 2025 am 12:02 AM
JavaScript在网站、移动应用、桌面应用和服务器端编程中均有广泛应用。1)在网站开发中,JavaScript与HTML、CSS一起操作DOM,实现动态效果,并支持如jQuery、React等框架。2)通过ReactNative和Ionic,JavaScript用于开发跨平台移动应用。3)Electron框架使JavaScript能构建桌面应用。4)Node.js让JavaScript在服务器端运行,支持高并发请求。
 Python vs. JavaScript:比较用例和应用程序Apr 21, 2025 am 12:01 AM
Python更适合数据科学和自动化,JavaScript更适合前端和全栈开发。1.Python在数据科学和机器学习中表现出色,使用NumPy、Pandas等库进行数据处理和建模。2.Python在自动化和脚本编写方面简洁高效。3.JavaScript在前端开发中不可或缺,用于构建动态网页和单页面应用。4.JavaScript通过Node.js在后端开发中发挥作用,支持全栈开发。
 C/C在JavaScript口译员和编译器中的作用Apr 20, 2025 am 12:01 AM
C和C 在JavaScript引擎中扮演了至关重要的角色,主要用于实现解释器和JIT编译器。 1)C 用于解析JavaScript源码并生成抽象语法树。 2)C 负责生成和执行字节码。 3)C 实现JIT编译器,在运行时优化和编译热点代码,显着提高JavaScript的执行效率。
 JavaScript在行动中:现实世界中的示例和项目Apr 19, 2025 am 12:13 AM
JavaScript在现实世界中的应用包括前端和后端开发。1)通过构建TODO列表应用展示前端应用,涉及DOM操作和事件处理。2)通过Node.js和Express构建RESTfulAPI展示后端应用。
 JavaScript和Web:核心功能和用例Apr 18, 2025 am 12:19 AM
JavaScript在Web开发中的主要用途包括客户端交互、表单验证和异步通信。1)通过DOM操作实现动态内容更新和用户交互;2)在用户提交数据前进行客户端验证,提高用户体验;3)通过AJAX技术实现与服务器的无刷新通信。
 了解JavaScript引擎:实施详细信息Apr 17, 2025 am 12:05 AM
理解JavaScript引擎内部工作原理对开发者重要,因为它能帮助编写更高效的代码并理解性能瓶颈和优化策略。1)引擎的工作流程包括解析、编译和执行三个阶段;2)执行过程中,引擎会进行动态优化,如内联缓存和隐藏类;3)最佳实践包括避免全局变量、优化循环、使用const和let,以及避免过度使用闭包。


热AI工具

Undresser.AI Undress
人工智能驱动的应用程序,用于创建逼真的裸体照片

AI Clothes Remover
用于从照片中去除衣服的在线人工智能工具。

Undress AI Tool
免费脱衣服图片

Clothoff.io
AI脱衣机

Video Face Swap
使用我们完全免费的人工智能换脸工具轻松在任何视频中换脸!

热门文章
热工具

VSCode Windows 64位 下载
微软推出的免费、功能强大的一款IDE编辑器

ZendStudio 13.5.1 Mac
功能强大的PHP集成开发环境

螳螂BT
Mantis是一个易于部署的基于Web的缺陷跟踪工具,用于帮助产品缺陷跟踪。它需要PHP、MySQL和一个Web服务器。请查看我们的演示和托管服务。

记事本++7.3.1
好用且免费的代码编辑器

mPDF
mPDF是一个PHP库,可以从UTF-8编码的HTML生成PDF文件。原作者Ian Back编写mPDF以从他的网站上“即时”输出PDF文件,并处理不同的语言。与原始脚本如HTML2FPDF相比,它的速度较慢,并且在使用Unicode字体时生成的文件较大,但支持CSS样式等,并进行了大量增强。支持几乎所有语言,包括RTL(阿拉伯语和希伯来语)和CJK(中日韩)。支持嵌套的块级元素(如P、DIV),

