

这篇文章主要介绍了jquery拖拽排序简单实现方法,涉及jQuery响应鼠标事件动态操作页面元素的相关技巧,需要的朋友可以参考下
本文实例讲述了jquery拖拽排序简单实现方法。分享给大家供大家参考,具体如下:
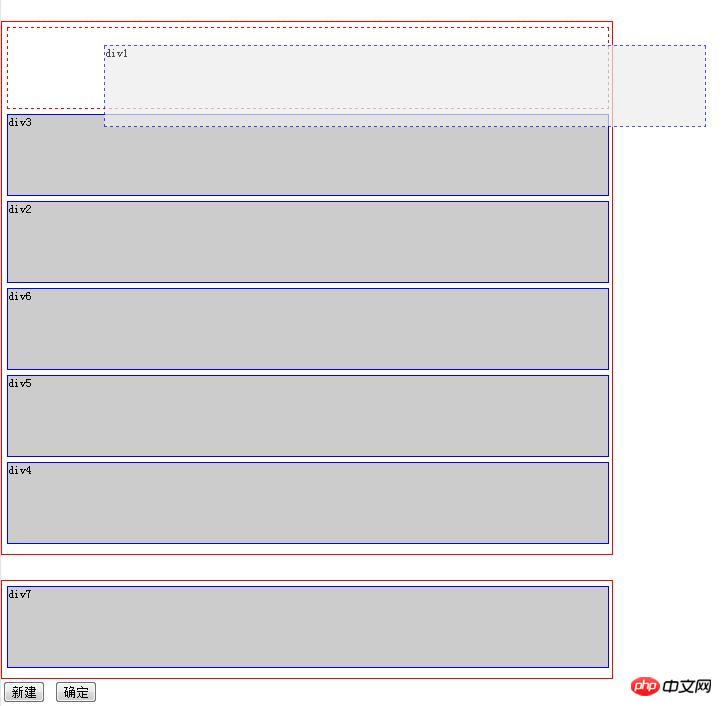
运行效果截图如下:
原来没有新建动作,分析代码后发现很容易增强~~
代码如下:
<!DOCTYPE HTML>
<html>
<head>
<meta http-equiv="Content-Type" content="text/html; charset=utf-8" />
<title>测试的拖拽功能</title>
<style type="text/css">
body, p { margin: 0; paading: 0; font-size: 12px; }
body { width:100%; margin: 0 auto; }
ul, li { margin: 0; padding: 0; list-style: none; }
.clear { clear: both; width: 1px; height: 0px; line-height: 0px; font-size: 1px; }
.drag_module_box { width: 600px; height: auto; margin: 25px 0 0 0; padding: 5px; border: 1px solid #f00; }
.drag_module_box1 { width: 600px; height: auto; margin: 25px 0 0 0; padding: 5px; border: 1px solid #f00; }
.drag_module_main { position: static; width: 600px; height: 80px; margin-bottom: 5px; border: 1px solid blue; background: #ccc; }
.drag_module_maindash { position: absolute; width: 600px; height: 80px; margin-bottom: 5px; border: 1px dashed blue; background: #ececec; opacity: 0.7; }
.drag_module_hide { width: 600px; height: 80px; margin-bottom: 5px; }
.drag_module_dash { position: sta;tic; width: 600px; height: 80px; margin-bottom: 5px; border: 1px dashed #f00; };
</style>
<script type="text/javascript" src="jquery-1.7.2.min.js"></script>
<script type="text/javascript">
$(document).ready( function () {
var range = { x: 0, y: 0 };//鼠标元素偏移量
var lastPos = { x: 0, y: 0, x1: 0, y1: 0 }; //拖拽对象的四个坐标
var tarPos = { x: 0, y: 0, x1: 0, y1: 0 }; //目标元素对象的坐标初始化
var thep = null, move = false;//拖拽对象 拖拽状态
var thepId =0, thepHeight = 0, thepHalf = 0; tarFirstY = 0; //拖拽对象的索引、高度、的初始化。
var tarp = null, tarFirst, tempp; //要插入的目标元素的对象, 临时的虚线对象
function loopbox(){ //循环初始化
$(".drag_module_box").find(".drag_module_main").each(function(){
console.log( 'find' );
$(this).mousedown(function (event){
//拖拽对象
thep = $(this);
//鼠标元素相对偏移量
range.x = event.pageX - thep.offset().left;
range.y = event.pageY - thep.offset().top;
thepId = thep.index();
thepHeight = thep.height();
thepHalf = thepHeight/2;
move = true;
thep.attr("class","drag_module_maindash");
// 创建新元素 插入拖拽元素之前的位置(虚线框)
$("<p class='drag_module_dash'></p>").insertBefore(thep);
});
});
}
loopbox();
$(".drag_module_box").mousemove(function(event) {
console.log( 'mousemove' );
if (!move) return false;
lastPos.x = event.pageX - range.x;
lastPos.y = event.pageY - range.y;
lastPos.y1 = lastPos.y + thepHeight;
// 拖拽元素随鼠标移动
thep.css({left: lastPos.x + 'px',top: lastPos.y + 'px'});
// 拖拽元素随鼠标移动 查找插入目标元素
var $main = $('.drag_module_main'); // 局部变量:按照重新排列过的顺序 再次获取 各个元素的坐标,
tempp = $(".drag_module_dash"); //获得临时 虚线框的对象
$main.each(function () {
tarp = $(this);
tarPos.x = tarp.offset().left;
tarPos.y = tarp.offset().top;
tarPos.y1 = tarPos.y + tarp.height()/2;
tarFirst = $main.eq(0); // 获得第一个元素
tarFirstY = tarFirst.offset().top + thepHalf ; // 第一个元素对象的中心纵坐标
//拖拽对象 移动到第一个位置
if (lastPos.y <= tarFirstY) {
tempp.insertBefore(tarFirst);
}
//判断要插入目标元素的 坐标后, 直接插入
if (lastPos.y >= tarPos.y - thepHalf && lastPos.y1 >= tarPos.y1 ) {
tempp.insertAfter(tarp);
}
});
}).mouseup(function(event) {
console.log( 'mouseup' );
if(thep==null) return false;
thep.insertBefore(tempp); // 拖拽元素插入到 虚线p的位置上
thep.attr("class", "drag_module_main"); //恢复对象的初始样式
$('.drag_module_dash').remove(); // 删除新建的虚线p
move=false;
});
$("#drag_module_insert").click(function(){
$("#drag_module_box1").html($("#drag_module_box1").html()+$("#drag_module_box2").html());
loopbox();
});
$("#drag_module_seque").click(function(){
$(".drag_module_box").find(".drag_module_main").each(function(){
console.log($(this).attr('id'));
});
});
});
</script>
</head>
<body>
<p class="drag_module_box" id="drag_module_box1">
<p class="drag_module_main" id="main1">p1</p>
<p class="drag_module_main" id="main2">p2</p>
<p class="drag_module_main" id="main3">p3</p>
<p class="drag_module_main" id="main4">p4</p>
<p class="drag_module_main" id="main5">p5</p>
<p class="drag_module_main" id="main6">p6</p>
</p>
<p class="drag_module_box1" id="drag_module_box2">
<p class="drag_module_main" id="main_first">p7</p>
</p>
<input type="button" value="新建" id="drag_module_insert"/>
<input type="button" value="确定" id="drag_module_seque"/>
</body>
</html>
相信看了本文案例你已经掌握了方法,更多精彩请关注php中文网其它相关文章!
推荐阅读:
以上是jquery操作多功能表格的详细内容。更多信息请关注PHP中文网其他相关文章!

 超越浏览器:现实世界中的JavaScriptApr 12, 2025 am 12:06 AM
JavaScript在现实世界中的应用包括服务器端编程、移动应用开发和物联网控制:1.通过Node.js实现服务器端编程,适用于高并发请求处理。2.通过ReactNative进行移动应用开发,支持跨平台部署。3.通过Johnny-Five库用于物联网设备控制,适用于硬件交互。
 使用Next.js(后端集成)构建多租户SaaS应用程序Apr 11, 2025 am 08:23 AM
我使用您的日常技术工具构建了功能性的多租户SaaS应用程序(一个Edtech应用程序),您可以做同样的事情。 首先,什么是多租户SaaS应用程序? 多租户SaaS应用程序可让您从唱歌中为多个客户提供服务
 如何使用Next.js(前端集成)构建多租户SaaS应用程序Apr 11, 2025 am 08:22 AM
本文展示了与许可证确保的后端的前端集成,并使用Next.js构建功能性Edtech SaaS应用程序。 前端获取用户权限以控制UI的可见性并确保API要求遵守角色库
 JavaScript:探索网络语言的多功能性Apr 11, 2025 am 12:01 AM
JavaScript是现代Web开发的核心语言,因其多样性和灵活性而广泛应用。1)前端开发:通过DOM操作和现代框架(如React、Vue.js、Angular)构建动态网页和单页面应用。2)服务器端开发:Node.js利用非阻塞I/O模型处理高并发和实时应用。3)移动和桌面应用开发:通过ReactNative和Electron实现跨平台开发,提高开发效率。
 JavaScript的演变:当前的趋势和未来前景Apr 10, 2025 am 09:33 AM
JavaScript的最新趋势包括TypeScript的崛起、现代框架和库的流行以及WebAssembly的应用。未来前景涵盖更强大的类型系统、服务器端JavaScript的发展、人工智能和机器学习的扩展以及物联网和边缘计算的潜力。
 神秘的JavaScript:它的作用以及为什么重要Apr 09, 2025 am 12:07 AM
JavaScript是现代Web开发的基石,它的主要功能包括事件驱动编程、动态内容生成和异步编程。1)事件驱动编程允许网页根据用户操作动态变化。2)动态内容生成使得页面内容可以根据条件调整。3)异步编程确保用户界面不被阻塞。JavaScript广泛应用于网页交互、单页面应用和服务器端开发,极大地提升了用户体验和跨平台开发的灵活性。
 Python还是JavaScript更好?Apr 06, 2025 am 12:14 AM
Python更适合数据科学和机器学习,JavaScript更适合前端和全栈开发。 1.Python以简洁语法和丰富库生态着称,适用于数据分析和Web开发。 2.JavaScript是前端开发核心,Node.js支持服务器端编程,适用于全栈开发。
 如何安装JavaScript?Apr 05, 2025 am 12:16 AM
JavaScript不需要安装,因为它已内置于现代浏览器中。你只需文本编辑器和浏览器即可开始使用。1)在浏览器环境中,通过标签嵌入HTML文件中运行。2)在Node.js环境中,下载并安装Node.js后,通过命令行运行JavaScript文件。


热AI工具

Undresser.AI Undress
人工智能驱动的应用程序,用于创建逼真的裸体照片

AI Clothes Remover
用于从照片中去除衣服的在线人工智能工具。

Undress AI Tool
免费脱衣服图片

Clothoff.io
AI脱衣机

AI Hentai Generator
免费生成ai无尽的。

热门文章
热工具

禅工作室 13.0.1
功能强大的PHP集成开发环境

WebStorm Mac版
好用的JavaScript开发工具

螳螂BT
Mantis是一个易于部署的基于Web的缺陷跟踪工具,用于帮助产品缺陷跟踪。它需要PHP、MySQL和一个Web服务器。请查看我们的演示和托管服务。

SublimeText3 Linux新版
SublimeText3 Linux最新版

记事本++7.3.1
好用且免费的代码编辑器

