本篇文章给大家分享的内容是关于面试:写一个Vue的双向数据绑定 ,有着一定的参考价值,有需要的朋友可以参考一下
在目前的前端面试中,vue的双向数据绑定已经成为了一个非常容易考到的点,即时不能当场写出来,至少也要能说出原理。本篇文章中我将会仿照vue写一个双向数据绑定的实例,名字就叫myVue吧。结合注释,希望能让大家有所收获。(推荐:vue面试题2020)
1、原理
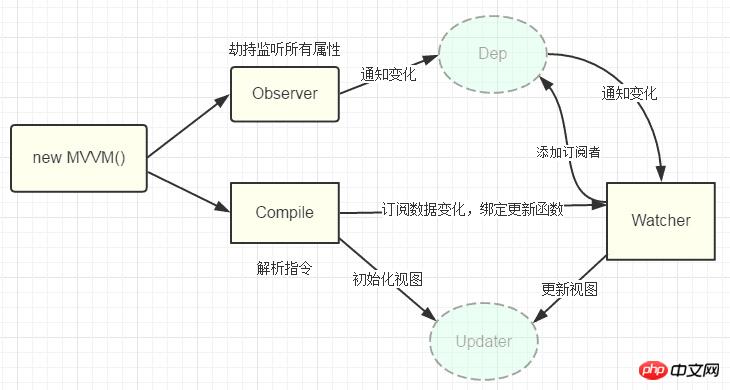
Vue的双向数据绑定的原理相信大家也都十分了解了,主要是通过 Object对象的defineProperty属性,重写data的set和get函数来实现的,这里对原理不做过多描述,只要还是来实现一个实例。为了使代码更加的清晰,这里只会实现最基本的内容,主要实现v-model,v-bind 和v-click三个命令,其他命令也可以自行补充。
添加网上的一张图

2、实现
页面结构很简单,如下
<p id="app">
    <form>
      <input type="text"  v-model="number">
      <button type="button" v-click="increment">增加</button>
    </form>
    <h3 v-bind="number"></h3>
  </p>
包含:
 1. 一个input,使用v-model指令
 2. 一个button,使用v-click指令
 3. 一个h3,使用v-bind指令。
我们最后会通过类似于vue的方式来使用我们的双向数据绑定,结合我们的数据结构添加注释
var app = new myVue({
      el:'#app',
      data: {
        number: 0
      },
      methods: {
        increment: function() {
          this.number ++;
        },
      }
    })
首先我们需要定义一个myVue构造函数:
function myVue(options) {

}
为了初始化这个构造函数,给它添加一 个_init属性
function myVue(options) {
  this._init(options);
}
myVue.prototype._init = function (options) {
    this.$options = options;  // options 为上面使用时传入的结构体,包括el,data,methods
    this.$el = document.querySelector(options.el); // el是 #app, this.$el是id为app的Element元素
    this.$data = options.data; // this.$data = {number: 0}
    this.$methods = options.methods;  // this.$methods = {increment: function(){}}
  }
接下来实现_obverse函数,对data进行处理,重写data的set和get函数
并改造_init函数
 myVue.prototype._obverse = function (obj) { // obj = {number: 0}
    var value;
    for (key in obj) {  //遍历obj对象
      if (obj.hasOwnProperty(key)) {
        value = obj[key];
        if (typeof value === 'object') {  //如果值还是对象,则遍历处理
          this._obverse(value);
        }
        Object.defineProperty(this.$data, key, {  //关键
          enumerable: true,
          configurable: true,
          get: function () {
            console.log(`获取${value}`);
            return value;
          },
          set: function (newVal) {
            console.log(`更新${newVal}`);
            if (value !== newVal) {
              value = newVal;
            }
          }
        })
      }
    }
  }

 myVue.prototype._init = function (options) {
    this.$options = options;
    this.$el = document.querySelector(options.el);
    this.$data = options.data;
    this.$methods = options.methods;

    this._obverse(this.$data);
  }
接下来我们写一个指令类Watcher,用来绑定更新函数,实现对DOM元素的更新
function Watcher(name, el, vm, exp, attr) {
    this.name = name;         //指令名称,例如文本节点,该值设为"text"
    this.el = el;             //指令对应的DOM元素
    this.vm = vm;             //指令所属myVue实例
    this.exp = exp;           //指令对应的值,本例如"number"
    this.attr = attr;         //绑定的属性值,本例为"innerHTML"

    this.update();
  }

  Watcher.prototype.update = function () {
    this.el[this.attr] = this.vm.$data[this.exp]; //比如 H3.innerHTML = this.data.number; 当number改变时,
    会触发这个update函数,保证对应的DOM内容进行了更新。
  }
更新_init函数以及_obverse函数
myVue.prototype._init = function (options) {
    //...
    this._binding = {};   //_binding保存着model与view的映射关系,也就是我们前面定义的Watcher的实例。
    当model改变时,我们会触发其中的指令类更新,保证view也能实时更新
    //...
  }

  myVue.prototype._obverse = function (obj) {
    //...
      if (obj.hasOwnProperty(key)) {
        this._binding[key] = {    // 按照前面的数据,_binding = {number: _directives: []}
          _directives: []
        };
        //...
        var binding = this._binding[key];
        Object.defineProperty(this.$data, key, {
          //...
          set: function (newVal) {
            console.log(`更新${newVal}`);
            if (value !== newVal) {
              value = newVal;
              binding._directives.forEach(function (item) {  // 当number改变时,
              触发_binding[number]._directives 中的绑定的Watcher类的更新
                item.update();
              })
            }
          }
        })
      }
    }
  }
那么如何将view与model进行绑定呢?接下来我们定义一个_compile函数,用来解析我们的指令(v-bind,v-model,v-clickde)等,并在这个过程中对view与model进行绑定。
myVue.prototype._init = function (options) {
//...
this._complie(this.$el);
}
myVue.prototype._complie = function (root) { root 为 id为app的Element元素,也就是我们的根元素
var _this = this;
var nodes = root.children;
for (var i = 0; i < nodes.length; i++) {
var node = nodes[i];
if (node.children.length) { // 对所有元素进行遍历,并进行处理
this._complie(node);
}
if (node.hasAttribute('v-click')) { // 如果有v-click属性,我们监听它的onclick事件,触发increment事件,
即number++
node.onclick = (function () {
var attrVal = nodes[i].getAttribute('v-click');
return _this.$methods[attrVal].bind(_this.$data);
//bind是使data的作用域与method函数的作用域保持一致
})();
}
if (node.hasAttribute('v-model') && (node.tagName = 'INPUT' || node.tagName == 'TEXTAREA')) {
// 如果有v-model属性,并且元素是INPUT或者TEXTAREA,我们监听它的input事件
node.addEventListener('input', (function(key) {
var attrVal = node.getAttribute('v-model');
//_this._binding['number']._directives = [一个Watcher实例]
// 其中Watcher.prototype.update = function () {
// node['vaule'] = _this.$data['number']; 这就将node的值保持与number一致
// }
_this._binding[attrVal]._directives.push(new Watcher(
'input',
node,
_this,
attrVal,
'value'
))
return function() {
_this.$data[attrVal] = nodes[key].value; // 使number 的值与 node的value保持一致,
已经实现了双向绑定
}
})(i));
}
if (node.hasAttribute('v-bind')) { // 如果有v-bind属性,我们只要使node的值及时更新为data中number的值即可
var attrVal = node.getAttribute('v-bind');
_this._binding[attrVal]._directives.push(new Watcher(
'text',
node,
_this,
attrVal,
'innerHTML'
))
}
}
}至此,我们已经实现了一个简单vue的双向绑定功能,包括v-bind, v-model, v-click三个指令。效果如下图

附上全部代码,不到150行
myVue <p id="app"> <form> <input type="text" v-model="number"> <button type="button" v-click="increment">增加</button> </form> <h3 v-bind="number"></h3> </p> <script> function myVue(options) { this._init(options); } myVue.prototype._init = function (options) { this.$options = options; this.$el = document.querySelector(options.el); this.$data = options.data; this.$methods = options.methods; this._binding = {}; this._obverse(this.$data); this._complie(this.$el); } myVue.prototype._obverse = function (obj) { var value; for (key in obj) { if (obj.hasOwnProperty(key)) { this._binding[key] = { _directives: [] }; value = obj[key]; if (typeof value === 'object') { this._obverse(value); } var binding = this._binding[key]; Object.defineProperty(this.$data, key, { enumerable: true, configurable: true, get: function () { console.log(`获取${value}`); return value; }, set: function (newVal) { console.log(`更新${newVal}`); if (value !== newVal) { value = newVal; binding._directives.forEach(function (item) { item.update(); }) } } }) } } } myVue.prototype._complie = function (root) { var _this = this; var nodes = root.children; for (var i = 0; i < nodes.length; i++) { var node = nodes[i]; if (node.children.length) { this._complie(node); } if (node.hasAttribute('v-click')) { node.onclick = (function () { var attrVal = nodes[i].getAttribute('v-click'); return _this.$methods[attrVal].bind(_this.$data); })(); } if (node.hasAttribute('v-model') && (node.tagName = 'INPUT' || node.tagName == 'TEXTAREA')) { node.addEventListener('input', (function(key) { var attrVal = node.getAttribute('v-model'); _this._binding[attrVal]._directives.push(new Watcher( 'input', node, _this, attrVal, 'value' )) return function() { _this.$data[attrVal] = nodes[key].value; } })(i)); } if (node.hasAttribute('v-bind')) { var attrVal = node.getAttribute('v-bind'); _this._binding[attrVal]._directives.push(new Watcher( 'text', node, _this, attrVal, 'innerHTML' )) } } } function Watcher(name, el, vm, exp, attr) { this.name = name; //指令名称,例如文本节点,该值设为"text" this.el = el; //指令对应的DOM元素 this.vm = vm; //指令所属myVue实例 this.exp = exp; //指令对应的值,本例如"number" this.attr = attr; //绑定的属性值,本例为"innerHTML" this.update(); } Watcher.prototype.update = function () { this.el[this.attr] = this.vm.$data[this.exp]; } window.onload = function() { var app = new myVue({ el:&#39;#app&#39;, data: { number: 0 }, methods: { increment: function() { this.number ++; }, } }) } </script>
相关推荐:
以上是关于面试:写一个Vue的双向数据绑定的详细内容。更多信息请关注PHP中文网其他相关文章!
 Python和JavaScript的未来:趋势和预测Apr 27, 2025 am 12:21 AM
Python和JavaScript的未来趋势包括:1.Python将巩固在科学计算和AI领域的地位,2.JavaScript将推动Web技术发展,3.跨平台开发将成为热门,4.性能优化将是重点。两者都将继续在各自领域扩展应用场景,并在性能上有更多突破。
 Python vs. JavaScript:开发环境和工具Apr 26, 2025 am 12:09 AM
Python和JavaScript在开发环境上的选择都很重要。1)Python的开发环境包括PyCharm、JupyterNotebook和Anaconda,适合数据科学和快速原型开发。2)JavaScript的开发环境包括Node.js、VSCode和Webpack,适用于前端和后端开发。根据项目需求选择合适的工具可以提高开发效率和项目成功率。
 JavaScript是用C编写的吗?检查证据Apr 25, 2025 am 12:15 AM
是的,JavaScript的引擎核心是用C语言编写的。1)C语言提供了高效性能和底层控制,适合JavaScript引擎的开发。2)以V8引擎为例,其核心用C 编写,结合了C的效率和面向对象特性。3)JavaScript引擎的工作原理包括解析、编译和执行,C语言在这些过程中发挥关键作用。
 JavaScript的角色:使网络交互和动态Apr 24, 2025 am 12:12 AM
JavaScript是现代网站的核心,因为它增强了网页的交互性和动态性。1)它允许在不刷新页面的情况下改变内容,2)通过DOMAPI操作网页,3)支持复杂的交互效果如动画和拖放,4)优化性能和最佳实践提高用户体验。
 C和JavaScript:连接解释Apr 23, 2025 am 12:07 AM
C 和JavaScript通过WebAssembly实现互操作性。1)C 代码编译成WebAssembly模块,引入到JavaScript环境中,增强计算能力。2)在游戏开发中,C 处理物理引擎和图形渲染,JavaScript负责游戏逻辑和用户界面。
 从网站到应用程序:JavaScript的不同应用Apr 22, 2025 am 12:02 AM
JavaScript在网站、移动应用、桌面应用和服务器端编程中均有广泛应用。1)在网站开发中,JavaScript与HTML、CSS一起操作DOM,实现动态效果,并支持如jQuery、React等框架。2)通过ReactNative和Ionic,JavaScript用于开发跨平台移动应用。3)Electron框架使JavaScript能构建桌面应用。4)Node.js让JavaScript在服务器端运行,支持高并发请求。
 Python vs. JavaScript:比较用例和应用程序Apr 21, 2025 am 12:01 AM
Python更适合数据科学和自动化,JavaScript更适合前端和全栈开发。1.Python在数据科学和机器学习中表现出色,使用NumPy、Pandas等库进行数据处理和建模。2.Python在自动化和脚本编写方面简洁高效。3.JavaScript在前端开发中不可或缺,用于构建动态网页和单页面应用。4.JavaScript通过Node.js在后端开发中发挥作用,支持全栈开发。
 C/C在JavaScript口译员和编译器中的作用Apr 20, 2025 am 12:01 AM
C和C 在JavaScript引擎中扮演了至关重要的角色,主要用于实现解释器和JIT编译器。 1)C 用于解析JavaScript源码并生成抽象语法树。 2)C 负责生成和执行字节码。 3)C 实现JIT编译器,在运行时优化和编译热点代码,显着提高JavaScript的执行效率。


热AI工具

Undresser.AI Undress
人工智能驱动的应用程序,用于创建逼真的裸体照片

AI Clothes Remover
用于从照片中去除衣服的在线人工智能工具。

Undress AI Tool
免费脱衣服图片

Clothoff.io
AI脱衣机

Video Face Swap
使用我们完全免费的人工智能换脸工具轻松在任何视频中换脸!

热门文章

热工具

安全考试浏览器
Safe Exam Browser是一个安全的浏览器环境,用于安全地进行在线考试。该软件将任何计算机变成一个安全的工作站。它控制对任何实用工具的访问,并防止学生使用未经授权的资源。

Dreamweaver Mac版
视觉化网页开发工具

WebStorm Mac版
好用的JavaScript开发工具

EditPlus 中文破解版
体积小,语法高亮,不支持代码提示功能

mPDF
mPDF是一个PHP库,可以从UTF-8编码的HTML生成PDF文件。原作者Ian Back编写mPDF以从他的网站上“即时”输出PDF文件,并处理不同的语言。与原始脚本如HTML2FPDF相比,它的速度较慢,并且在使用Unicode字体时生成的文件较大,但支持CSS样式等,并进行了大量增强。支持几乎所有语言,包括RTL(阿拉伯语和希伯来语)和CJK(中日韩)。支持嵌套的块级元素(如P、DIV),


