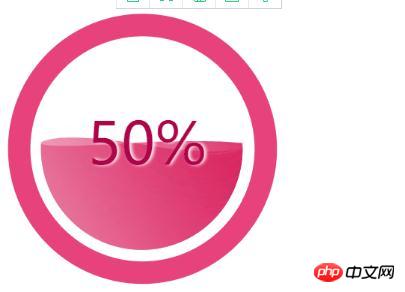
在SVG发展到今天,已经在互联网上进行了各式各样的运用,当然也就包括进度条以及进度球的制作,制作这个类型的动画交互该如何制作呢?接下来就带大家来揭秘吧!
1. 兴趣引导 > 最终效果 - SVG进度球:

2. HTML(包含SVG)结构
<!DOCTYPE html>
<html>
<head>
<meta charset="utf-8">
<title></title>
<style type="text/css">
.perText{font-size:58pt;font-family:Arial Rounded MT Bold;fill:#AD054A;text-anchor:middle;dominant-baseline: middle;text-shadow: 3px 0 6px #fff;transform:translate3d(6px,0,0);}
</style>
</head>
<body>
<svg xmlns="http://www.w3.org/2000/svg" x="0px" y="0px" width="384.415px" height="383.232px" viewBox="0 0 384.415 383.232" >
<circle style="fill:#E8427D;" cx="192.668" cy="195.399" r="180"/>
<circle style="fill:#FFFFFF;" cx="192.668" cy="195.399" r="150"/>
<circle style="display:none;fill:none;stroke:#000000;stroke-miterlimit:10;" cx="796.667" cy="-58.434" r="140.123"/>
<path style="fill:none;" d="M656.667,8386.899"/>
<path style="fill:none;" d="M656.667-7996.101"/>
<g>
<!-- 定义变量 -->
<defs>
<circle id="SVGID_1_" cx="191.668" cy="195.069" r="135" fill="red"/>
</defs>
<clipPath id="SVGID_2_">
<use xlink:href="#SVGID_1_" style="overflow:visible;" cx="191.668" cy="295.069" />
</clipPath>
<linearGradient id="SVGID_3_" gradientUnits="userSpaceOnUse" x1="431.4199" y1="221.6279" x2="-31.4133" y2="488.8449">
<stop offset="0" style="stop-color:#DA1654"/>
<stop offset="0.6452" style="stop-color:#E1457C;stop-opacity:0.4731"/>
<stop offset="1" style="stop-color:#F7F8F8;stop-opacity:0.3"/>
</linearGradient>
<linearGradient id="SVGID_4_" gradientUnits="userSpaceOnUse" x1="462.0762" y1="286.5215" x2="-63.9186" y2="590.2048">
<stop offset="0" style="stop-color:#F7F8F8;stop-opacity:0.3"/>
<stop offset="0.5" style="stop-color:#E1457C;stop-opacity:0.4731"/>
<stop offset="0.871" style="stop-color:#DA1654"/>
</linearGradient>
<!-- clip-path:url(#SVGID_2_) -->
<g class="group" id='pathGroup' style="clip-path:url(#SVGID_2_)">
<!--<path class="bgPath bgPath_01" style="fill:url(#SVGID_3_);" id="bgPathOne">
<animate
dur="5s"
attributeName="d"
attributeType="XML"
repeatCount="indefinite"
values=""
calcMode="linear"
keyTimes="0;.6;1"></animate>
</path> -->
<path class="bgPath bgPath_02" style="fill:url(#SVGID_3_);" d="">
<animate
dur="5s"
attributeName="d"
attributeType="XML"
repeatCount="indefinite"
values=""
calcMode="linear"
keyTimes="0;.3;1"></animate>
</path>-->
</g>
<text x='192.668' y='195.399' class="perText">50%</text>
</g>
</svg>
</body>
</html>3. javascript计算path路径,控制svg动画
class svgPercent
{
constructor({y1,y2,group,text})
{
this.y1 = y1 ? y1 : 0;
this.y2 = y2 ? y2 : 0;
this.group = group;
this.xmlns = 'http://www.w3.org/2000/svg';
this.textBox = text;
this.currentPercentText = '0%';
//初始 进度球
this.init();
}
init()
{
//1.获取路径数据
this.getSvgPathData(this.y1,this.y2);
//2.根据数据绘制路径
this.createPath();
//3.设置百分比
this.setPercentText();
//4.模拟进度增长的情况
this.changePathShape();
}
initChangeShape()
{
//1.获取路径数据
this.getSvgPathData(this.y1,this.y2);
//2. 设置路径形状改变
this.setPaths();
}
//获取路径数据
getSvgPathData(y,y2)
{
this.d1=`M327.898,${225.235+y}c3.086,${-11.496+y},4.74,${-11.496+y},4.74,${-36.167+y}c0,${0+y},-31.712,${-28.628+y},-140.67,${-2+y}c-120.71,${29.5+y},-125.21,${11+y}-140.67,${0.35+y}c0.032,${13.105+y},1.862,${25.787+y},5.247,${37.817+y}h-90.043 v390 h467 v-390 H327.898 z`;
this.a1=`M 327.898,${225.235+y}c 3.086,${-11.496+y},4.74,${-23.611+y},4.74,${-36.167+y}c 0,${0+y},-23.971,${54.165+y},-140.67,${-2+y}c-111.97,${-53.888+y}-135.301,${-9.835+y}-140.67,${0.35+y}c 0.032,${13.105+y},1.862,${25.787+y},5.247,${37.817+y}h-90.043 v390 h 467 v-390 H 327.898 z`;
this.d2 = `M 327.898,${237.031+y2}c 3.086,${-14.234+y2},4.74,${-29.236+y2},4.74,${-44.785+y2}c 0,${0+y2}-30.305,${36.653+y2}-140.67,${-2.477+y2}c-118.866,${-42.144+y2}-134.529,${-9.191+y2}-140.67,${0.434+y2}c 0.032,${16.229+y2},1.862,${31.933+y2},5.247,${46.828+y2}h-90.043 v 405.865 h 467 V ${237.031+y2} H 327.898 z`;
this.a2 = `M 327.898,${237.031+y2}c 3.086,${-14.234+y2},4.74,${-29.236+y2},4.74,${-44.785+y2}c 0,${0+y2}-56.638,${-36.347+y2}-140.67,${-2.477+y2}C 74.997,${236.916+y2},63,${199.232+y2},51.299,${190.203+y2}c 0.032,${16.229+y2},1.862,${31.933+y2},5.247,${46.828+y2}h-90.043 v 405.865 h 467 V ${237.031+y2} H 327.898 z`;
}
//创建path路径
createPath(group)
{
this.pathOne = document.createElementNS(this.xmlns,'path');
this.animate = document.createElementNS(this.xmlns,'animate');
this.pathOne.setAttribute('style','fill:url(#SVGID_3_)');
this.pathOne.setAttribute('d',this.d1);
this.animate.setAttribute('dur','5s');
this.animate.setAttribute('attributeName','d');
this.animate.setAttribute('attributeType','XML');
this.animate.setAttribute('repeatCount','indefinite');
this.animate.setAttribute('keyTimes','0;0.55;1');
this.animate.setAttribute('values',this.d1+';'+this.a1+';'+this.d1);
this.pathOne.appendChild(this.animate);
this.group.appendChild(this.pathOne);
this.pathTwo = document.createElementNS(this.xmlns,'path');
this.animate2 = document.createElementNS(this.xmlns,'animate');
this.pathTwo.setAttribute('style','fill:url(#SVGID_3_)');
this.pathTwo.setAttribute('d',this.d2);
this.animate2.setAttribute('dur','5s');
this.animate2.setAttribute('attributeName','d');
this.animate2.setAttribute('attributeType','XML');
this.animate2.setAttribute('repeatCount','indefinite');
this.animate2.setAttribute('keyTimes','0;0.55;1');
this.animate2.setAttribute('values',this.d2+';'+this.a2+';'+this.d2);
this.pathTwo.appendChild(this.animate2);
this.group.appendChild(this.pathTwo);
}
//设置path路径
setPaths()
{
this.pathOne.setAttribute('d',this.d1);
this.pathTwo.setAttribute('d',this.d2);
this.animate.setAttribute('values',this.d1+';'+this.a1+';'+this.d1);
this.animate2.setAttribute('values',this.d2+';'+this.a2+';'+this.d2);
}
//设置百分比文字
setPercentText(val)
{
let vals = val ? val : this.currentPercentText;
this.textBox.textContent = vals;
}
//改变路径形状
changePathShape()
{
let dis = 0.3;
let percent = '';
let p = '';
let start = this.y1;
let end = -50;
let This = this;
function step()
{
This.y1 -= dis;
This.y2 -= dis;
This.initChangeShape();
percent = parseInt((Math.abs(This.y1 - start) / Math.abs(end-start))*100);
p = percent + '%';
This.setPercentText(p);
if(percent < 50){
requestAnimationFrame(step);
}
}
requestAnimationFrame(step);
}
}
// 初始化配置参数调用
let obj = {
y1: 50,
y2: 50,
group: document.querySelector('#pathGroup'),
text: document.querySelector('.perText')
}
new svgPercent(obj);4. 总结:
(1) 通过animate控制path的d属性 (注意,有坑,values至少三组值 values="原来的值 ; 要变化到的值 ; 原来的值")
(2) 通过js控制用到了path的d属性(注意,有坑,拼接字符串的时候,末尾不能有分号,会报错;在拼接values值的时候 需要单独加分号)
(3)clipPath的标签的运用,是这个案例实现滚动波纹从下到上的一个核心 。
以上是javascript制作svg进度球实例分享的详细内容。更多信息请关注PHP中文网其他相关文章!
 了解JavaScript引擎:实施详细信息Apr 17, 2025 am 12:05 AM
理解JavaScript引擎内部工作原理对开发者重要,因为它能帮助编写更高效的代码并理解性能瓶颈和优化策略。1)引擎的工作流程包括解析、编译和执行三个阶段;2)执行过程中,引擎会进行动态优化,如内联缓存和隐藏类;3)最佳实践包括避免全局变量、优化循环、使用const和let,以及避免过度使用闭包。
 Python vs. JavaScript:学习曲线和易用性Apr 16, 2025 am 12:12 AM
Python更适合初学者,学习曲线平缓,语法简洁;JavaScript适合前端开发,学习曲线较陡,语法灵活。1.Python语法直观,适用于数据科学和后端开发。2.JavaScript灵活,广泛用于前端和服务器端编程。
 Python vs. JavaScript:社区,图书馆和资源Apr 15, 2025 am 12:16 AM
Python和JavaScript在社区、库和资源方面的对比各有优劣。1)Python社区友好,适合初学者,但前端开发资源不如JavaScript丰富。2)Python在数据科学和机器学习库方面强大,JavaScript则在前端开发库和框架上更胜一筹。3)两者的学习资源都丰富,但Python适合从官方文档开始,JavaScript则以MDNWebDocs为佳。选择应基于项目需求和个人兴趣。
 从C/C到JavaScript:所有工作方式Apr 14, 2025 am 12:05 AM
从C/C 转向JavaScript需要适应动态类型、垃圾回收和异步编程等特点。1)C/C 是静态类型语言,需手动管理内存,而JavaScript是动态类型,垃圾回收自动处理。2)C/C 需编译成机器码,JavaScript则为解释型语言。3)JavaScript引入闭包、原型链和Promise等概念,增强了灵活性和异步编程能力。
 JavaScript引擎:比较实施Apr 13, 2025 am 12:05 AM
不同JavaScript引擎在解析和执行JavaScript代码时,效果会有所不同,因为每个引擎的实现原理和优化策略各有差异。1.词法分析:将源码转换为词法单元。2.语法分析:生成抽象语法树。3.优化和编译:通过JIT编译器生成机器码。4.执行:运行机器码。V8引擎通过即时编译和隐藏类优化,SpiderMonkey使用类型推断系统,导致在相同代码上的性能表现不同。
 超越浏览器:现实世界中的JavaScriptApr 12, 2025 am 12:06 AM
JavaScript在现实世界中的应用包括服务器端编程、移动应用开发和物联网控制:1.通过Node.js实现服务器端编程,适用于高并发请求处理。2.通过ReactNative进行移动应用开发,支持跨平台部署。3.通过Johnny-Five库用于物联网设备控制,适用于硬件交互。
 使用Next.js(后端集成)构建多租户SaaS应用程序Apr 11, 2025 am 08:23 AM
我使用您的日常技术工具构建了功能性的多租户SaaS应用程序(一个Edtech应用程序),您可以做同样的事情。 首先,什么是多租户SaaS应用程序? 多租户SaaS应用程序可让您从唱歌中为多个客户提供服务
 如何使用Next.js(前端集成)构建多租户SaaS应用程序Apr 11, 2025 am 08:22 AM
本文展示了与许可证确保的后端的前端集成,并使用Next.js构建功能性Edtech SaaS应用程序。 前端获取用户权限以控制UI的可见性并确保API要求遵守角色库


热AI工具

Undresser.AI Undress
人工智能驱动的应用程序,用于创建逼真的裸体照片

AI Clothes Remover
用于从照片中去除衣服的在线人工智能工具。

Undress AI Tool
免费脱衣服图片

Clothoff.io
AI脱衣机

AI Hentai Generator
免费生成ai无尽的。

热门文章

热工具

记事本++7.3.1
好用且免费的代码编辑器

Atom编辑器mac版下载
最流行的的开源编辑器

适用于 Eclipse 的 SAP NetWeaver 服务器适配器
将Eclipse与SAP NetWeaver应用服务器集成。

SecLists
SecLists是最终安全测试人员的伙伴。它是一个包含各种类型列表的集合,这些列表在安全评估过程中经常使用,都在一个地方。SecLists通过方便地提供安全测试人员可能需要的所有列表,帮助提高安全测试的效率和生产力。列表类型包括用户名、密码、URL、模糊测试有效载荷、敏感数据模式、Web shell等等。测试人员只需将此存储库拉到新的测试机上,他就可以访问到所需的每种类型的列表。

VSCode Windows 64位 下载
微软推出的免费、功能强大的一款IDE编辑器


