


本文主要和大家介绍了vue实现裁切图片同时实现放大、缩小、旋转功能,小编觉得挺不错的,现在分享给大家,也给大家做个参考,希望能帮助到大家。
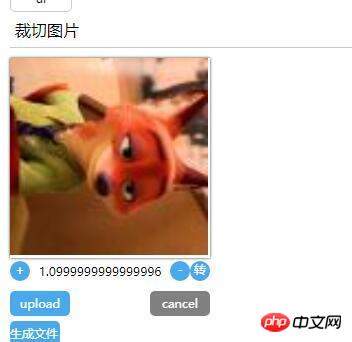
实现效果:
裁切指定区域内的图片
旋转图片
放大图片
输出bolb 格式数据 提供给 formData 对象
效果图


大概原理:
利用h5 FileReader 对象, 获取 d9fae9a589f7d7312c0f67fffbcf927a “上传到浏览器的文件” ,文件形式 为base64形式, 把 base64 赋给canvas的上下文。
然后给canvas 元素上加入对(mousedown)监听事件。 当用户鼠标左键在canvas按下时:
挂载对 window 对象mousemove事件 ---> 获取 鼠标移动x,y距离.从而操作 canvas里的图像的位置移动。
挂载对 window 对象mouseup 事件, 清除 mousemove事件的绑定。(同时该事件触发后会被删除)
剩下的 放大、缩小 、 旋转 是对 canvas 对象的操作/坐标体系的操作。具体api详见mdn canvas 文档
代码
dom.js
export const on = ({el, type, fn}) => {
if (typeof window) {
if (window.addEventListener) {
el.addEventListener(type, fn, false)
} else {
el.attachEvent(`on${type}`, fn)
}
}
}
export const off = ({el, type, fn}) => {
if (typeof window) {
if (window.addEventListener) {
el.removeEventListener(type, fn)
} else {
el.detachEvent(`on${type}`, fn)
}
}
}
export const once = ({el, type, fn}) => {
const hyFn = (event) => {
try {
fn(event)
}
finally {
off({el, type, fn: hyFn})
}
}
on({el, type, fn: hyFn})
}
// 最后一个
export const fbTwice = ({fn, time = 300}) => {
let [cTime, k] = [null, null]
// 获取当前时间
const getTime = () => new Date().getTime()
// 混合函数
const hyFn = () => {
const ags = argments
return () => {
clearTimeout(k)
k = cTime = null
fn(...ags)
}
}
return () => {
if (cTime == null) {
k = setTimeout(hyFn(...arguments), time)
cTime = getTime()
} else {
if ( getTime() - cTime < 0) {
// 清除之前的函数堆 ---- 重新记录
clearTimeout(k)
k = null
cTime = getTime()
k = setTimeout(hyFn(...arguments), time)
}
}}
}
export const contains = function(parentNode, childNode) {
if (parentNode.contains) {
return parentNode != childNode && parentNode.contains(childNode)
} else {
return !!(parentNode.compareDocumentPosition(childNode) & 16)
}
}
export const addClass = function (el, className) {
if (typeof el !== "object") {
console.log('el is not elem')
return null
}
let classList = el['className']
classList = classList === '' ? [] : classList.split(/\s+/)
if (classList.indexOf(className) === -1) {
classList.push(className)
el.className = classList.join(' ')
} else {
console.warn('warn className current')
}
}
export const removeClass = function (el, className) {
let classList = el['className']
classList = classList === '' ? [] : classList.split(/\s+/)
classList = classList.filter(item => {
return item !== className
})
el.className = classList.join(' ')
}
export const delay = ({fn, time}) => {
let oT = null
let k = null
return () => {
// 当前时间
let cT = new Date().getTime()
const fixFn = () => {
k = oT = null
fn()
}
if (k === null) {
oT = cT
k = setTimeout(fixFn, time)
return
}
if (cT - oT < time) {
oT = cT
clearTimeout(k)
k = setTimeout(fixFn, time)
}
}
}
export const Event = function () {
// 类型
this.typeList = {}
}
Event.prototype.on = function ({type, fn}){
if (this.typeList.hasOwnProperty(type)) {
this.typeList[type].push(fn)
} else {
this.typeList[type] = []
this.typeList[type].push(fn)
}
}
Event.prototype.off = function({type, fn}) {
if (this.typeList.hasOwnProperty(type)) {
let list = this.typeList[type]
let index = list.indexOf(fn)
if (index !== -1 ) {
list.splice(index, 1)
}
} else {
console.warn('not has this type')
}
}
Event.prototype.once = function ({type, fn}) {
const fixFn = () => {
fn()
this.off({type, fn: fixFn})
}
this.on({type, fn: fixFn})
}
Event.prototype.trigger = function (type){
if (this.typeList.hasOwnProperty(type)) {
this.typeList[type].forEach(fn => {
fn()
})
}
}
组件模板
<template>
<p class="jc-clip-image" :style="{width: `${clip.width}`}">
<canvas ref="ctx"
:width="clip.width"
:height="clip.height"
@mousedown="handleClip($event)"
>
</canvas>
<input type="file" ref="file" @change="readFileMsg($event)">
<p class="clip-scale-btn">
<a class="add" @click="handleScale(false)">+</a>
<a @click="rotate" class="right-rotate">转</a>
<a class="poor" @click="handleScale(true)">-</a>
<span>{{scale}}</span>
</p>
<p class="upload-warp">
<a class="upload-btn" @click="dispatchUpload($event)">upload</a>
<a class="upload-cancel">cancel</a>
</p>
<p class="create-canvas">
<a class="to-send-file" @click="outFile" title="请打开控制台">生成文件</a>
</p>
</p>
</template>
<script>
import {on, off, once} from '../../utils/dom'
export default {
ctx: null,
file: null,
x: 0, // 点击canvas x 鼠标地址
y: 0,// 点击canvas y 鼠标地址
xV: 0, // 鼠标移动 x距离
yV: 0, // 鼠标移动 y距离
nX: 0, // 原始坐标点 图像 x
nY: 0,// 原始坐标点 图像 y
img: null,
props: {
src: {
type: String,
default: null
},
clip: {
type: Object,
default () {
return {width: '200px', height: '200px'}
}
}
},
data () {
return {
isShow: false,
base64: null,
scale: 1.5, //放大比例
deg: 0 //旋转角度
}
},
computed: {
width () {
const {clip} = this
return parseFloat(clip.width.replace('px', ''))
},
height () {
const {clip} = this
return parseFloat(clip.height.replace('px', ''))
}
},
mounted () {
const {$options, $refs, width, height} = this
// 初始化 canvas file nX nY
Object.assign($options, {
ctx: $refs.ctx.getContext('2d'),
file: $refs.file,
nX: -width / 2,
nY: -height / 2
})
},
methods: {
// 旋转操作
rotate () {
const {$options, draw} = this
this.deg = (this.deg + Math.PI /2)% (Math.PI * 2)
draw($options.img, $options.nX + $options.xV, $options.nY + $options.yV, this.scale, this.deg)
},
// 处理放大
handleScale (flag) {
const {$options, draw, deg} = this
flag && this.scale > 0.1 && (this.scale = this.scale - 0.1)
!flag && this.scale < 1.9 && (this.scale = this.scale + 0.1)
$options.img && draw($options.img, $options.nX + $options.xV, $options.nY + $options.yV, this.scale, deg)
},
// 模拟file 点击事件
dispatchUpload (e) {
this.clearState()
const {file} = this.$options
e.preventDefault()
file.click()
},
// 读取 input file 信息
readFileMsg () {
const {file} = this.$options
const {draw, createImage, $options: {nX, nY}, scale, deg} = this
const wFile = file.files[0]
const reader = new FileReader()
reader.onload = (e) => {
const img = createImage(e.target.result, (img) => {
draw(img, nX, nY, scale, deg)
})
file.value = null
}
reader.readAsDataURL(wFile)
},
// 生成 图像
createImage (src, cb) {
const img = new Image()
this.$el.append(img)
img.className = 'base64-hidden'
img.onload = () => {
cb(img)
}
img.src = src
this.$options.img = img
},
// 操作画布画图
draw (img, x = 0, y = 0, scale = 0.5,deg = Math.PI ) {
const {ctx} = this.$options
let {width, height} = this
// 图片尺寸
let imgW = img.offsetWidth
let imgH = img.offsetHeight
ctx.save()
ctx.clearRect( 0, 0, width, height)
ctx.translate( width / 2, height / 2, img)
ctx.rotate(deg)
ctx.drawImage(img, x, y, imgW * scale, imgH * scale)
ctx.restore()
},
// ... 事件绑定
handleClip (e) {
const {handleMove, $options, deg} = this
if (!$options.img) {
return
}
Object.assign(this.$options, {
x: e.screenX,
y: e.screenY
})
on({
el: window,
type: 'mousemove',
fn: handleMove
})
once({
el: window,
type: 'mouseup',
fn: (e) =>{
console.log('down')
switch (deg) {
case 0: {
Object.assign($options, {
nX: $options.nX + $options.xV,
nY: $options.nY + $options.yV,
xV: 0,
yV: 0
})
break;
}
case Math.PI / 2: {
Object.assign($options, {
nX: $options.nY + $options.yV,
nY: $options.nX - $options.xV,
xV: 0,
yV: 0
})
break;
}
case Math.PI: {
Object.assign($options, {
nX: $options.nX - $options.xV,
nY: $options.nY - $options.yV,
xV: 0,
yV: 0
})
break;
}
default: {
// $options.nY - $options.yV, $options.nX + $options.xV
Object.assign($options, {
nX: $options.nY - $options.yV,
nY: $options.nX + $options.xV,
xV: 0,
yV: 0
})
}
}
off({
el: window,
type: 'mousemove',
fn: handleMove
})
}
})
},
// ... 处理鼠标移动
handleMove (e){
e.preventDefault()
e.stopPropagation()
const {$options, draw, scale, deg} = this
Object.assign($options, {
xV: e.screenX - $options.x,
yV: e.screenY - $options.y
})
switch (deg) {
case 0: {
draw($options.img, $options.nX + $options.xV, $options.nY + $options.yV, scale, deg)
break;
}
case Math.PI / 2: {
draw($options.img, $options.nY + $options.yV, $options.nX - $options.xV, scale, deg)
break;
}
case Math.PI: {
draw($options.img, $options.nX - $options.xV, $options.nY - $options.yV, scale, deg)
break;
}
default: {
draw($options.img, $options.nY - $options.yV, $options.nX + $options.xV, scale, deg)
break;
}
}
},
// 清除状态
clearState () {
const {$options, width, height} = this
if ($options.img) {
this.$el.removeChild($options.img)
Object.assign($options, {
x: 0,
y: 0,
xV: 0,
yV: 0,
nX: -width / 2,
nY: -height / 2,
img: null,
})
}
},
// 输出文件
outFile () {
const {$refs: {ctx}} = this
console.log(ctx.toDataURL())
ctx.toBlob((blob) => {console.log(blob)})
}
}
}
</script>
<style>
@component-namespace jc {
@component clip-image{
position: relative;
width: 100%;
canvas {
position: relative;
width: 100%;
height: 100%;
cursor: pointer;
box-shadow: 0 0 3px #333;
}
input {
display: none;
}
.base64-hidden {
position: absolute;
top: 0;
left: 0;
display: block;
width: 100%;
height: auto;
z-index: -999;
opacity: 0;
}
.clip-scale-btn {
position: relative;
@utils-clearfix;
margin-bottom: 5px;
text-align: center;
a {
float: left;
width: 20px;
height: 20px;
border-radius: 50%;
color: #fff;
background: #49a9ee;
text-align: center;
cursor: pointer;
}
&>.poor, &>.right-rotate {
float: right;
}
&>span{
position: absolute;
z-index: -9;
top: 0;
left: 0;
display: block;
position: relative;
width: 100%;
text-align: center;
height: 20px;
line-height: 20px;
}
}
.upload-warp {
@utils-clearfix;
.upload-btn,.upload-cancel {
float: left;
display:inline-block;
width: 60px;
height: 25px;
line-height: 25px;
color: #fff;
border-radius: 5px;
background: #49a9ee;
box-shadow: 0 0 0 #333;
text-align: center;
top: 0;
left: 0;
right: 0;
bottom: 0;
margin: auto;
cursor: pointer;
margin-top: 5px;
}
.upload-cancel{
background: gray;
float: right;
}
}
.to-send-file {
margin-top: 5px;
display: block;
width: 50px;
height: 25px;
line-height: 25px;
color: #fff;
border-radius: 5px;
background: #49a9ee;
cursor: pointer;
}
}以上是vue裁切图片实现放大、缩小、旋转功能代码的详细内容。更多信息请关注PHP中文网其他相关文章!

 如何通过Vue实现图片的特定区域放大功能?Aug 26, 2023 pm 04:43 PM
如何通过Vue实现图片的特定区域放大功能?引言:在网页设计和开发中,经常会遇到需要展示较大图片的情况。为了提供更好的用户体验,往往希望用户可以放大某些特定区域以查看细节。本文将介绍如何通过Vue实现图片的特定区域放大功能,让用户能够轻松查看图片的细节。技术准备:在实现这个功能之前,需要准备好以下技术工具:Vue.js:一个用于构建交互式用户界面的JavaSc
 HTML、CSS和jQuery:实现图片放大缩小特效的技巧Oct 24, 2023 am 10:22 AM
HTML、CSS和jQuery:实现图片放大缩小特效的技巧,需要具体代码示例随着互联网的发展,网页的设计越来越注重用户体验。其中,图片作为网页设计的重要元素之一,往往能够给用户带来直观、丰富的视觉体验。图片的放大缩小特效能够增强用户对网页内容的感知和交互,因此在网页设计中被广泛使用。本文将介绍如何利用HTML、CSS和jQuery实现图片的放大缩小特效,并提
 win10搜索栏大小调整指南Jan 04, 2024 pm 05:22 PM
win10自带的搜索框,用户觉得在任务栏中有些太大了,很是碍事,问win10搜索框怎么缩小,一般只要将它变成图标状就是缩小,下面一起看看详细的win10搜索框缩小教程吧。win10搜索框怎么缩小:1、右击任务栏,弹出多项功能。2、在其中找到搜索功能项。3、打开搜索功能,我们选择显示搜索图标(W)即可缩小。4、设置完之后就会变成缩小版的图标了,就是下图这样了。
 Word图片怎么旋转呢Mar 19, 2024 pm 06:16 PM
我们在使用Word办公软件进行文档处理的时候,经常需要在文档里插入一些图片之类的素材,但是,为了排版美观的需要,我们还需要将图片进行一些特殊的排版,其中旋转处理是最基本的排版处理,但是,对于一些刚刚接触Word办公软件的职场新人来讲,可能还不太会在Word文档里处理图片。下边,我们就分享一下Word图片怎么旋转的方法,希望对你有所帮助和启发。1、首先,我们打开一个Word文档,随后,我们菜单栏点击插入-图片按钮,电脑中随意找一张图片插入,便于我们操作演示使用。2、如果我们要将图片进行旋转,接着需
 如何使用Python对图片进行缩放和旋转Aug 17, 2023 pm 10:52 PM
如何使用Python对图片进行缩放和旋转导语:如今,我们经常使用图片来丰富我们的网页设计、移动应用、社交媒体等各种场景。在图片处理中,缩放和旋转是两个常见的需求。Python作为一种脚本语言和强大的图像处理工具,提供了许多库和方法来处理这些任务。本文将介绍如何使用Python对图片进行缩放和旋转,并提供代码示例。一、缩放图片缩放图片是调整图像大小的基本操作之
 如何使用Vue实现3D立体旋转特效Sep 19, 2023 am 08:42 AM
如何使用Vue实现3D立体旋转特效作为一种流行的前端框架,Vue.js在开发动态网页和应用程序中起着重要的作用。它提供了一种直观、高效的方式来构建交互式界面,并且易于集成和扩展。本文将介绍如何使用Vue.js实现一个令人惊叹的3D立体旋转特效,并提供具体的代码示例。在开始之前,请确保您已经安装了Vue.js,并且对Vue.js的基本用法有一定的了解。如果您还
 CSS实现加载动画效果的技巧和方法Oct 19, 2023 am 10:42 AM
CSS实现加载动画效果的技巧和方法随着互联网的发展,加载速度成为了用户体验的重要指标之一。为了提升页面加载时的用户体验,我们通常会使用加载动画效果来增加页面的互动性和吸引力。而CSS作为前端开发中的重要技术之一,提供了许多实现加载动画效果的技巧和方法。本文将介绍几种常见的CSS加载动画效果的实现技巧和方法,并提供相应的代码示例。旋转加载动画旋转加载动画是一种
 如何利用Layui实现图片裁剪和旋转功能Oct 26, 2023 am 09:39 AM
如何利用Layui实现图片裁剪和旋转功能一、背景介绍在Web开发中,经常会遇到需要对图片进行裁剪和旋转的场景,比如头像上传、图片编辑等。Layui是一款轻量级的前端框架,提供了丰富的UI组件和友好的API,特别适合快速搭建网页应用。本文将介绍如何利用Layui实现图片裁剪和旋转功能,并提供具体的代码示例。二、环境准备在开始之前,需要确认以下环境已经准备就绪:


热AI工具

Undresser.AI Undress
人工智能驱动的应用程序,用于创建逼真的裸体照片

AI Clothes Remover
用于从照片中去除衣服的在线人工智能工具。

Undress AI Tool
免费脱衣服图片

Clothoff.io
AI脱衣机

AI Hentai Generator
免费生成ai无尽的。

热门文章
热工具

安全考试浏览器
Safe Exam Browser是一个安全的浏览器环境,用于安全地进行在线考试。该软件将任何计算机变成一个安全的工作站。它控制对任何实用工具的访问,并防止学生使用未经授权的资源。

DVWA
Damn Vulnerable Web App (DVWA) 是一个PHP/MySQL的Web应用程序,非常容易受到攻击。它的主要目标是成为安全专业人员在合法环境中测试自己的技能和工具的辅助工具,帮助Web开发人员更好地理解保护Web应用程序的过程,并帮助教师/学生在课堂环境中教授/学习Web应用程序安全。DVWA的目标是通过简单直接的界面练习一些最常见的Web漏洞,难度各不相同。请注意,该软件中

SublimeText3 英文版
推荐:为Win版本,支持代码提示!

EditPlus 中文破解版
体积小,语法高亮,不支持代码提示功能

SublimeText3 Linux新版
SublimeText3 Linux最新版

