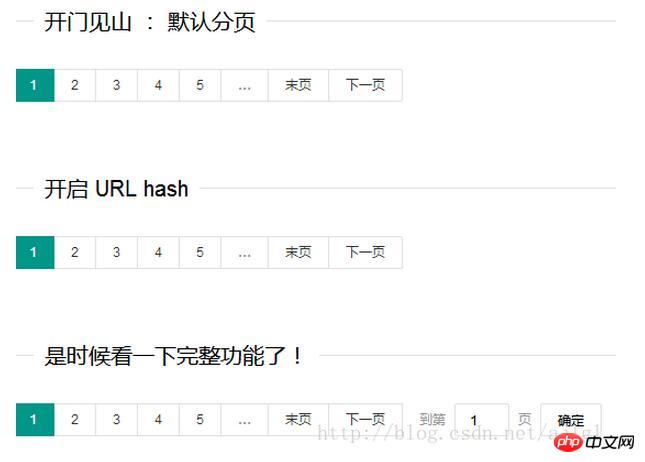
本文主要为大家详细介绍了layui前段框架分页效果的实现代码,具有一定的参考价值,感兴趣的小伙伴们可以参考一下,希望能帮助到大家。
<!DOCTYPE html>
<html>
<head>
<meta charset="UTF-8">
<title>分页</title>
<link rel="stylesheet" href="layui/css/layui.css" >
</head>
<body>
<fieldset class="layui-elem-field layui-field-title" style="margin-top: 20px;">
<legend>开门见山 : 默认分页</legend>
</fieldset>
<p id="demo1"></p>
<fieldset class="layui-elem-field layui-field-title" style="margin-top: 50px;">
<legend>开启 URL hash</legend>
</fieldset>
<p id="demo5"></p>
<fieldset class="layui-elem-field layui-field-title" style="margin-top: 50px;">
<legend>是时候看一下完整功能了!</legend>
</fieldset>
<p id="demo7"></p>
<script src="layui/layui.js"></script>
<script>
layui.use(['laypage', 'layer'], function(){
var laypage = layui.laypage
,layer = layui.layer;
laypage({
cont: 'demo1'
,pages: 100 //总页数
,groups: 5 //连续显示分页数
});
laypage({
cont: 'demo5'
,pages: 100
,curr: location.hash.replace('#!fenye=', '') //获取hash值为fenye的当前页
,hash: 'fenye' //自定义hash值
});
laypage({
cont: 'demo7'
,pages: 100
,skip: true
});
});
</script>
</body>
</html>效果图:

相关推荐:
以上是layui分页效果实现代码分享的详细内容。更多信息请关注PHP中文网其他相关文章!
 Python和JavaScript的未来:趋势和预测Apr 27, 2025 am 12:21 AM
Python和JavaScript的未来趋势包括:1.Python将巩固在科学计算和AI领域的地位,2.JavaScript将推动Web技术发展,3.跨平台开发将成为热门,4.性能优化将是重点。两者都将继续在各自领域扩展应用场景,并在性能上有更多突破。
 Python vs. JavaScript:开发环境和工具Apr 26, 2025 am 12:09 AM
Python和JavaScript在开发环境上的选择都很重要。1)Python的开发环境包括PyCharm、JupyterNotebook和Anaconda,适合数据科学和快速原型开发。2)JavaScript的开发环境包括Node.js、VSCode和Webpack,适用于前端和后端开发。根据项目需求选择合适的工具可以提高开发效率和项目成功率。
 JavaScript是用C编写的吗?检查证据Apr 25, 2025 am 12:15 AM
是的,JavaScript的引擎核心是用C语言编写的。1)C语言提供了高效性能和底层控制,适合JavaScript引擎的开发。2)以V8引擎为例,其核心用C 编写,结合了C的效率和面向对象特性。3)JavaScript引擎的工作原理包括解析、编译和执行,C语言在这些过程中发挥关键作用。
 JavaScript的角色:使网络交互和动态Apr 24, 2025 am 12:12 AM
JavaScript是现代网站的核心,因为它增强了网页的交互性和动态性。1)它允许在不刷新页面的情况下改变内容,2)通过DOMAPI操作网页,3)支持复杂的交互效果如动画和拖放,4)优化性能和最佳实践提高用户体验。
 C和JavaScript:连接解释Apr 23, 2025 am 12:07 AM
C 和JavaScript通过WebAssembly实现互操作性。1)C 代码编译成WebAssembly模块,引入到JavaScript环境中,增强计算能力。2)在游戏开发中,C 处理物理引擎和图形渲染,JavaScript负责游戏逻辑和用户界面。
 从网站到应用程序:JavaScript的不同应用Apr 22, 2025 am 12:02 AM
JavaScript在网站、移动应用、桌面应用和服务器端编程中均有广泛应用。1)在网站开发中,JavaScript与HTML、CSS一起操作DOM,实现动态效果,并支持如jQuery、React等框架。2)通过ReactNative和Ionic,JavaScript用于开发跨平台移动应用。3)Electron框架使JavaScript能构建桌面应用。4)Node.js让JavaScript在服务器端运行,支持高并发请求。
 Python vs. JavaScript:比较用例和应用程序Apr 21, 2025 am 12:01 AM
Python更适合数据科学和自动化,JavaScript更适合前端和全栈开发。1.Python在数据科学和机器学习中表现出色,使用NumPy、Pandas等库进行数据处理和建模。2.Python在自动化和脚本编写方面简洁高效。3.JavaScript在前端开发中不可或缺,用于构建动态网页和单页面应用。4.JavaScript通过Node.js在后端开发中发挥作用,支持全栈开发。
 C/C在JavaScript口译员和编译器中的作用Apr 20, 2025 am 12:01 AM
C和C 在JavaScript引擎中扮演了至关重要的角色,主要用于实现解释器和JIT编译器。 1)C 用于解析JavaScript源码并生成抽象语法树。 2)C 负责生成和执行字节码。 3)C 实现JIT编译器,在运行时优化和编译热点代码,显着提高JavaScript的执行效率。


热AI工具

Undresser.AI Undress
人工智能驱动的应用程序,用于创建逼真的裸体照片

AI Clothes Remover
用于从照片中去除衣服的在线人工智能工具。

Undress AI Tool
免费脱衣服图片

Clothoff.io
AI脱衣机

Video Face Swap
使用我们完全免费的人工智能换脸工具轻松在任何视频中换脸!

热门文章

热工具

SublimeText3 Linux新版
SublimeText3 Linux最新版

适用于 Eclipse 的 SAP NetWeaver 服务器适配器
将Eclipse与SAP NetWeaver应用服务器集成。

VSCode Windows 64位 下载
微软推出的免费、功能强大的一款IDE编辑器

ZendStudio 13.5.1 Mac
功能强大的PHP集成开发环境

SublimeText3汉化版
中文版,非常好用


