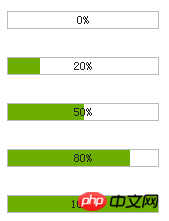
我们在之前的文章给大家介绍了关于JavaScript实现进度条的实例,我们都知道在实际项目中,进度条的用处还是非常大的,今天我们就大家继续介绍下JavaScript实现进度条的有哪几种方式!
我们先看看最终效果:

第一步,基本
构建基本的代码,看效果演示:
<!DOCTYPE html PUBLIC "-//W3C//DTD XHTML 1.0 Transitional//EN" "http://www.w3.org/TR/xhtml1/DTD/xhtml1-transitional.dtd">
<html xmlns="http://www.w3.org/1999/xhtml">
<head>
<title>制作进度条的两种方法</title>
<meta http-equiv="Content-Type" content="text/html; charset=gb2312" />
<style>
*{
    margin:0;
    padding:0;
}
body{font-size:12px;}h1{font-size:15px;}
.wrap{
    font-size: 12px;
    margin:40px auto;
    width:400px;
}
/*进度条样式*/
.progressbar_1{
    background-color:#eee;
    height:16px;
    width:150px;
    border:1px solid #bbb;
    color:#222;
}
.progressbar_1 .bar {
    background-color:#6CAF00;
    height:16px;
    width:0;
}
</style>
</head>
<body>
<div class="wrap">
    <h1>1,构建基本的HTML结构和CSS样式</h1>


    0%的状态:
    <div class="progressbar_1">
        <div class="bar"></div>
    </div>


    50%的状态:
    <div class="progressbar_1">
        <div class="bar" style="width: 50%;"></div>
    </div>


    80%的状态:
    <div class="progressbar_1">
        <div class="bar" style="width: 80%;"></div>
    </div>


    100%的状态:
    <div class="progressbar_1">
        <div class="bar" style="width: 100%;"></div>
    </div>


    这步非常简单,相信大家都能看明白。
</div>
</body>
</html>
第二步,给进度条增加文字显示
<!DOCTYPE html PUBLIC "-//W3C//DTD XHTML 1.0 Transitional//EN" "http://www.w3.org/TR/xhtml1/DTD/xhtml1-transitional.dtd">
<html xmlns="http://www.w3.org/1999/xhtml">
<head>
<title>制作进度条的两种方法</title>
<meta http-equiv="Content-Type" content="text/html; charset=gb2312" />
<style>
*{
    margin:0;
    padding:0;
}
body{font-size:12px;}h1{font-size:15px;}
.wrap{
    font-size: 12px;
    margin:40px auto;
    width:400px;
}
/*进度条样式*/
.progressbar_1{
    background-color:#eee;
    color:#222;
    height:16px;
    width:150px;
    border:1px solid #bbb;
}
.progressbar_1 .bar {
    background-color:#6CAF00;
    height:16px;
    width:0;
}
/*绝对定位*/
.progressbar_2{
    background-color:#eee;
    color:#222;
    height:16px;
    width:150px;
    border:1px solid #bbb;
    text-align:center;
    position:relative;
}
.progressbar_2 .bar {
    background-color:#6CAF00;
    height:16px;
    width:0;
    position:absolute;
    left:0;
    top:0;
}
.progressbar_2 .text {
    height:16px;
    position:absolute;
    left:0;
    top:0;
    width:100%;
    line-height:16px;
}
/*绝对定位 + z-index */
.progressbar_3{
    background-color:#eee;
    color:#222;
    height:16px;
    width:150px;
    border:1px solid #bbb;
    text-align:center;
    position:relative;
}
.progressbar_3 .bar {
    background-color:#6CAF00;
    height:16px;
    width:0;
    position:absolute;
    left:0;
    top:0;
    z-index:10;
}
.progressbar_3 .text {
    height:16px;
    position:absolute;
    left:0;
    top:0;
    width:100%;
    line-height:16px;

    z-index:100;
}
</style>
</head>
<body>
<div class="wrap">
    <h1>2,给进度条增加文字显示</h1>


    一个进度条需要包含对应的进度文字显示,本例中,我希望文字显示在进度条的中间。
    接下来,我们在进度条元素内增加一个显示 文字的div。


    很显然,直接添加div后,div会占据原先绿色进度条的位置。看下面例子:

        <div class="progressbar_1">
        <div >50%</div>
        <div class="bar" style="width: 50%;"></div>
    </div>


    那么有什么办法使得文字 和 绿色进度条 同时显示在 一起呢?


    估计你也想到了,那就是绝对定位。通过对父元素添加相对定位,然后给子元素添加绝对定位,设置子元素的左边距和上边距都为0。


    看下面的例子:


    <div class="progressbar_2">
        <div class="text">50%</div>
        <div class="bar" style="width: 50%;"></div>
    </div>


    这时你会发现文字被遮盖了,相信你第一时间就会想到用 z-index 去设置他们的层级关系。

    对,我也选择的是它。通过给他们设置不同的z-index值来确定层级关系,值越大越显示在上面。看下面例子:


    <div class="progressbar_3">
        <div class="text">50%</div>
        <div class="bar" style="width: 50%;"></div>
    </div>


    <div class="progressbar_3">
        <div class="text">80%</div>
        <div class="bar" style="width: 80%;"></div>
    </div>


    <div class="progressbar_3">
        <div class="text">100%</div>
        <div class="bar" style="width: 100%;"></div>
    </div>
        这是第一种方式,也是目前最为流行的 制作进度条的方式。

    他的原理就是采用 相对定位和绝对定位,然后通过背景不同来控制进度。
    接下来我们看第二种方式制作进度条。
 </div>
</body>
</html>
他的原理就是采用 相对定位和绝对定位,然后通过背景不同来控制进度。 接下来我们看第二种方式制作进度条。
第三步,制作进度条的第二种方式---直接使用图片+背景图片
<!DOCTYPE html PUBLIC "-//W3C//DTD XHTML 1.0 Transitional//EN" "http://www.w3.org/TR/xhtml1/DTD/xhtml1-transitional.dtd">
<html xmlns="http://www.w3.org/1999/xhtml">
<head>
<title></title>
<meta http-equiv="Content-Type" content="text/html; charset=gb2312" />
<style>
*{
    margin:0;
    padding:0;
}
body{font-size:12px;}h1{font-size:15px;}
.wrap{
    font-size: 12px;
    margin:40px auto;
    width:400px;
}
/*不带文字*/
.progress{
    border:0;
    width: 152px;
    height: 18px;
    background:url(img/progress.gif) no-repeat -100px 50%;
}
/*带文字显示*/
.progressbar_3{
    width:152px;
    position:relative;
    height:18px;
    text-align:center;
    position:relative;
    color:#222;
}
.progressbar_3 .text{
    width:152px;
    position:absolute;
    left:0;
    top:0;
    height:18px;
    line-height:18px;
    z-index:100;
}
.progressbar_3 .progress{
    width:152px;
    position:absolute;
    left:0;
    top:0;
    height:18px;
    z-index:10;
}
</style>
</head>
<body>
<div class="wrap">
    <h1>3,制作进度条的第二种方式---直接使用图片+背景图片</h1>
      <img class="progress" width="152" height="18" title="0%" alt="0%" src="img/bg.gif" style="background-position:-152px 50%;"/>
       <img class="progress" width="152" height="18" title="20%" alt="20%" src="img/bg.gif" style="background-position:-120px 50%;"/>
        <img class="progress" width="152" height="18" title="50%" alt="50%" src="img/bg.gif" style="background-position:-76px 50%;"/>
         <img class="progress" width="152" height="18" title="80%" alt="80%" src="img/bg.gif" style="background-position:-30px 50%;"/>
        <img class="progress" width="152" height="18" title="100%" alt="100%" src="img/bg.gif" style="background-position: 0 50%;"/>

    如果你想在上面进度条上添加进度显示的文字,你应该知道怎么办了(如果你仔细阅读过前面的例子的话)。

    对,就是使用绝对定位+相对定位来控制。
    <div class="progressbar_3">
        <div class="text">0%</div>
        <img class="progress" width="152" height="18" title="0%" alt="0%" src="img/bg.gif" style="background-position:-152px 50%;"/>
    </div>
    <div class="progressbar_3">
        <div class="text">20%</div>
        <img class="progress" width="152" height="18" title="20%" alt="20%" src="img/bg.gif" style="background-position:-120px 50%;"/>
    </div>
    <div class="progressbar_3">
        <div class="text">50%</div>
        <img class="progress" width="152" height="18" title="50%" alt="50%" src="img/bg.gif" style="background-position:-76px 50%;"/>
    </div>
    <div class="progressbar_3">
        <div class="text">80%</div>
        <img class="progress" width="152" height="18" title="80%" alt="80%" src="img/bg.gif" style="background-position:-30px 50%;"/>
    </div>
    <div class="progressbar_3">
        <div class="text">100%</div>
        <img class="progress" width="152" height="18" title="100%" alt="100%" src="img/bg.gif" style="background-position: 0 50%;"/>
    </div>
    这种方式的原理就是 利用 一张img图片,然后给img图片又设置背景图,通过背景图的background position 属性 来显示不同的部分。

    当然这种方式 对图片有点要求 。你仔细一点就会发现,宽度是img的2倍。

    另外图片必须是gif透明的,也就是说空心的。呵呵。看不到进度条。

    总的来说,这应该算一个技巧,在实际项目中,也是能使用的。
<p style="float:right;">Dev By <a href="http://www.jb51.net" >jb51.net</a></p>
</div>
</body>
</html>
第四步,应用
最后我们看一个简单的应用:
<!DOCTYPE html PUBLIC "-//W3C//DTD XHTML 1.0 Transitional//EN" "http://www.w3.org/TR/xhtml1/DTD/xhtml1-transitional.dtd">
<html xmlns="http://www.w3.org/1999/xhtml">
<head>
<title></title>
<meta http-equiv="Content-Type" content="text/html; charset=gb2312" />

<style>
*{
    margin:0;
    padding:0;
}
body{font-size:12px;}h1{font-size:15px;}
.wrap{
    font-size: 12px;
    margin:40px auto;
    width:400px;
}

/*不带文字*/
.progress{
    border:0;
    width: 152px;
    height: 18px;
    background:url(img/progress.gif) no-repeat -100px 50%;
}
/*带文字显示*/
.progressbar_3{
    width:152px;
    position:relative;
    height:18px;
    text-align:center;
    position:relative;
    color:#222;
}
.progressbar_3 .text{
    width:152px;
    position:absolute;
    left:0;
    top:0;
    height:18px;
    line-height:18px;
    z-index:100;
}
.progressbar_3 .progress{
    width:152px;
    position:absolute;
    left:0;
    top:0;
    height:18px;
    z-index:10;
}
</style>

<script src="http://jqueryjs.googlecode.com/files/jquery-1.3.2.min.js" type="text/javascript" language="javascript" charset="gb2312"></script>
<script>
$(function(){
    var $txt = $(".progressbar_3 .text");
    var $progress = $(".progressbar_3 .progress");

    $("#addTo").click(function(){
        $progress.animate({"backgroundPosition":"-76px 50%"},500,function(){
            $(this).attr({"alt":"50%","title":"50%"});
            $txt.text("50%");
            $("<p>进度条加载完毕!</p>").appendTo(".wrap");
        });
    });
    $("#cutdown").click(function(){
        $progress.animate({"backgroundPosition":"-120px 50%"},500,function(){
            $(this).attr({"alt":"20%","title":"20%"});
            $txt.text("20%");
            $("<p>进度条加载完毕!</p>").appendTo(".wrap");
        });
    });
});
</script>
</head>
<body>
<div class="wrap">
    <h1>4,应用</h1>
          <div class="progressbar_3">
        <div class="text">0%</div>
        <img class="progress" width="152" height="18" title="0%" alt="0%" src="img/bg.gif" style="background-position:-152px 50%;"/>
    </div>
      <button id="addTo" >增加至50%</button>
    <button id="cutdown" >减少至20%</button>
     我使用的是第二种方式来做控制,通过animate来控制图片的background-position来达到进度条效果。
     当然你也可以使用第一种方式做,第一种方式需要改变的是进度条的 width 属性。
        <p style="float:right;">Dev By <a href="http://www.jb51.net" >jb51.net</a></p>
    </div>
</body>
</html>
通过animate来控制图片的background-position来达到进度条效果。
当然你也可以使用第一种方式做,第一种方式需要改变的是进度条的 width 属性。
总结:
通过本文的学习相信小伙伴们对JavaScript实现进度条的方法有了进一步的了解,每个方法都有不同,小伙伴们可以根据自己的需求选择合适的方法!
相关推荐:
以上是JavaScript实现进度条的几种方法介绍的详细内容。更多信息请关注PHP中文网其他相关文章!
 了解JavaScript引擎:实施详细信息Apr 17, 2025 am 12:05 AM
理解JavaScript引擎内部工作原理对开发者重要,因为它能帮助编写更高效的代码并理解性能瓶颈和优化策略。1)引擎的工作流程包括解析、编译和执行三个阶段;2)执行过程中,引擎会进行动态优化,如内联缓存和隐藏类;3)最佳实践包括避免全局变量、优化循环、使用const和let,以及避免过度使用闭包。
 Python vs. JavaScript:学习曲线和易用性Apr 16, 2025 am 12:12 AM
Python更适合初学者,学习曲线平缓,语法简洁;JavaScript适合前端开发,学习曲线较陡,语法灵活。1.Python语法直观,适用于数据科学和后端开发。2.JavaScript灵活,广泛用于前端和服务器端编程。
 Python vs. JavaScript:社区,图书馆和资源Apr 15, 2025 am 12:16 AM
Python和JavaScript在社区、库和资源方面的对比各有优劣。1)Python社区友好,适合初学者,但前端开发资源不如JavaScript丰富。2)Python在数据科学和机器学习库方面强大,JavaScript则在前端开发库和框架上更胜一筹。3)两者的学习资源都丰富,但Python适合从官方文档开始,JavaScript则以MDNWebDocs为佳。选择应基于项目需求和个人兴趣。
 从C/C到JavaScript:所有工作方式Apr 14, 2025 am 12:05 AM
从C/C 转向JavaScript需要适应动态类型、垃圾回收和异步编程等特点。1)C/C 是静态类型语言,需手动管理内存,而JavaScript是动态类型,垃圾回收自动处理。2)C/C 需编译成机器码,JavaScript则为解释型语言。3)JavaScript引入闭包、原型链和Promise等概念,增强了灵活性和异步编程能力。
 JavaScript引擎:比较实施Apr 13, 2025 am 12:05 AM
不同JavaScript引擎在解析和执行JavaScript代码时,效果会有所不同,因为每个引擎的实现原理和优化策略各有差异。1.词法分析:将源码转换为词法单元。2.语法分析:生成抽象语法树。3.优化和编译:通过JIT编译器生成机器码。4.执行:运行机器码。V8引擎通过即时编译和隐藏类优化,SpiderMonkey使用类型推断系统,导致在相同代码上的性能表现不同。
 超越浏览器:现实世界中的JavaScriptApr 12, 2025 am 12:06 AM
JavaScript在现实世界中的应用包括服务器端编程、移动应用开发和物联网控制:1.通过Node.js实现服务器端编程,适用于高并发请求处理。2.通过ReactNative进行移动应用开发,支持跨平台部署。3.通过Johnny-Five库用于物联网设备控制,适用于硬件交互。
 使用Next.js(后端集成)构建多租户SaaS应用程序Apr 11, 2025 am 08:23 AM
我使用您的日常技术工具构建了功能性的多租户SaaS应用程序(一个Edtech应用程序),您可以做同样的事情。 首先,什么是多租户SaaS应用程序? 多租户SaaS应用程序可让您从唱歌中为多个客户提供服务
 如何使用Next.js(前端集成)构建多租户SaaS应用程序Apr 11, 2025 am 08:22 AM
本文展示了与许可证确保的后端的前端集成,并使用Next.js构建功能性Edtech SaaS应用程序。 前端获取用户权限以控制UI的可见性并确保API要求遵守角色库


热AI工具

Undresser.AI Undress
人工智能驱动的应用程序,用于创建逼真的裸体照片

AI Clothes Remover
用于从照片中去除衣服的在线人工智能工具。

Undress AI Tool
免费脱衣服图片

Clothoff.io
AI脱衣机

AI Hentai Generator
免费生成ai无尽的。

热门文章

热工具

适用于 Eclipse 的 SAP NetWeaver 服务器适配器
将Eclipse与SAP NetWeaver应用服务器集成。

安全考试浏览器
Safe Exam Browser是一个安全的浏览器环境,用于安全地进行在线考试。该软件将任何计算机变成一个安全的工作站。它控制对任何实用工具的访问,并防止学生使用未经授权的资源。

Atom编辑器mac版下载
最流行的的开源编辑器

Dreamweaver CS6
视觉化网页开发工具

Dreamweaver Mac版
视觉化网页开发工具


