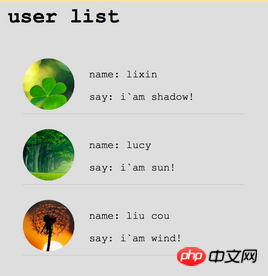
在现在的PHP开发中,大多数程序员会开发一些用户注册等功能,有时候为了美观起见,用户头像也会有相对的要求,那么下面我们就为大家讲讲如何用PHP制作圆形用户头像。
使用图层的方法设计,共需要创建3个图像层
1.底层:最后生成的图像
2.真实用户头像:作为中间层,用户上传的真实头像图片
3.圆形蒙版:作为最上层,在蒙版中绘制圆形,并设置为透明

代码如下:
<?php
class avatar
{
private $fileName; //文件的绝对路径(或基于最终调用文件的相对路径)
private $rgb; //颜色索引(数组 array(255,255,0) 或 16进制值 ffff00/#ffff00/ff0/#ff0)
private $size; //图像大小
private $imgInfo; //图像信息
/**
* 初始化
* Enter deion here ...
* @param string $fileName 文件的绝对路径(或基于最终调用文件的相对路径)
* @param mixed $rgb 颜色索引(数组 array(255,255,0) 或 16进制值 ffff00/#ffff00/ff0/#ff0)
* @param int $size 图像大小
*/
public function __construct($fileName, $rgb, $size)
{
$this->fileName = $fileName;
if(is_array($rgb)){
$this->rgb = $rgb; //rgb颜色数组 array(255,255,0)
}else{
//有的人喜欢带#号
$rgb = trim($rgb, '#');
//处理缩写形式
if (strlen($rgb)==3){
$_tmp = $rgb[0].$rgb[0].$rgb[1].$rgb[1].$rgb[2].$rgb[2];
$rgb = $_tmp;
}
$this->rgb = $this->createRGB($rgb); //16进制值 ffff00
}
$this->size = $size;
$this->imgInfo = getimagesize($this->fileName);
if(!$this->imgInfo){
throw Exception("无法读取图像文件");
}
if(!in_array($this->imgInfo[2], array(2,3))){
//仅允许jpg和png
throw Exception("图像格式不支持");
}
}
/**
* 显示图像
* Enter deion here ...
*/
public function show()
{
header("content-type:image/png");
$shadow = $this->createshadow(); //遮罩图片
//创建一个方形图片
$imgbk = imagecreatetruecolor($this->size, $this->size); //目标图片
switch ($this->imgInfo[2]){
case 2:
$imgfk = imagecreatefromjpeg($this->fileName); //原素材图片
break;
case 3:
$imgfk = imagecreatefrompng($this->fileName); //原素材图片
default:
return ;
break;
}
$realSize = $this->imgInfo[0]<$this->imgInfo[1]? $this->imgInfo[0] : $this->imgInfo[1];
imagecopyresized($imgbk, $imgfk, 0, 0, 0, 0, $this->size, $this->size, $realSize, $realSize);
imagecopymerge($imgbk, $shadow, 0, 0, 0, 0, $this->size, $this->size, 100);
//创建图像
imagepng($imgbk);
//销毁资源
imagedestroy($imgbk);
imagedestroy($imgfk);
imagedestroy($shadow);
}
/**
* 创建一个圆形遮罩
* Enter deion here ...
* @param array 10进制颜色数组
*/
private function createshadow()
{
$img = imagecreatetruecolor($this->size, $this->size);
imageantialias($img, true); //开启抗锯齿
$color_bg = imagecolorallocate($img, $this->rgb[0], $this->rgb[1], $this->rgb[2]); //背景色
$color_fg = imagecolorallocate($img, 0, 0, 0); //前景色,主要用来创建圆形
imagefilledrectangle($img, 0, 0, 200, 200, $color_bg);
imagefilledarc($img, 100, 100, 200, 200, 0, 0, $color_fg, IMG_ARC_PIE);
imagecolortransparent($img, $color_fg); //将前景色转换为透明
return $img;
}
/**
* 将字符形式16进制串转为10进制
* Enter deion here ...
* @param $str
*/
private function getIntFromHexStr($str)
{
$format = '0123456789abcdef';
$sum = 0;
for($i=strlen($str)-1, $c=0, $j=0; $i>=$c; $i--,$j++){
$index = strpos($format, $str[$i]);//strpos从0计算
$sum+=$index * pow(16,$j);
}
return $sum;
}
/**
* 将16进制颜色转为10进制颜色值数组(RGB)
* Enter deion here ...
* @param $str 16进制串(如:ff9900)
*/
private function createRGB($str)
{
$rgb = array();
if(strlen($str) != 6){
$rgb[] = 0xff;
$rgb[] = 0xff;
$rgb[] = 0xff;
return $rgb; //默认白色
}
$rgb[] = $this->getIntFromHexStr(substr($str, 0, 2));
$rgb[] = $this->getIntFromHexStr(substr($str, 2, 2));
$rgb[] = $this->getIntFromHexStr(substr($str, 4, 2));
return $rgb;
}
}PHP教程就到这里了,当我们用PHP完成一件开发之后,心里真的是很有成就感,所以现在不会的小伙伴们赶紧跟着教程动手自己做一个吧。
相关推荐:
以上是PHP教程—制作圆形用户头像的详细内容。更多信息请关注PHP中文网其他相关文章!
 PHP电子邮件:分步发送指南May 09, 2025 am 12:14 AM
phpisusedforsendendemailsduetoitsignegrationwithservermailservicesand andexternalsmtpproviders,自动化notifications andMarketingCampaigns.1)设置设置yourphpenvironcormentswironmentswithaweberswithawebserverserverserverandphp,确保themailfunctionisenabled.2)useabasicscruct
 如何通过PHP发送电子邮件:示例和代码May 09, 2025 am 12:13 AM
发送电子邮件的最佳方法是使用PHPMailer库。1)使用mail()函数简单但不可靠,可能导致邮件进入垃圾邮件或无法送达。2)PHPMailer提供更好的控制和可靠性,支持HTML邮件、附件和SMTP认证。3)确保正确配置SMTP设置并使用加密(如STARTTLS或SSL/TLS)以增强安全性。4)对于大量邮件,考虑使用邮件队列系统来优化性能。
 高级PHP电子邮件:自定义标题和功能May 09, 2025 am 12:13 AM
CustomHeadersheadersandAdvancedFeaturesInphpeMailenHanceFunctionalityAndreliability.1)CustomHeadersheadersheadersaddmetadatatatatataatafortrackingandCategorization.2)htmlemailsallowformattingandttinganditive.3)attachmentscanmentscanmentscanbesmentscanbestmentscanbesentscanbesentingslibrarieslibrarieslibrariesliblarikelikephpmailer.4)smtppapapairatienticationaltication enterticationallimpr
 使用PHP和SMTP发送电子邮件的指南May 09, 2025 am 12:06 AM
使用PHP和SMTP发送邮件可以通过PHPMailer库实现。1)安装并配置PHPMailer,2)设置SMTP服务器细节,3)定义邮件内容,4)发送邮件并处理错误。使用此方法可以确保邮件的可靠性和安全性。
 使用PHP发送电子邮件的最佳方法是什么?May 08, 2025 am 12:21 AM
ThebestapproachforsendingemailsinPHPisusingthePHPMailerlibraryduetoitsreliability,featurerichness,andeaseofuse.PHPMailersupportsSMTP,providesdetailederrorhandling,allowssendingHTMLandplaintextemails,supportsattachments,andenhancessecurity.Foroptimalu
 PHP中依赖注入的最佳实践May 08, 2025 am 12:21 AM
使用依赖注入(DI)的原因是它促进了代码的松耦合、可测试性和可维护性。1)使用构造函数注入依赖,2)避免使用服务定位器,3)利用依赖注入容器管理依赖,4)通过注入依赖提高测试性,5)避免过度注入依赖,6)考虑DI对性能的影响。
 PHP性能调整技巧和技巧May 08, 2025 am 12:20 AM
phperformancetuningiscialbecapeitenhancesspeedandeffice,whatevitalforwebapplications.1)cachingwithapcureduccureducesdatabaseloadprovesrovesponsemetimes.2)优化
 PHP电子邮件安全性:发送电子邮件的最佳实践May 08, 2025 am 12:16 AM
ThebestpracticesforsendingemailssecurelyinPHPinclude:1)UsingsecureconfigurationswithSMTPandSTARTTLSencryption,2)Validatingandsanitizinginputstopreventinjectionattacks,3)EncryptingsensitivedatawithinemailsusingOpenSSL,4)Properlyhandlingemailheaderstoa


热AI工具

Undresser.AI Undress
人工智能驱动的应用程序,用于创建逼真的裸体照片

AI Clothes Remover
用于从照片中去除衣服的在线人工智能工具。

Undress AI Tool
免费脱衣服图片

Clothoff.io
AI脱衣机

Video Face Swap
使用我们完全免费的人工智能换脸工具轻松在任何视频中换脸!

热门文章

热工具

mPDF
mPDF是一个PHP库,可以从UTF-8编码的HTML生成PDF文件。原作者Ian Back编写mPDF以从他的网站上“即时”输出PDF文件,并处理不同的语言。与原始脚本如HTML2FPDF相比,它的速度较慢,并且在使用Unicode字体时生成的文件较大,但支持CSS样式等,并进行了大量增强。支持几乎所有语言,包括RTL(阿拉伯语和希伯来语)和CJK(中日韩)。支持嵌套的块级元素(如P、DIV),

VSCode Windows 64位 下载
微软推出的免费、功能强大的一款IDE编辑器

记事本++7.3.1
好用且免费的代码编辑器

螳螂BT
Mantis是一个易于部署的基于Web的缺陷跟踪工具,用于帮助产品缺陷跟踪。它需要PHP、MySQL和一个Web服务器。请查看我们的演示和托管服务。

禅工作室 13.0.1
功能强大的PHP集成开发环境


