这几天公司需要更新一个移动端web的页面,因为任务简单,就交给作为菜鸟新人的我来做。第一次接触css还是在14年刚上大一的时候跟着html一起学习的,之后就再也没有接触过。所以只好一边学习,一边完成任务(⊙﹏⊙)b
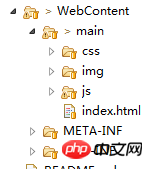
结构:java web项目中的WebContent目录下创建名为“main”的文件夹,再在文件夹里创建两个子文件夹,css(存放css文件),img(存放图片),至于html文件就放在main文件夹里。
在html文件中,不要忘记了在93f0f5c25f18dab9d176bd4f6de5d30e...9c3bca370b5104690d9ef395f2c5f8d1中加入ad34c05beae48a956fe4837e4b950fa8,否则css样式加载不出来的。
css中的整体布局没劲写,就讲讲动画的设置
.logo{
		            position: absolute;
			    width: 86%;
			    left: 6%;
			    height: 33%;
			    z-index: 3;
			    top: 50%;
			    background: url(../img/test.png) no-repeat top center;
			    background-size: contain;
			    animation: bounceInUp .7s ease 0s normal both;
			    -moz-animation: bounceInUp .7s ease 0s normal both;
			    -webkit-animation: bounceInUp .7s ease 0s  normal both;
			    -o-animation:  bounceInUp .7s ease 0s normal both;
			}
			section.active .logo{
				animation: bounceInUp .7s ease 0s normal both;
				-moz-animation: bounceInUp .7s ease 0s normal both;
				-webkit-animation: bounceInUp .7s ease 0s  normal both;
				-o-animation:  bounceInUp .7s ease 0s normal both;
			}

			@keyframes bounceInUp
			{
			0% {top: -30%;}
			40%{top: 55%;}
			60%{top: 30%;}
			80%{top: 45%;}
			100% {top: 50%;}
			}

			@-webkit-keyframes bounceInUp  /* Safari 鍜� Chrome */
			{
			0% {top: -30%;}
			40%{top: 55%;}
			60%{top: 30%;}
			80%{top: 45%;}
			100% {top: 50%;}
			}
			@-moz-keyframes bounceInUp /* Firefox */
			{
			0% {top: -30%;}
			40%{top: 55%;}
			60%{top: 30%;}
			80%{top: 45%;}
			100% {top: 50%;}
			}

			@-o-keyframes bounceInUp /* bounceInUp */
			{
			0% {top: -30%;}
			40%{top: 55%;}
			60%{top: 30%;}
			80%{top: 45%;}
			100% {top: 50%;}
			}
.logo{...}包含了全部某一个图片的相关的css样式,
position属性用于规定元素的定位类型,absolute值为生成绝对定位的元素;
width,height是设置图片的宽高,在这里需要注意,当没有为图片设置宽高的话,图片自己是不会撑开元素的;
left(/right)用于指定图片与左边框(/右边框)的。
z-index用于指定图片层叠的顺序,后边的值越大,图片就在最前面显示(即不会被其他图片覆盖在上面);
top指定图片距离上边框的距离;
background:url(../img/2.png);指定使用的图片的路径
background-repeat:属性表示是否让图片重复,一般情况下是默认为“no-repeat”即不重复
background-size属性设置图片背景的大小尺寸
在.logo{...}中的最后四句就是对图片动画的设定,在这里我们需要对动画animation属性的语法做一定的了解:
        animation:   name    duration    timing-function     delay    iteration-count    direction    fill-mode     play-state;
其相应的作用是:
    动画(声明) :   动画的名称   动画完成时间    运动路径   延迟时间   播放次数   是否逆向播放   动画不播放时要用到的元素样式   指定动画是否正在运行或暂停
     此时会有人说为什么相同的一句语法要重复四次?因为有些浏览器不支持keyframes规则,所以要用相应的浏览器中的支持替代,所以
    @keyframes bounceInUp{...}
    @-webkit-keyframes bounceInUp{...}
    @-moz-keyframes bounceInUp{...}
    @-o-keyframes bounceInUp{...}
    这四条语句块中的内容也是完全相同,其中的0%{},40%{},60%{},80%{},100%{}指定图片的动画在完成到整体动画的百分比进度时的位置所在,因为我使用的是bounceInUp动画,即从上往下进入,所以其中用top指定图片的位置

最后在html中调用外部css样式语句,在<body>...</body>中添加<p class="logo"></p>即可调用动画
以上是用css实现简单动画效果 的详细内容。更多信息请关注PHP中文网其他相关文章!
 丢失的CSS技巧cohost.orgApr 25, 2025 am 09:51 AM
在这篇文章中,布莱克·莫里(Blackle Mori)向您展示了一些骇客,同时试图推动同位HTML支持的极限。如果您敢于使用这些,以免您也被标记为CSS罪犯。
 光标的下一个CSS样式Apr 23, 2025 am 11:04 AM
具有CSS的自定义光标很棒,但是我们可以将JavaScript提升到一个新的水平。使用JavaScript,我们可以在光标状态之间过渡,将动态文本放置在光标中,应用复杂的动画并应用过滤器。
 世界碰撞:使用样式查询的钥匙帧碰撞检测Apr 23, 2025 am 10:42 AM
互动CSS动画和元素相互启动的元素在2025年似乎更合理。虽然不需要在CSS中实施乒乓球,但CSS的灵活性和力量的增加,可以怀疑Lee&Aver Lee&Aver Lee有一天将是一场
 使用CSS背景过滤器进行UI效果Apr 23, 2025 am 10:20 AM
有关利用CSS背景滤波器属性来样式用户界面的提示和技巧。您将学习如何在多个元素之间进行背景过滤器,并将它们与其他CSS图形效果集成在一起以创建精心设计的设计。
 微笑吗?Apr 23, 2025 am 09:57 AM
好吧,事实证明,SVG的内置动画功能从未按计划进行弃用。当然,CSS和JavaScript具有承载负载的能力,但是很高兴知道Smil并没有像以前那样死在水中
 '漂亮”在情人眼中Apr 23, 2025 am 09:40 AM
是的,让#039;跳上文字包装:Safari Technology Preview In Pretty Landing!但是请注意,它与在铬浏览器中的工作方式不同。
 CSS-tricks编年史XLIIIApr 23, 2025 am 09:35 AM
此CSS-tricks更新了,重点介绍了年鉴,最近的播客出现,新的CSS计数器指南以及增加了几位新作者,这些新作者贡献了有价值的内容。
 tailwind的@Apply功能比听起来更好Apr 23, 2025 am 09:23 AM
在大多数情况下,人们展示了@Apply的@Apply功能,其中包括Tailwind的单个property实用程序之一(会改变单个CSS声明)。当以这种方式展示时,@Apply听起来似乎很有希望。如此明显


热AI工具

Undresser.AI Undress
人工智能驱动的应用程序,用于创建逼真的裸体照片

AI Clothes Remover
用于从照片中去除衣服的在线人工智能工具。

Undress AI Tool
免费脱衣服图片

Clothoff.io
AI脱衣机

Video Face Swap
使用我们完全免费的人工智能换脸工具轻松在任何视频中换脸!

热门文章

热工具

DVWA
Damn Vulnerable Web App (DVWA) 是一个PHP/MySQL的Web应用程序,非常容易受到攻击。它的主要目标是成为安全专业人员在合法环境中测试自己的技能和工具的辅助工具,帮助Web开发人员更好地理解保护Web应用程序的过程,并帮助教师/学生在课堂环境中教授/学习Web应用程序安全。DVWA的目标是通过简单直接的界面练习一些最常见的Web漏洞,难度各不相同。请注意,该软件中

WebStorm Mac版
好用的JavaScript开发工具

Atom编辑器mac版下载
最流行的的开源编辑器

EditPlus 中文破解版
体积小,语法高亮,不支持代码提示功能

MinGW - 适用于 Windows 的极简 GNU
这个项目正在迁移到osdn.net/projects/mingw的过程中,你可以继续在那里关注我们。MinGW:GNU编译器集合(GCC)的本地Windows移植版本,可自由分发的导入库和用于构建本地Windows应用程序的头文件;包括对MSVC运行时的扩展,以支持C99功能。MinGW的所有软件都可以在64位Windows平台上运行。


