


1、Composer 安装 phpmailer
composer require phpmailer/phpmailer
2、ThinkPHP 中封装邮件服务类
我把它封装在扩展目录 extend/Mail.php 文件里,内容如下:
<?php
/**
* 邮件服务类
*/
class Mail extends \PHPMailer
{
function __construct()
{
date_default_timezone_set('PRC'); // 默认时区设置
$this->CharSet = config('mail.charset'); // 邮件编码设置
$this->isSMTP(); // 启用SMTP服务
$this->SMTPDebug = config('mail.smtp_debug'); // Debug模式级别
$this->Debugoutput = config('mail.debug_output'); // Debug输出类型
$this->Host = config('mail.host'); // SMTP服务器地址
$this->Port = config('mail.port'); // 端口号
$this->SMTPAuth = config('mail.smtp_auth'); // SMTP登录认证
$this->SMTPSecure = config('mail.smtp_secure'); // SMTP安全协议
$this->Username = config('mail.username'); // SMTP登录邮箱
$this->Password = config('mail.password'); // SMTP登录密码
$this->setFrom(config('mail.from'), config('mail.from_name')); // 发件人邮箱和名称
$this->addReplyTo(config('mail.reply_to'), config('mail.reply_to_name')); // 回复邮箱和名称
}
/**
* 发送邮件
* @param [type] $toMail 收件人地址
* @param [type] $toName 收件人名称
* @param [type] $subject 邮件主题
* @param [type] $content 邮件内容,支持html
* @param [type] $attachment 附件列表。文件路径或路径数组
* @return [type] 成功返回true,失败返回错误消息
*/
function sendMail($toMail, $toName, $subject, $content, $attachment = null)
{
$this->addAddress($toMail, $toName);
$this->Subject = $subject;
$this->msgHTML($content);
if($attachment) { // 添加附件
if(is_string($attachment)){
is_file($attachment) && $this->AddAttachment($attachment);
}
else if(is_array($attachment)){
foreach ($attachment as $file) {
is_file($file) && $this->AddAttachment($file);
}
}
}
if(!$this->send()){ // 发送
return $this->ErrorInfo;
}
else{
return true;
}
}
}注意:如果发送附件,建议使用英文路径。中文路径可能会导致附件发送失败,收到的邮件没有附件。
上面需要的一些配置参数,我把它们放在扩展配置目录 application/extra/mail.php 文件里 ,内容如下:
<?php /** * 邮件服务相关配置 */ return [ 'charset' => 'utf-8', // 邮件编码 'smtp_debug' => 0, // Debug模式。0: 关闭,1: 客户端消息,2: 客户端和服务器消息,3: 2和连接状态,4: 更详细 'debug_output' => 'html', // Debug输出类型。`echo`(默认),`html`,或`error_log` 'host' => 'smtp.126.com', // SMTP服务器地址 'port' => 465, // 端口号。默认25 'smtp_auth' => true, // 启用SMTP认证 'smtp_secure' => 'ssl', // 启用安全协议。''(默认),'ssl'或'tls',留空不启用 'username' => 'yourname@example.com', // SMTP登录邮箱 'password' => 'yourpassword', // SMTP登录密码。126邮箱使用客户端授权码,QQ邮箱用独立密码 'from' => 'from@example.com', // 发件人邮箱 'from_name' => 'name', // 发件人名称 'reply_to' => '', // 回复邮箱的地址。留空取发件人邮箱 'reply_to_name' => '', // 回复邮箱人名称。留空取发件人名称 ];
注意:一般默认端口 25。如果使用了安全协议 ssl,那么端口号一般是 465 或 587。譬如 126 邮箱。建议使用安全协议,因为像阿里云服务器就禁止了非安全协议的 25 端口。
3、测试
在控制器里方法里,添加测试代码:
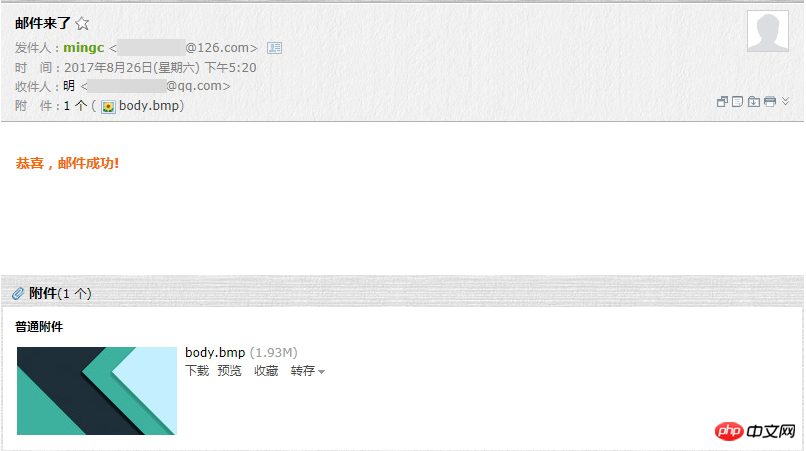
public function mail()
{
$mail = new \Mail;
$ok = $mail->sendMail('xxxxxxxxx@qq.com', 'mingc', '邮件来了', '<p style="color: #f60; font-weight: 700;">恭喜,邮件成功!</p>', 'C:/Users/Administrator/Desktop/body.bmp');
var_dump($ok);
}这里我使用 126 邮箱,安全协议 ssl,端口号 465,发送 html 内容,测试成功:
以上是如何使用ThinkPHP5发送邮件的详细内容。更多信息请关注PHP中文网其他相关文章!

 您如何防止与会议有关的跨站点脚本(XSS)攻击?Apr 23, 2025 am 12:16 AM
要保护应用免受与会话相关的XSS攻击,需采取以下措施:1.设置HttpOnly和Secure标志保护会话cookie。2.对所有用户输入进行输出编码。3.实施内容安全策略(CSP)限制脚本来源。通过这些策略,可以有效防护会话相关的XSS攻击,确保用户数据安全。
 您如何优化PHP会话性能?Apr 23, 2025 am 12:13 AM
优化PHP会话性能的方法包括:1.延迟会话启动,2.使用数据库存储会话,3.压缩会话数据,4.管理会话生命周期,5.实现会话共享。这些策略能显着提升应用在高并发环境下的效率。
 什么是session.gc_maxlifetime配置设置?Apr 23, 2025 am 12:10 AM
thesession.gc_maxlifetimesettinginphpdeterminesthelifespanofsessiondata,setInSeconds.1)它'sconfiguredinphp.iniorviaini_set().2)abalanceIsiseededeedeedeedeedeedeedto to to avoidperformance andununununununexpectedLogOgouts.3)
 您如何在PHP中配置会话名?Apr 23, 2025 am 12:08 AM
在PHP中,可以使用session_name()函数配置会话名称。具体步骤如下:1.使用session_name()函数设置会话名称,例如session_name("my_session")。2.在设置会话名称后,调用session_start()启动会话。配置会话名称可以避免多应用间的会话数据冲突,并增强安全性,但需注意会话名称的唯一性、安全性、长度和设置时机。
 您应该多久再生一次会话ID?Apr 23, 2025 am 12:03 AM
会话ID应在登录时、敏感操作前和每30分钟定期重新生成。1.登录时重新生成会话ID可防会话固定攻击。2.敏感操作前重新生成提高安全性。3.定期重新生成降低长期利用风险,但需权衡用户体验。
 如何在PHP中设置会话cookie参数?Apr 22, 2025 pm 05:33 PM
在PHP中设置会话cookie参数可以通过session_set_cookie_params()函数实现。1)使用该函数设置参数,如过期时间、路径、域名、安全标志等;2)调用session_start()使参数生效;3)根据需求动态调整参数,如用户登录状态;4)注意设置secure和httponly标志以提升安全性。
 在PHP中使用会议的主要目的是什么?Apr 22, 2025 pm 05:25 PM
在PHP中使用会话的主要目的是维护用户在不同页面之间的状态。1)会话通过session_start()函数启动,创建唯一会话ID并存储在用户cookie中。2)会话数据保存在服务器上,允许在不同请求间传递数据,如登录状态和购物车内容。
 您如何在子域中分享会议?Apr 22, 2025 pm 05:21 PM
如何在子域名间共享会话?通过设置通用域名的会话cookie实现。1.在服务器端设置会话cookie的域为.example.com。2.选择合适的会话存储方式,如内存、数据库或分布式缓存。3.通过cookie传递会话ID,服务器根据ID检索和更新会话数据。


热AI工具

Undresser.AI Undress
人工智能驱动的应用程序,用于创建逼真的裸体照片

AI Clothes Remover
用于从照片中去除衣服的在线人工智能工具。

Undress AI Tool
免费脱衣服图片

Clothoff.io
AI脱衣机

Video Face Swap
使用我们完全免费的人工智能换脸工具轻松在任何视频中换脸!

热门文章
热工具

SublimeText3汉化版
中文版,非常好用

安全考试浏览器
Safe Exam Browser是一个安全的浏览器环境,用于安全地进行在线考试。该软件将任何计算机变成一个安全的工作站。它控制对任何实用工具的访问,并防止学生使用未经授权的资源。

记事本++7.3.1
好用且免费的代码编辑器

适用于 Eclipse 的 SAP NetWeaver 服务器适配器
将Eclipse与SAP NetWeaver应用服务器集成。

SublimeText3 Linux新版
SublimeText3 Linux最新版

