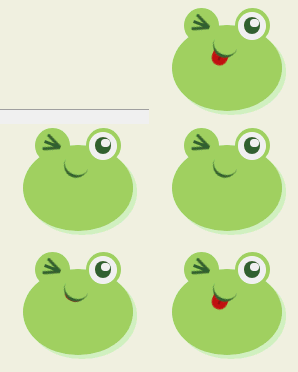
先感受一下全部表情包:

在开始之前先安利一个知识点:Flex弹性布局
我们一般做水平三列布局都是用的float方法,将每一块浮动显示在同一行。这种方法会导致元素没有原来的高度属性,要用清除浮动来解决空间占据问题。对于那些特殊布局非常不方便,比如,垂直居中就不容易实现。
2009年,W3C 提出了一种新的方案----Flex 布局,可以简便、完整、响应式地实现各种页面布局。目前,它已经得到了几乎所有浏览器的支持,这意味着,现在就能很安全地使用这项功能。基本语法查看博客:Flex 布局教程:语法篇
另外还要对css中的伪元素有一定的了解:before、after
最后想要表情动起来,最主要的就是animation属性的使用了。
整体布局
我们先对整体座椅个布局,使各个表情能直观的展示在各个位置上,因为每个表情几乎占据的是一个正方形的空间,所以我们将每个青蛙表情水平展示在页面上,这里就用到了flex布局方式。
<p class="container">
<!--所有表情的存放容器,flex布局,所有子项目水平显示,自动换行,水平居中显示,竖直方向从顶部开始-->
<p class="emoji-container">
<!--存放青蛙表情的大容器,控制大小间距之类的属性-->
<p class="icon">
<!--存放每一个青蛙表情的容器,控制每一个表情自己的位置和特征-->
<p class="frog" id="frog-n"></p></p></p></p>
body {background-color: #F1FFE6;}
.container {width: 950px;margin: 70px auto 0px auto;text-align: center;}
.container .emoji-container {
/*flex弹性布局,多用于左右并排布局,跟float的作用类似,不用清除浮动*/
display: -webkit-box;
display: -ms-flexbox;
display: flex;
/*justify-content属性定义了项目在主轴上的对齐方式。center就是在x轴上居中显示*/
-ms-grid-column-align: center;
    justify-items: center;
/*align-items属性定义项目在交叉轴上如何对齐。flex-start就是从y轴的最上端开始排列*/
-webkit-box-align: start;
    -ms-flex-align: start;
        align-items: flex-start;
/*flex-wrap属性定义,如果一条轴线排不下,如何换行。wrap:换行,第一行在上方。*/
-ms-flex-wrap: wrap;
    flex-wrap: wrap;
}
.container .emoji-container .icon {
margin-right: 40px;
margin-bottom: 40px;
}
.container .emoji-container .icon:nth-child(6n) {
margin-right: 0px;
}
.icon {width: 125px;height: 120px;position: relative;}
.icon .frog {position: absolute; top: 0;left: 0;width: 100%;height: 100%;}
蛙蛙的通用样式
观察一个每一个蛙蛙表情,虽然每一个表情形态各异,但是它们的身体、嘴巴、眼睛、小红晕的位置和大小几乎都是一致,这些一致的样式我们可以写成公用样式,每个蛙蛙的特征再根据每个人蛙蛙的id写单个的样式进行重绘或者覆盖。
<p class="frog" id="frog-1">
      <!-- 蛙蛙的身体部分 -->
      <p class="body">
        <!-- 蛙蛙的嘴巴 -->
        <p class="mouth"></p>
      </p>
      <!-- 蛙蛙的眼睛 -->
      <p class="eyes">
        <!-- 蛙蛙的左右眼睛 -->
        <p class="eye eye-left">
          <!-- 蛙蛙的内眼圈儿 -->
          <p class="eye-inner">
            <!-- 蛙蛙的眼珠 -->
            <p class="pupil">
              <!-- 蛙蛙眼圈里的光晕 -->
              <p class="light"></p>
            </p>
          </p>
        </p>
        <p class="eye eye-right">
          <p class="eye-inner">
            <p class="pupil">
              <p class="light"></p>
            </p>
          </p>
        </p>
      </p>
    </p>
    /*蛙蛙身体部分样式*/
    .icon .frog .body {
    width: 110px;
    height: 86px;
    background-color: #A3D768;
    border-radius: 50%;
    position: absolute;
    top: 25px;left: 0;
    right: 0;
    margin: auto;box-shadow: 4px 4px 0px 0px rgba(163, 215, 104, 0.3);
}
/*蛙蛙嘴巴部分样式,因为每个蛙蛙的嘴巴不一样,所以公共样式就只定义了位置*/
.icon .frog .body .mouth {
margin: auto;
}
.icon .frog .eyes {
width: 86px;
height: 35px;
position: absolute;
top: 8px;
left: 0;right: 0;
margin: auto;
}
/*蛙蛙眼睛部分样式*/
.icon .frog .eyes .eye {width: 35px;height: 35px;}
.icon .frog .eyes .eye:before {content: "";display: block;width: 100%;height: 100%;
background-color: #A3D768;border-radius: 50%;
}
/*蛙蛙眼圈部分样式*/
.icon .frog .eyes .eye .eye-inner {background-color: #fff;width: 80%;height: 80%;
position: absolute;top: 10%;left: 10%;border-radius: 50%;
}
/*蛙蛙眼珠部分样式*/
.icon .frog .eyes .eye .eye-inner .pupil {background-color: #3F6A34;
width: 60%;height: 60%;position: absolute;top: 20%;left: 20%;border-radius: 50%;
}
/*蛙蛙眼珠里的亮光部分样式*/
.icon .frog .eyes .eye .eye-inner .pupil .light {background-color: #fff;
width: 50%;height: 50%;position: absolute;top: 10%;left: 10%;border-radius: 50%;
}
/*蛙蛙左右两边眼睛的位置*/
.icon .frog .eyes .eye-left {position: absolute;top: 0px;left: 0;}.icon .frog .eyes .eye-right {position: absolute;top: 0px;right: 0;}
蛙蛙基本公用样式.png
第一只小青蛙
第一只小青蛙
第一只小青蛙是在基本样式的基础上有一个嘴角上扬的动态效果,所以要完成第一只蛙蛙的绘制,只要在公用样式的基础上加上嘴巴的动效就可以了,dom结构也是一样的。
.frog#frog-1 .body .mouth {
width: 18px;height: 22px;
border-bottom: 3px solid #3F6A34;
position: absolute;top: 6px;left: 0;right: 0;
-webkit-animation: smile 3.8s linear 0s infinite;
animation: smile 3.8s linear 0s infinite;
}
@-webkit-keyframes smile {
0% {  border-radius: 0%;
}
20% {  border-radius: 50%;
}
70% {  border-radius: 50%;
}
}
@keyframes smile {
0% {  border-radius: 0%;
}
20% {  border-radius: 50%;
}
70% {  border-radius: 50%;
}
}
第一只蛙蛙动图.gif
第二只小青蛙
第二只小青蛙的嘴巴是一个大嘴巴,脸颊上还有两个小红晕,眼睛是冒着爱心的,所以在dom结构上要加上红晕的p,嘴巴眼睛的样式也要做相应的修改。(主要是嘴巴、红晕和红色爱心的制作)
<p class="frog" id="frog-2">
      <p class="body">
        <!--存放蛙蛙的脸颊红晕-->
        <p class="blush"></p>
       <!--加上大嘴巴的class big-month-->
        <p class="mouth big-mouth"></p>
      </p>
      <p class="eyes">
        <p class="eye eye-left">
          <p class="eye-inner">
            <p class="pupil">
              <p class="light"></p>
            </p>
          </p>
        </p>
        <p class="eye eye-right">
          <p class="eye-inner">
            <p class="pupil">
              <p class="light"></p>
            </p>
          </p>
        </p>
      </p>
    </p>/*第二只青蛙脸颊两边的红晕样式*
    /.icon .frog .body .blush {width: 75px;height: 9px;position: absolute;
    top: 20px;left: 0;right: 0;margin: auto;
}
.icon .frog .body .blush:before, .icon .frog .body .blush:after {
content: "";
display: block;width: 12px;height: 100%;background-color: #F7D2C9;border-radius: 50%;
}
.icon .frog .body .blush:before {position: absolute;top: 0;left: 0;}
.icon .frog .body .blush:after {position: absolute;top: 0;right: 0;}
/*第二只青蛙的嘴巴样式,用圆角和阴影的方式制作而成*/
.icon .frog .body .big-mouth {width: 30px;height: 20px;border-radius: 0 0 50% 50%;
box-shadow: 2px 2px 0px 0px rgba(63, 106, 52, 0.3);
}
.frog#frog-2 .mouth {background-color: #fff;position: absolute;top: 30px;left: 0;right: 0;
}
/*第二只青蛙的眼睛样式,将眼圈的背景设置为透明色,圆圈里面的亮光隐藏*/
.frog#frog-2 .eye-inner {top: 17%;background-color: transparent !important;
-webkit-animation: hearts 0.6s linear 0s infinite alternate;
animation: hearts 0.6s linear 0s infinite alternate;
}
@-webkit-keyframes hearts {0% {
  -webkit-transform: scale(0.7);
  transform: scale(0.7);
}100% {
  -webkit-transform: scale(1);
  transform: scale(1);
}
}
@keyframes hearts {0% {
  -webkit-transform: scale(0.7);
  transform: scale(0.7);
}100% {
  -webkit-transform: scale(1);
  transform: scale(1);
}
}
/*第二只青蛙的眼睛的爱心样式,左上角和右上角设置交圆角50%,然后左右对应的旋转45度合并成一个爱心的形状*/
.frog#frog-2 .eye-inner:before, .frog#frog-2 .eye-inner:after {content: "";display: block;
height: 70%;width: 40%;background-color: #C71F1C;border-radius: 50% 50% 0 0;
}
.frog#frog-2 .eye-inner:before {position: absolute;top: 0;left: 5px;
           -webkit-transform: rotate(-45deg);
           transform: rotate(-45deg);
}
.frog#frog-2 .eye-inner:after {position: absolute;top: 0;right: 5px;
            -webkit-transform: rotate(45deg);
            transform: rotate(45deg);
}
.frog#frog-2 .eye-inner .pupil {display: none;}
第二只蛙蛙动图.gif
第三只小青蛙
第三只小青蛙相对于公共样式的变化是眼睛和嘴巴的变化,所以最主要的是画出左眼样式和嘴巴样式。
-
舌头的制作一个椭圆旋转对应的角度额按后被嘴巴遮挡住一部分制作而成,

第三只青蛙的舌头分解显示.png
<p class="frog" id="frog-3">
<p class="body">
<p class="mouth">
<!--存放舌头样式的容器-->
<p class="toungue"></p>
</p>
</p>
<p class="eyes">
<!--左眼添加wink的样式,作为左眼眯眼样式-->
<p class="eye eye-left wink">
<p class="eye-inner">
<p class="pupil">
<p class="light"></p>
</p>
</p>
</p>
<p class="eye eye-right">
<p class="eye-inner">
<p class="pupil">
<p class="light"></p>
</p>
</p>
</p>
</p>
</p>
/*第三只小青蛙的左眼眯眼样式*/
.icon .frog .eyes .eye.wink .eye-inner {
background-color: transparent;
width: 17px;
height: 3px;
background-color: #3F6A34;
border-radius: 0;
position: absolute;
top: 15px;
left: 0;
right: 0;
margin: auto;
-webkit-transform: rotate(21deg);
transform: rotate(21deg);
}
.icon .frog .eyes .eye.wink .eye-inner:before, .icon .frog .eyes .eye.wink .eye-inner:after {
content: '';
display: block;
width: 17px;
height: 3px;
background-color: #3F6A34;
}
.icon .frog .eyes .eye.wink .eye-inner:before {
-webkit-transform: rotate(25deg);
transform: rotate(25deg);
position: absolute;
top: -4px;
left: 0;
}
.icon .frog .eyes .eye.wink .eye-inner:after {
-webkit-transform: rotate(-25deg);
transform: rotate(-25deg);
position: absolute;
top: 4px;
left: 0;
}
.icon .frog .eyes .eye.wink .pupil {
display: none;
}
/*第三只小青蛙的右眼亮光位置*/
.frog#frog-3 .eye-right .light {
position: absolute;
top: 10%;
left: auto;
right: 10%;
}
/*第三只小青蛙的嘴巴吐舌头样式*/
.frog#frog-3 .mouth {
width: 25px;
height: 25px;
position: absolute;
top: 5px;
left: 0;
right: 0;
-webkit-transform: rotate(23deg);
transform: rotate(23deg);
}
.frog#frog-3 .mouth:before {
content: "";
display: block;
border-bottom: 3px solid #3F6A34;
width: 100%;
height: 100%;
border-radius: 50%;
background-color: #A3D768;
z-index: 3;
position: absolute;
top: 0px;
left: 0;
}
.frog#frog-3 .toungue {
width: 16px;
height: 20px;
background-color: #C71F1C;
border-radius: 30px;
z-index: 2;
position: absolute;
top: 17px;
left: 4px;
-webkit-transform-origin: center top;
transform-origin: center top;
-webkit-animation: toungue 2.0s linear 0s infinite;
animation: toungue 2.0s linear 0s infinite;
}
@-webkit-keyframes toungue {
0% {
-webkit-transform: scale(1, 1);
transform: scale(1, 1);
}
40% {
-webkit-transform: scale(1, 1);
transform: scale(1, 1);
}
75% {
-webkit-transform: scale(1, 0);
transform: scale(1, 0);
}
}
@keyframes toungue {
0% {
-webkit-transform: scale(1, 1);
transform: scale(1, 1);
}
40% {
-webkit-transform: scale(1, 1);
transform: scale(1, 1);
}
75% {
-webkit-transform: scale(1, 0);
transform: scale(1, 0);
}
}
.frog#frog-3 .toungue:before {
content: "";
display: block;
width: 2px;
height: 4px;
background-color: #410a09;
position: absolute;
left: 0px;
right: 0px;
bottom: 5px;
margin: auto;
opacity: 0.4;
}
第三只蛙蛙动图.gif
第四只小青蛙
第四只小青蛙相对于公共样式的变化是眼睛和嘴巴的变化,眼睛的眼珠里面有两个亮光点,嘴巴是大嘴巴并且可以一张一合,嘴巴里面还有一个小舌头。它的光晕处于一会有一会没有的状态。
<p class="frog" id="frog-4">
      <p class="body">
        <p class="mouth big-mouth">
          <p class="toungue"></p>
        </p>
      </p>
      <p class="eyes">
        <!--控制另一个眼珠闪光点的样式extra-light-->
        <p class="eye eye-left extra-light">
          <p class="eye-inner">
            <p class="pupil">
              <p class="light"></p>
            </p>
          </p>
        </p>
        <p class="eye eye-right extra-light">
          <p class="eye-inner">
            <p class="pupil">
              <p class="light"></p>
            </p>
          </p>
        </p>
      </p>
    </p>
/*第四只小青蛙眼珠另一个闪光点样式*/
.icon .frog .eyes .eye.extra-light .light {width: 40%;height: 40%;}
.icon .frog .eyes .eye.extra-light .light:before {content: "";display: block;width: 70%;
            height: 70%;background-color: #fff;border-radius: 50%;
}
第四只蛙蛙动图.gif
剩余的其它蛙蛙
其它蛙蛙的画法都是基于通用样式的基础上对独特样式进行编写,最重要的是对动画帧的控制,各种形状就是基本几何图形的拼接(正方形,border-radius,transform,position的合理运用)。
由于代码量太大我就不在文章里赘述,主要还是对动画帧的熟练运用!(重要的事情说三遍)。
以上是关于html如何打造动画可爱的蛙蛙表情的案例分享的详细内容。更多信息请关注PHP中文网其他相关文章!
 如何验证您的HTML代码?Apr 24, 2025 am 12:04 AM
HTML代码可以通过在线验证器、集成工具和自动化流程来确保其清洁度。1)使用W3CMarkupValidationService在线验证HTML代码。2)在VisualStudioCode中安装并配置HTMLHint扩展进行实时验证。3)利用HTMLTidy在构建流程中自动验证和清理HTML文件。
 HTML与CSS和JavaScript:比较Web技术Apr 23, 2025 am 12:05 AM
HTML、CSS和JavaScript是构建现代网页的核心技术:1.HTML定义网页结构,2.CSS负责网页外观,3.JavaScript提供网页动态和交互性,它们共同作用,打造出用户体验良好的网站。
 HTML作为标记语言:其功能和目的Apr 22, 2025 am 12:02 AM
HTML的功能是定义网页的结构和内容,其目的在于提供一种标准化的方式来展示信息。1)HTML通过标签和属性组织网页的各个部分,如标题和段落。2)它支持内容与表现分离,提升维护效率。3)HTML具有可扩展性,允许自定义标签增强SEO。
 HTML,CSS和JavaScript的未来:网络开发趋势Apr 19, 2025 am 12:02 AM
HTML的未来趋势是语义化和Web组件,CSS的未来趋势是CSS-in-JS和CSSHoudini,JavaScript的未来趋势是WebAssembly和Serverless。1.HTML的语义化提高可访问性和SEO效果,Web组件提升开发效率但需注意浏览器兼容性。2.CSS-in-JS增强样式管理灵活性但可能增大文件体积,CSSHoudini允许直接操作CSS渲染。3.WebAssembly优化浏览器应用性能但学习曲线陡,Serverless简化开发但需优化冷启动问题。
 HTML:结构,CSS:样式,JavaScript:行为Apr 18, 2025 am 12:09 AM
HTML、CSS和JavaScript在Web开发中的作用分别是:1.HTML定义网页结构,2.CSS控制网页样式,3.JavaScript添加动态行为。它们共同构建了现代网站的框架、美观和交互性。
 HTML的未来:网络设计的发展和趋势Apr 17, 2025 am 12:12 AM
HTML的未来充满了无限可能。1)新功能和标准将包括更多的语义化标签和WebComponents的普及。2)网页设计趋势将继续向响应式和无障碍设计发展。3)性能优化将通过响应式图片加载和延迟加载技术提升用户体验。
 HTML与CSS vs. JavaScript:比较概述Apr 16, 2025 am 12:04 AM
HTML、CSS和JavaScript在网页开发中的角色分别是:HTML负责内容结构,CSS负责样式,JavaScript负责动态行为。1.HTML通过标签定义网页结构和内容,确保语义化。2.CSS通过选择器和属性控制网页样式,使其美观易读。3.JavaScript通过脚本控制网页行为,实现动态和交互功能。
 HTML:是编程语言还是其他?Apr 15, 2025 am 12:13 AM
HTMLISNOTAPROGRAMMENGUAGE; ITISAMARKUMARKUPLAGUAGE.1)htmlStructures andFormatSwebContentusingtags.2)itworkswithcsssforstylingandjavascript for Interactivity,增强WebevebDevelopment。


热AI工具

Undresser.AI Undress
人工智能驱动的应用程序,用于创建逼真的裸体照片

AI Clothes Remover
用于从照片中去除衣服的在线人工智能工具。

Undress AI Tool
免费脱衣服图片

Clothoff.io
AI脱衣机

Video Face Swap
使用我们完全免费的人工智能换脸工具轻松在任何视频中换脸!

热门文章

热工具

适用于 Eclipse 的 SAP NetWeaver 服务器适配器
将Eclipse与SAP NetWeaver应用服务器集成。

mPDF
mPDF是一个PHP库,可以从UTF-8编码的HTML生成PDF文件。原作者Ian Back编写mPDF以从他的网站上“即时”输出PDF文件,并处理不同的语言。与原始脚本如HTML2FPDF相比,它的速度较慢,并且在使用Unicode字体时生成的文件较大,但支持CSS样式等,并进行了大量增强。支持几乎所有语言,包括RTL(阿拉伯语和希伯来语)和CJK(中日韩)。支持嵌套的块级元素(如P、DIV),

DVWA
Damn Vulnerable Web App (DVWA) 是一个PHP/MySQL的Web应用程序,非常容易受到攻击。它的主要目标是成为安全专业人员在合法环境中测试自己的技能和工具的辅助工具,帮助Web开发人员更好地理解保护Web应用程序的过程,并帮助教师/学生在课堂环境中教授/学习Web应用程序安全。DVWA的目标是通过简单直接的界面练习一些最常见的Web漏洞,难度各不相同。请注意,该软件中

Atom编辑器mac版下载
最流行的的开源编辑器

禅工作室 13.0.1
功能强大的PHP集成开发环境


