

<br>
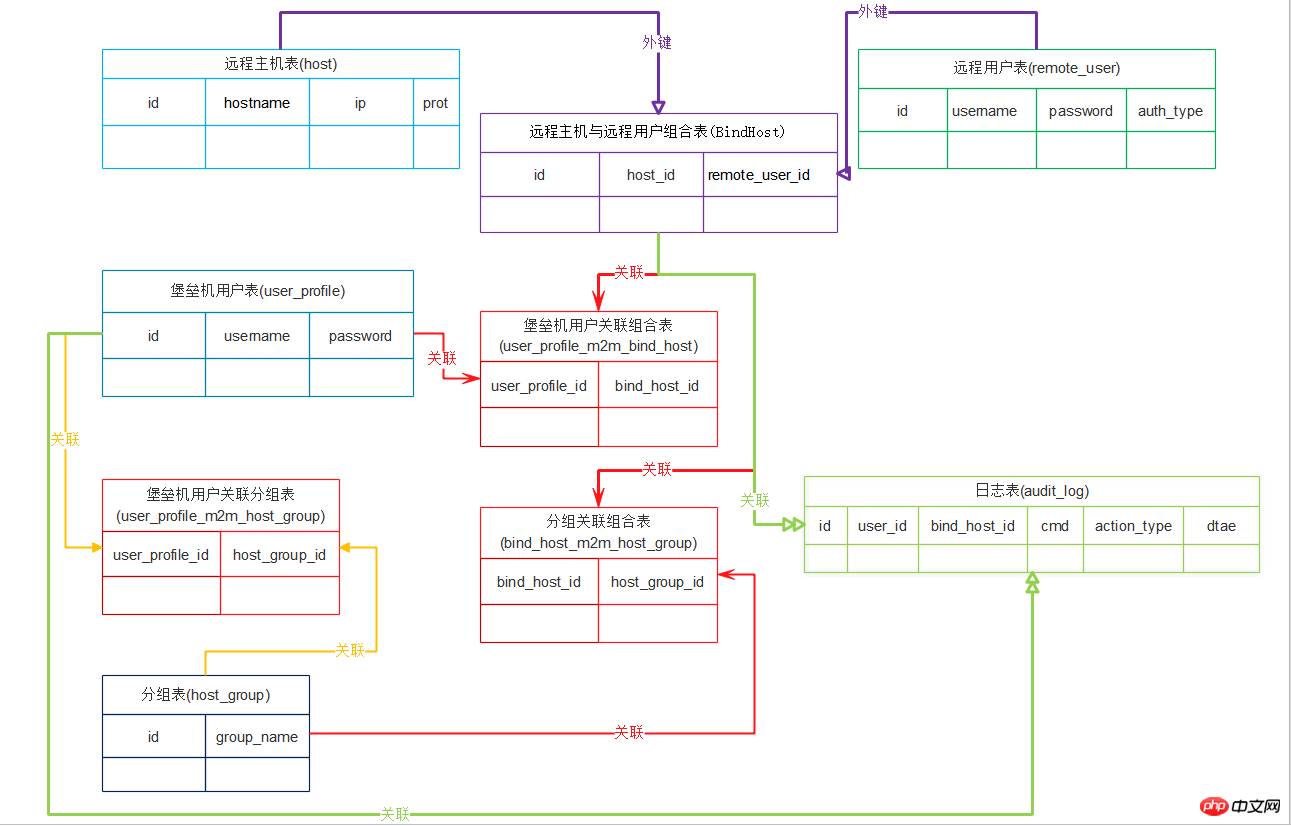
堡垒机
windows ,linux 都通过测试
初始化说明:
    #进入根目录
    1、初始化表结构   #python3 bin/start.py syncdb
    2、创建堡垒机用户 #python3 bin/start.py create_users -f share/examples/new_user.yml
    3、创建分组       #python3 bin/start.py create_groups -f share/examples/new_groups.yml
    4、创建远程主机   #python3 bin/start.py create_hosts -f share/examples/new_hosts.yml
    5、创建远程主机用户(绑定堡垒机用户与分组)#python3 bin/start.py create_remoteusers -f share/examples/new_remoteusers.yml
    6、绑定远程主机与远程主机用户【远程绑定组合】(关联远程绑定组合与堡垒机用户、关联远程绑定组合与分组)
        #python3 bin/start.py create_bindhosts -f share/examples/new_bindhosts.yml
    7、登陆堡垒机    #python3 bin/start.py start_session  (示例用户: uge3 密码:uge3)
    8、查看用户日志      #python3 bin/start.py audit -n uge3


plj/#程序目录
|- - -__init__.py
|- - -bin/#启动目录
|      |- - -__init__.py
|      |- - -start.py#启动
|
|- - -conf/#配置目录
|      |- - -__init__.py
|      |- - -action_registers.py#开始参数配置文件
|      |- - -settings.py#配置文件
|
|- - -modules/#主逻辑目录
|      |- - -__init__.py
|      |- - -actions.py#开始函数 帮助信息
|      |- - -db_conn.py#数据库连接配置
|      |- - -interactive.py#ssh命令重写
|      |- - -models.py#表结构 类
|      |- - -ssh_login.py#登陆远程主机调用
|      |- - -utils.py#工具函数
|      |- - -views.py#主要逻辑函数
|
|- - -REDMAE
|
|- - -share/#添加堡垒机用户\远程主机\分组\远程主机用户 目录
|      |- - -examples/#文件目录
|              |- - -new_bindhosts.yml/#远程主机用户与远程主机 组合表(组合表与 分组)(堡垒机用户与组合表) 创建 示例
|              |- - -new_groups.yml/#分组创建 示例( 堡垒机用户与 分组)
|              |- - -new_hosts.yml/#远程主机创建 示例
|              |- - -new_remoteusers.yml/#远程主机用户创建 示例
|              |- - -new_user.yml/#堡垒机用户机创建 示例
plj/#程序目录
|- - -__init__.py
|- - -bin/#启动目录
|      |- - -__init__.py
|      |- - -start.py#启动


1 #!/usr/bin/env python 2 #_*_coding:utf-8_*_ 3 #Python 4 #17-7-14 下午6:22 5 #__author__='Administrator' 6 7 import os,sys 8 9 BASE_DIR = os.path.dirname(os.path.dirname(os.path.abspath(__file__)))10 11 #print(BASE_DIR)12 sys.path.append(BASE_DIR)#加入环境变量13 14 if __name__ == '__main__':15 from modules.actions import excute_from_command_line16 excute_from_command_line(sys.argv)
|- - -conf/#配置目录
|      |- - -__init__.py
|      |- - -action_registers.py#开始参数配置文件


1 #_*_coding:utf-8_*_ 2 import os,sys 3 4 BASE_DIR = os.path.dirname(os.path.dirname(os.path.abspath(__file__))) 5 6 sys.path.append(BASE_DIR)#加入环境变量 7 8 from modules import views 9 10 '''11 actions = {12 'start_session': views.start_session,#开始程序13 'stop': views.stop_server,#停止14 'syncdb': views.syncdb,#创建表结构15 'create_users': views.create_users,16 'create_groups': views.create_groups,17 'create_hosts': views.create_hosts,18 'create_bindhosts': views.create_bindhosts,19 'create_remoteusers': views.create_remoteusers,20 }21 '''22 actions = {23 'audit':views.audit,#查看日志24 'start_session': views.start_session,#开始程序25 'stop': views.stop_server,#停止26 'syncdb': views.syncdb,#创建表结构27 'create_users': views.create_users,#创建堡垒机用户28 'create_groups': views.create_groups,#创建分组29 'create_hosts': views.create_hosts,#创建远程主机30 'create_remoteusers': views.create_remoteusers,# #创建远程主机用户31 'create_bindhosts': views.create_bindhosts,# 远程主机与远程主机用户 绑定 关联堡垒机用户与32 #'ass_bind_group': views.ass_bindhost_group,#远程主机与远程主机用户组合 与 分组33 34 35 }36 37 actionses = {38 'audit [查看日志]':views.audit,#查看日志39 'start_session [开始程序]': views.start_session,#开始程序40 'stop [停止]': views.stop_server,#停止41 'syncdb [创建表结构]': views.syncdb,#创建表结构42 'create_users [创建堡垒机用户]': views.create_users,#创建堡垒机用户43 'create_groups [创建分组]': views.create_groups,#创建分组44 'create_hosts [创建远程主机]': views.create_hosts,#创建远程主机45 'create_remoteusers [创建远程主机用户]': views.create_remoteusers,# #创建远程主机用户46 'create_bindhosts [绑定堡垒机用户与远程主机用户]': views.create_bindhosts,#绑定堡垒机用户与远程主机用户47 #'ass_bind_group [绑定远程主机+远程主机用户组合与分组]': views.ass_bindhost_group,#远程主机与远程主机用户组合 与 分组48 49 50 }| |- - -settings.py#配置文件


1 import os,sys 2 3 BASE_DIR = os.path.dirname(os.path.dirname(os.path.abspath(__file__))) 4 5 USER='root'#用户名 6 PASSWORD='root'#密码 7 HOST_IP='127.0.0.1'#数据库地址 8 PORT="3306"#数据库端口 9 DB='little_finger'#库名10 DB_CONN ="mysql+pymysql://"+USER+":"+PASSWORD+"@"+HOST_IP+":"+PORT+"/"+DB+"?charset=utf8"#连接参数11 #DB_CONN ="mysql+pymysql://root:root@localhost:3306/"+DB+"?charset=utf8"#连接参数
|- - -modules/#主逻辑目录
|      |- - -__init__.py
|      |- - -actions.py#开始函数 帮助信息


1 #!/usr/bin/env python 2 #_*_coding:utf-8_*_ 3 #Python 4 #17-7-14 下午6:25 5 #__author__='Administrator' 6 import os,sys 7 8 BASE_DIR = os.path.dirname(os.path.dirname(os.path.abspath(__file__))) 9 10 sys.path.append(BASE_DIR)#加入环境变量11 12 from conf import settings13 from conf import action_registers14 from modules import utils15 16 17 def help_msg():#帮助信息18 '''19 print help msgs20 :return:21 '''22 print("\033[31;1mAvailable commands:\033[0m")23 for key in action_registers.actionses:#打印配置文件中的帮助信息24 print("\t",key)25 26 27 def excute_from_command_line(argvs):#接收输入的命令28 if len(argvs) < 2: #如果小于两个词29 help_msg()#打印帮助信息30 exit()31 if argvs[1] not in action_registers.actions:32 utils.print_err("Command [%s] does not exist!" % argvs[1], quit=True)33 action_registers.actions[argvs[1]](argvs[1:])#获取到命令| |- - -db_conn.py#数据库连接配置


1 from sqlalchemy import create_engine,Table 2 from sqlalchemy.orm import sessionmaker 3 4 from conf import settings 5 6 7 #engine = create_engine(settings.DB_CONN) 8 engine = create_engine(settings.DB_CONN,echo=True)#数据库连接通道 9 10 SessionCls = sessionmaker(bind=engine) #创建与数据库的会话session class ,注意,这里返回给session的是个class,不是实例11 session = SessionCls()
| |- - -interactive.py#ssh命令重写


1 import socket 2 import sys 3 from paramiko.py3compat import u 4 from modules import models 5 import datetime 6 7 # windows does not have termios... 8 try: 9 import termios 10 import tty 11 has_termios = True 12 except ImportError: 13 has_termios = False 14 15 #记录日志相关 堡垒机用户 连接主机 命令 写入日志 16 def interactive_shell(chan,user_obj,bind_host_obj,cmd_caches,log_recording): 17 if has_termios: 18 posix_shell(chan,user_obj,bind_host_obj,cmd_caches,log_recording) 19 else: 20 windows_shell(chan) 21 22 23 def posix_shell(chan,user_obj,bind_host_obj,cmd_caches,log_recording): 24 import select 25 26 oldtty = termios.tcgetattr(sys.stdin) 27 try: 28 tty.setraw(sys.stdin.fileno()) 29 tty.setcbreak(sys.stdin.fileno()) 30 chan.settimeout(0.0) 31 cmd = '' 32 tab_key = False 33 while True: 34 r, w, e = select.select([chan, sys.stdin], [], [])#select 连接传入命令返回 三个变量 35 if chan in r:#如果命令存在 36 try: 37 x = u(chan.recv(1024))#连接返回数据 38 if tab_key: 39 if x not in ('\x07' , '\r\n'): #判断空格 和回车 40 #print('tab:',x) 41 cmd += x 42 tab_key = False 43 if len(x) == 0: 44 sys.stdout.write('\r\n*** EOF\r\n') 45 break 46 sys.stdout.write(x) 47 sys.stdout.flush()#实时输出到屏幕 48 except socket.timeout: 49 pass 50 if sys.stdin in r: 51 x = sys.stdin.read(1) 52 if '\r' != x: 53 cmd +=x 54 else: 55 56 print('cmd->:',cmd)#命令 57 log_item = models.AuditLog(user_id=user_obj.id, 58 bind_host_id=bind_host_obj.id, 59 action_type='cmd', 60 cmd=cmd , 61 date=datetime.datetime.now() 62 ) 63 cmd_caches.append(log_item)#添加到列表 64 cmd = '' 65 66 if len(cmd_caches)>=10:#每十条写入日志 67 log_recording(user_obj,bind_host_obj,cmd_caches) 68 cmd_caches = [] 69 if '\t' == x: 70 tab_key = True 71 if len(x) == 0: 72 break 73 chan.send(x)#发送命令 74 75 finally: 76 termios.tcsetattr(sys.stdin, termios.TCSADRAIN, oldtty) 77 78 79 # thanks to Mike Looijmans for this code 80 def windows_shell(chan): 81 import threading 82 83 sys.stdout.write("Line-buffered terminal emulation. Press F6 or ^Z to send EOF.\r\n\r\n") 84 85 def writeall(sock): 86 while True: 87 data = sock.recv(256) 88 if not data: 89 sys.stdout.write('\r\n*** EOF ***\r\n\r\n') 90 sys.stdout.flush() 91 break 92 sys.stdout.write(data.decode())##windows下要转成str 93 sys.stdout.flush()#实时输出到屏幕 94 95 writer = threading.Thread(target=writeall, args=(chan,)) 96 writer.start() 97 98 try: 99 while True:100 d = sys.stdin.read(1)101 if not d:102 break103 chan.send(d)104 except EOFError:105 # user hit ^Z or F6106 pass| |- - -models.py#表结构 类


1 #!/usr/bin/env python 2 #_*_coding:utf-8_*_ 3 #Python 4 #17-7-12 上午10:54 5 #__author__='Administrator' 6 7 # 创建表 8 import os ,sys 9 BASE_DIR=os.path.dirname(os.path.dirname(os.path.abspath(__file__)))#获取相对路径转为绝对路径赋于变量 10 sys.path.append(BASE_DIR)#增加环境变量 11 from sqlalchemy.ext.declarative import declarative_base 12 from sqlalchemy import Column, Integer, String, ForeignKey, UniqueConstraint, Index,Table,DATE,DateTime 13 from sqlalchemy.orm import sessionmaker, relationship 14 from sqlalchemy import create_engine 15 from sqlalchemy import func #统计 16 from sqlalchemy_utils import ChoiceType,PasswordType # 17 from conf import settings 18 Base = declarative_base()#生成orm 基类 19 20 # #创建堡垒机用户关联--联合表,自动维护 21 user_profile_m2m_bind_host = Table('user_profile_m2m_bind_host', Base.metadata, 22 Column('user_profile_id',Integer,ForeignKey('user_profile.id')),#关联,用户id 23 Column('bind_host_id',Integer,ForeignKey('bind_host.id')),#关联,联合表id 24 ) 25 # #创建联合表--分组,自动维护 26 bind_host_m2m_host_group = Table('bind_host_m2m_host_group', Base.metadata, 27 Column('bind_host_id',Integer,ForeignKey('bind_host.id')),#关联,联合表id 28 Column('host_group_id',Integer,ForeignKey('host_group.id')),#关联,分组id 29 ) 30 # #创建堡垒机用户--分组,自动维护 31 user_profile_m2m_host_group = Table('user_profile_m2m_host_group', Base.metadata, 32 Column('user_profile_id',Integer,ForeignKey('user_profile.id')),#关联,堡垒机用户id 33 Column('host_group_id',Integer,ForeignKey('host_group.id')),#关联,分组id 34 ) 35 #主机表 36 class Host(Base):#主机表 37 __tablename__='host' 38 id=Column(Integer,primary_key=True) 39 hostname=Column(String(64),unique=True)#主机名 40 ip=Column(String(64),unique=True)#ip 41 port=Column(Integer,default=22)#端口默认为22 42 def __repr__(self): 43 return self.hostname#输出主机名 44 45 #服务器远程主机用户名密码 46 class RemoteUser(Base): 47 __tablename__='remote_user' 48 49 id=Column(Integer,primary_key=True) 50 AuthType=[ 51 ('ssh-passwd','SSH-Password'), 52 ('ssh-key','SSH-Key'), 53 ] 54 auth_type=Column(ChoiceType(AuthType))#认证类型 55 username=Column(String(64))#用户名 不用唯一 56 password=Column(String(64)) 57 __table_args__=(UniqueConstraint('auth_type','username','password',name='user_password_type'),)#联合只唯一 58 def __repr__(self): 59 return self.username#用户名 60 61 #绑定远程主机-远程用户关联表 62 class BindHost(Base): 63 __tablename__='bind_host' 64 __table_args__=(UniqueConstraint('host_id',"remote_user_id",name='host_id_remote'),)#联合唯一 65 id=Column(Integer,primary_key=True) 66 host_id=Column(Integer,ForeignKey('host.id'))#外键--〉主机表 67 remote_user_id=Column(Integer,ForeignKey('remote_user.id'))#外键--〉主机用户表 68 host=relationship('Host',backref='bind_hosts')#外键 主机表 查询与反查 69 remote_user=relationship('RemoteUser',backref='bind_hosts')#外键 用户表 查询与反查 70 def __repr__(self): 71 return '[主机:%s----->登陆用户:%s]'%(self.host.ip,self.remote_user.username)# 72 73 74 #主机分组 75 class HostGroup(Base): 76 __tablename__='host_group' 77 id=Column(Integer,primary_key=True) 78 group_name=Column(String(64),unique=True)#主机分组名 79 bind_host=relationship('BindHost',secondary=bind_host_m2m_host_group,backref='host_groups')#分组表 远程联合表 查询与反查 80 def __repr__(self): 81 return self.group_name#输出主机名 82 83 #堡垒机用户, 84 class UserProfile(Base): 85 __tablename__='user_profile' 86 id=Column(Integer,primary_key=True) 87 username=Column(String(64),unique=True)#用户名 88 password=Column(String(256)) 89 bind_hosts = relationship('BindHost',secondary=user_profile_m2m_bind_host,backref='user_profiles')#调用关联绑定表查看 堡垒机用户名 90 host_group = relationship('HostGroup',secondary=user_profile_m2m_host_group,backref='user_profiles')#调用关联 分组查看 堡垒机用户名 91 #audit_logs = relationship('AuditLog')#查日志 92 def __repr__(self): 93 return self.username#用户名 94 95 #日志类 96 class AuditLog(Base): 97 __tablename__ = 'audit_log' 98 id = Column(Integer,primary_key=True) 99 user_id = Column(Integer,ForeignKey('user_profile.id'))#外键 堡垒机用户ID100 bind_host_id = Column(Integer,ForeignKey('bind_host.id'))#外键 远程主机ID101 action_choices = [102 (u'cmd',u'CMD'),#命令103 (u'login',u'Login'),#登陆104 (u'logout',u'Logout'),#退出105 ]106 action_type = Column(ChoiceType(action_choices))#日志类型107 cmd = Column(String(255))#命令108 date = Column(DateTime)#日期时间109 user_profile = relationship("UserProfile",backref='audit_logs')#关联堡垒机用户 查询110 bind_host = relationship("BindHost",backref='audit_logs')#关联远程主机 查询| |- - -ssh_login.py#登陆远程主机调用


1 #!usr/bin/env python 2 #-*-coding:utf-8-*- 3 # Author calmyan 4 #python 5 #2017/7/15 19:44 6 #__author__='Administrator' 7 8 9 import base6410 import getpass11 import os12 import socket13 import sys14 import traceback15 from paramiko.py3compat import input16 from modules import models17 import datetime18 19 import paramiko20 try:21 import interactive22 except ImportError:23 from . import interactive24 25 #登陆远程主机26 def ssh_login(user_obj,bind_host_obj,mysql_engine,log_recording):#ssh进入远程主机27 # now, connect and use paramiko Client to negotiate SSH2 across the connection28 try:29 client = paramiko.SSHClient()30 client.load_system_host_keys()31 client.set_missing_host_key_policy(paramiko.WarningPolicy())32 print('*** Connecting...')#开始连接33 #client.connect(hostname, port, username, password)34 client.connect(bind_host_obj.host.ip,35 bind_host_obj.host.port,36 bind_host_obj.remote_user.username,37 bind_host_obj.remote_user.password,38 timeout=30)#超时30秒39 40 cmd_caches = []#定义一个列表,暂时保存命令41 chan = client.invoke_shell()42 print(repr(client.get_transport()))43 print('*** Here we go!\n')44 cmd_caches.append(models.AuditLog(user_id=user_obj.id,45 bind_host_id=bind_host_obj.id,46 action_type='login',47 date=datetime.datetime.now()48 ))49 log_recording(user_obj,bind_host_obj,cmd_caches)50 interactive.interactive_shell(chan,user_obj,bind_host_obj,cmd_caches,log_recording)#传入 堡垒机用户, 连接远程主机 命令 记当日志函数51 chan.close()52 client.close()53 54 except Exception as e:55 print('*** Caught exception: %s: %s' % (e.__class__, e))56 traceback.print_exc()57 try:58 client.close()59 except:60 pass61 sys.exit(1)| |- - -utils.py#工具函数


1 from conf import settings 2 import yaml 3 try: 4 from yaml import CLoader as Loader, CDumper as Dumper 5 except ImportError: 6 from yaml import Loader, Dumper 7 8 def print_err(msg,quit=False):#错误提示输出 9 output = "\033[31;1mError: %s\033[0m" % msg10 if quit:11 exit(output)12 else:13 print(output)14 15 16 def yaml_parser(yml_filename):17 '''18 load yaml file and return19 :param yml_filename:20 :return:21 '''22 #yml_filename = "%s/%s.yml" % (settings.StateFileBaseDir,yml_filename)23 try:24 yaml_file = open(yml_filename,'r')#打开文件25 data = yaml.load(yaml_file)#load 成一个对象26 return data#返回数据27 except Exception as e:28 print_err(e)
| |- - -views.py#主要逻辑函数


1 #_*_coding:utf-8_*_ 2 import os,sys 3 BASE_DIR = os.path.dirname(os.path.dirname(os.path.abspath(__file__))) 4 5 sys.path.append(BASE_DIR)#加入环境变量 6 from modules import models 7 from modules.db_conn import engine,session 8 from modules.utils import print_err,yaml_parser 9 #from modules import common_filt 10 from modules import ssh_login 11 from sqlalchemy import create_engine,Table 12 from sqlalchemy.orm import sessionmaker 13 14 from conf import settings 15 16 #用户登陆函数 17 def auth(): 18 ''' 19 do the user login authentication 20 :return: 21 ''' 22 count = 0 23 while count <3:#用户输入三次机会 24 username = input("\033[32;1mUsername:\033[0m").strip() 25 if len(username) ==0:continue 26 password = input("\033[32;1mPassword:\033[0m").strip() 27 if len(password) ==0:continue 28 user_obj = session.query(models.UserProfile).filter(models.UserProfile.username==username, 29 models.UserProfile.password==password).first()#从数据库中获取堡垒机用户信息 30 if user_obj: 31 return user_obj 32 else: 33 print("wrong username or password, you have %s more chances." %(3-count-1)) 34 count +=1 35 else: 36 print_err("too many attempts.") 37 38 39 #欢迎界面 40 def welcome_msg(user): 41 WELCOME_MSG = '''\033[32;1m 42 ------------- Welcome [%s] login LittleFinger ------------- 43 \033[0m'''% user.username 44 print(WELCOME_MSG) 45 46 47 #写入数据库 日志 48 def log_recording(user_obj,bind_host_obj,logs): 49 ''' 50 flush user operations on remote host into DB 51 :param user_obj: 52 :param bind_host_obj: 53 :param logs: list format [logItem1,logItem2,...] 54 :return: 55 ''' 56 print("\033[41;1m--logs:\033[0m",logs) 57 session.add_all(logs) 58 session.commit() 59 60 #开始函数 61 def start_session(argvs): 62 print('going to start sesssion ') 63 user = auth()#判断用户名 并返回用户对应信息 64 if user: 65 welcome_msg(user)#打印欢迎界面 66 #print(user.id)#用户ID 67 #print(user.bind_hosts)#绑定主机 68 #print(user.host_group)#所在组 69 #log_recording(user,user.bind_hosts,user.host_group,logs) 70 exit_flag = False#设定点 为假 71 while not exit_flag:#如果设定点 为假 说明登陆成功 72 if user.bind_hosts:#有绑定远程主机 打印远程主机 73 print('\033[32;1mz.\tungroupped hosts (%s)\033[0m' %len(user.bind_hosts) ) 74 for index,group in enumerate(user.host_group):#打印当前用户所在组 75 print('\033[32;1m%s.\t%s (%s)\033[0m' %(index,group.group_name, len(group.bind_host)) ) 76 77 print('(q)=quit') 78 choice = input("[%s]:" % user.username).strip()#开始获取输入的命令 79 80 if len(choice) == 0:continue#如果没有输入跳过 81 if choice == 'q': 82 exit_flag=True 83 #if choice=='exit': exit()#退出 84 if choice == 'z':#如果输入 z 85 print("------ Group: ungroupped hosts ------" )#输出所有的未分组的主机 86 for index,bind_host in enumerate(user.bind_hosts): 87 print(" %s.\t%s@%s(%s)"%(index, 88 bind_host.remote_user.username,#绑定的用户名 89 bind_host.host.hostname,#主机名 90 bind_host.host.ip,#IP地址 91 )) 92 print("----------- END -----------" ) 93 elif choice.isdigit():#如果是选择数字 94 choice = int(choice) 95 if choice < len(user.host_group): 96 print("------ Group: %s ------" % user.host_group[choice].group_name ) 97 for index,bind_host in enumerate(user.host_group[choice].bind_host):#打印出选择组的包括的 98 print(" %s.\t%s@%s(%s)"%(index, 99 bind_host.remote_user.username,#绑定的用户名100 bind_host.host.hostname,#主机名101 bind_host.host.ip,#IP地址102 ))103 print("----------- END -----------" )104 105 #host selection106 while not exit_flag:107 user_option = input("[(b)back, (q)quit, select host to login]:").strip()108 if len(user_option)==0:continue109 if user_option == 'b':break110 if user_option == 'q':111 exit_flag=True112 if user_option.isdigit():113 user_option = int(user_option)114 if user_option < len(user.host_group[choice].bind_host) :#查看分组所绑定的远程 主机115 print('host:',user.host_group[choice].bind_host[user_option])116 print('audit log:',user.host_group[choice].bind_host[user_option].audit_logs)117 ssh_login.ssh_login(user,118 user.host_group[choice].bind_host[user_option],119 session,120 log_recording)121 else:122 print("no this option..")123 124 #停止退出125 def stop_server(argvs):126 exit()127 128 #创建表结构129 def syncdb(argvs):130 print("Syncing DB....[创建所有表结构]")131 models.Base.metadata.create_all(engine) #创建所有表结构132 133 '''======创建四个基础表==== '''134 #堡垒机用户添加135 def create_users(argvs):136 if '-f' in argvs:#判断参数 -f 是否存在137 user_file = argvs[argvs.index("-f") +1 ]#获取文件位置138 else:139 print_err("invalid usage, should be:\ncreateusers -f <the new users file>",quit=True)140 source = yaml_parser(user_file)#获取文件内容数据141 if source:#如果获取成功142 for key,val in source.items():143 print(key,val)144 obj = models.UserProfile(username=key,password=val.get('password'))#创建新数据145 session.add(obj)146 session.commit()147 148 #分组添加149 def create_groups(argvs):150 if '-f' in argvs:#判断参数 -f 是否存在151 group_file = argvs[argvs.index("-f") +1 ]152 else:153 print_err("invalid usage, should be:\ncreategroups -f <the new groups file>",quit=True)154 source = yaml_parser(group_file)#通过yaml 获取文件中的数据,155 if source:156 for key,val in source.items():157 print(key,val)158 obj = models.HostGroup(group_name=key)#创建一条新数据159 if val.get('bind_hosts'):#160 bind_hosts = bind_hosts_filter(val)#绑定的远程主机组合表161 obj.bind_host = bind_hosts162 if val.get('user_profiles'):#堡垒机用户163 user_profiles = user_profiles_filter(val)#堡垒机用户164 obj.user_profiles = user_profiles165 session.add(obj)166 session.commit()167 168 #远程主机添加169 def create_hosts(argvs):170 if '-f' in argvs:#判断参数 -f 是否存在171 hosts_file = argvs[argvs.index("-f") +1 ]172 else:173 print_err("invalid usage, should be:\ncreate_hosts -f <the new hosts file>",quit=True)#退出函数174 source = yaml_parser(hosts_file)#通过yaml 获取文件中的数据,175 if source:#如果获取成功,不为空176 for key,val in source.items():#进行数据的解析177 print(key)178 print(val)179 obj = models.Host(hostname=key,ip=val.get('ip'), port=val.get('port') or 22)#port 端口默认为22180 session.add(obj)#写入到数据库181 session.commit()#关闭 确认写入182 183 #创建远程主机用户184 def create_remoteusers(argvs):185 if '-f' in argvs:186 remoteusers_file = argvs[argvs.index("-f") +1 ]187 else:188 print_err("invalid usage, should be:\ncreate_remoteusers -f <the new remoteusers file>",quit=True)189 source = yaml_parser(remoteusers_file)#通过yaml 获取文件中的数据,190 if source:191 for key,val in source.items():#进行数据的解析192 print(key,val)193 obj = models.RemoteUser(username=val.get('username'),auth_type=val.get('auth_type'),password=val.get('password'))194 session.add(obj)#写入数据库195 session.commit()196 197 198 '''====远程主机与远程主机用户组合表====='''199 ##远程主机用户名密码与远程主机组合绑定 关联 到堡垒机用户200 def create_bindhosts(argvs):201 if '-f' in argvs:202 bindhosts_file = argvs[argvs.index("-f") +1 ]203 else:204 print_err("invalid usage, should be:\ncreate_hosts -f <the new bindhosts file>",quit=True)205 source = yaml_parser(bindhosts_file)#通过yaml 获取文件中的数据,206 if source:207 for key,val in source.items():208 print(key,val)209 host_obj = session.query(models.Host).filter(models.Host.hostname==val.get('hostname')).first()#获取对应主机数据210 assert host_obj#断言 当前主机一定要存在才能往下执行211 for item in val['remote_users']:#输出存在的远程主机用户212 print(item )213 assert item.get('auth_type')#断言 一定要存在才能往下执行214 if item.get('auth_type') == 'ssh-passwd':#判断ssh连接类型 从数据库选出合条件的数据215 remoteuser_obj = session.query(models.RemoteUser).filter(216 models.RemoteUser.username==item.get('username'),217 models.RemoteUser.password==item.get('password')218 ).first()#获取主机数据 返回对象219 else:220 remoteuser_obj = session.query(models.RemoteUser).filter(221 models.RemoteUser.username==item.get('username'),222 models.RemoteUser.auth_type==item.get('auth_type'),223 ).first()224 if not remoteuser_obj:#如果远程主机用户不存在225 print_err("RemoteUser obj %s does not exist." % item,quit=True )226 bindhost_obj = models.BindHost(host_id=host_obj.id,remote_user_id=remoteuser_obj.id)#创建一条新数据227 session.add(bindhost_obj)228 #for groups this host binds to229 if source[key].get('groups'):#如果有分组标志230 #获取分组信息231 group_objs = session.query(models.HostGroup).filter(models.HostGroup.group_name.in_(source[key].get('groups') )).all()232 assert group_objs#断言 分组一定要存在才能往下执行233 print('groups:', group_objs)234 bindhost_obj.host_groups = group_objs#主机加到分组235 #for user_profiles this host binds to236 if source[key].get('user_profiles'):#如果有堡垒机用户标志237 #获取堡垒机用信息238 userprofile_objs = session.query(models.UserProfile).filter(models.UserProfile.username.in_(239 source[key].get('user_profiles')240 )).all()241 assert userprofile_objs#断言 堡垒机用户一定要存在才能往下执行242 print("userprofiles:",userprofile_objs)243 bindhost_obj.user_profiles = userprofile_objs#主机与堡垒机用户绑定244 #print(bindhost_obj)245 session.commit()246 247 248 #远程主机组合表查看249 def bind_hosts_filter(vals):#远程主机组合表查看250 print('**>',vals.get('bind_hosts') )251 bind_hosts = session.query(models.BindHost).filter(models.Host.hostname.in_(vals.get('bind_hosts'))).all()252 if not bind_hosts:253 print_err("none of [%s] exist in bind_host table." % vals.get('bind_hosts'),quit=True)254 return bind_hosts255 256 #堡垒机用户查看257 def user_profiles_filter(vals):258 user_profiles = session.query(models.UserProfile).filter(models.UserProfile.username.in_(vals.get('user_profiles'))).all()259 if not user_profiles:260 print_err("none of [%s] exist in user_profile table." % vals.get('user_profiles'),quit=True)261 return user_profiles262 263 264 265 #查看用户日志266 def audit(argvs):267 if '-n' in argvs:268 user_name = argvs[argvs.index("-n") +1 ]#获取要查看的用户名269 else:270 print_err("invalid usage, should be:\n输入参数 -n <用户名/user_name >",quit=True)271 print(user_name)272 user_obj = session.query(models.UserProfile).filter(models.UserProfile.username==user_name).first()#取到273 print(user_obj.id)274 log_obj = session.query(models.AuditLog).filter(models.AuditLog.user_id==user_obj.id).all()275 for i in log_obj:276 print('堡垒机用户:【%s】,远程主机【%s】,远程用户:【%s】命令:【%s】,日期:【%s】'%(i.user_profile,i.bind_host.host,i.bind_host.remote_user,i.cmd,i.date))277 input('========')
|- - -share/#添加堡垒机用户\远程主机\分组\远程主机用户 目录
|      |- - -examples/#文件目录
|              |- - -new_bindhosts.yml/#远程主机用户与远程主机 组合表(组合表与 分组)(堡垒机用户与组合表) 创建 示例


1 bind0: 2 hostname: ubuntu test 3 remote_users: 4 - user0: 5 username: root 6 auth_type: ssh-passwd 7 password: root 8 groups: 9 - test_group10 user_profiles:11 - uge312 - alex13 14 15 bind1:16 hostname: server117 remote_users:18 - user1:19 username: root20 auth_type: ssh-key21 #password: 12322 - user0:23 username: root24 auth_type: ssh-passwd25 password: root26 - user4:27 username: calmyan28 auth_type: ssh-passwd29 password: yjj30 groups:31 - bj_group32 user_profiles:33 - uge334 35 bind2:36 hostname: server237 remote_users:38 - user1:39 username: alex40 auth_type: ssh-passwd41 password: alex371442 groups:43 - bj_group44 - sh_group45 user_profiles:46 - rain
| |- - -new_groups.yml/#分组创建 示例( 堡垒机用户与 分组)


1 bj_group: 2 user_profiles: 3 - alex 4 - uge3 5 6 sh_group: 7 user_profiles: 8 - jack 9 - alex10 - rain11 - uge312 test_group:13 user_profiles:14 - uge3
| |- - -new_hosts.yml/#远程主机创建 示例


1 ubuntu test: 2 ip: 192.168.11.50 3 port: 22 4 5 server1: 6 ip: 192.168.11.51 7 8 9 server2:10 ip: 10.4.4.2211 port: 30000
| |- - -new_remoteusers.yml/#远程主机用户创建 示例


1 user0: 2 auth_type: ssh-passwd 3 username: root 4 password: root 5 6 user1: 7 auth_type: ssh-passwd 8 username: root 9 password: alex!3432110 11 user2:12 auth_type: ssh-key13 username: root14 #password: abc!2315 16 user3:17 auth_type: ssh-passwd18 username: alex19 password: alex371420 21 user4:22 auth_type: ssh-passwd23 username: calmyan24 password: yjj
| |- - -new_user.yml/#堡垒机用户机创建 示例


1 alex: 2 password: alex123 3 uge3: 4 password: uge3 5 6 jack: 7 password: jack123 8 9 rain:10 password: rain123
<br><br>
以上是python-堡垒机制作的详细内容。更多信息请关注PHP中文网其他相关文章!

 Python和时间:充分利用您的学习时间Apr 14, 2025 am 12:02 AM
要在有限的时间内最大化学习Python的效率,可以使用Python的datetime、time和schedule模块。1.datetime模块用于记录和规划学习时间。2.time模块帮助设置学习和休息时间。3.schedule模块自动化安排每周学习任务。
 Python:游戏,Guis等Apr 13, 2025 am 12:14 AM
Python在游戏和GUI开发中表现出色。1)游戏开发使用Pygame,提供绘图、音频等功能,适合创建2D游戏。2)GUI开发可选择Tkinter或PyQt,Tkinter简单易用,PyQt功能丰富,适合专业开发。
 Python vs.C:申请和用例Apr 12, 2025 am 12:01 AM
Python适合数据科学、Web开发和自动化任务,而C 适用于系统编程、游戏开发和嵌入式系统。 Python以简洁和强大的生态系统着称,C 则以高性能和底层控制能力闻名。
 2小时的Python计划:一种现实的方法Apr 11, 2025 am 12:04 AM
2小时内可以学会Python的基本编程概念和技能。1.学习变量和数据类型,2.掌握控制流(条件语句和循环),3.理解函数的定义和使用,4.通过简单示例和代码片段快速上手Python编程。
 Python:探索其主要应用程序Apr 10, 2025 am 09:41 AM
Python在web开发、数据科学、机器学习、自动化和脚本编写等领域有广泛应用。1)在web开发中,Django和Flask框架简化了开发过程。2)数据科学和机器学习领域,NumPy、Pandas、Scikit-learn和TensorFlow库提供了强大支持。3)自动化和脚本编写方面,Python适用于自动化测试和系统管理等任务。
 您可以在2小时内学到多少python?Apr 09, 2025 pm 04:33 PM
两小时内可以学到Python的基础知识。1.学习变量和数据类型,2.掌握控制结构如if语句和循环,3.了解函数的定义和使用。这些将帮助你开始编写简单的Python程序。
 如何在10小时内通过项目和问题驱动的方式教计算机小白编程基础?Apr 02, 2025 am 07:18 AM
如何在10小时内教计算机小白编程基础?如果你只有10个小时来教计算机小白一些编程知识,你会选择教些什么�...
 如何在使用 Fiddler Everywhere 进行中间人读取时避免被浏览器检测到?Apr 02, 2025 am 07:15 AM
使用FiddlerEverywhere进行中间人读取时如何避免被检测到当你使用FiddlerEverywhere...


热AI工具

Undresser.AI Undress
人工智能驱动的应用程序,用于创建逼真的裸体照片

AI Clothes Remover
用于从照片中去除衣服的在线人工智能工具。

Undress AI Tool
免费脱衣服图片

Clothoff.io
AI脱衣机

AI Hentai Generator
免费生成ai无尽的。

热门文章
热工具

SublimeText3 Linux新版
SublimeText3 Linux最新版

EditPlus 中文破解版
体积小,语法高亮,不支持代码提示功能

PhpStorm Mac 版本
最新(2018.2.1 )专业的PHP集成开发工具

SublimeText3 Mac版
神级代码编辑软件(SublimeText3)

记事本++7.3.1
好用且免费的代码编辑器

