LNMP简介
LAMP(Linux apache mysql php)---比较早的web服务。
LNMP(Linux nginx mysql php)---比较潮流,新的webn服务,使用率上升趋势(国内非常流行)。
Nginx(Engine X),是俄罗斯人开发的,开源的www服务软件,软件一共780K(非常小),是一款静态(html,js,css,jpg等)www软件,静态小文件高并发,同时占用资源很少。
Nginx使用平台(linux unix windows都可以)和apache一样。
Nginx的功能:
a.www web服务---http 80
b.负载均衡(反向代理proxy)
c.web cache
nginx的优点:
1.配置简单,灵活。
2.高并发(静态小文件),静态1-2W。
3.占用资源少,2W并发开10个线程服务,内存消耗几百兆。
4.功能种类比较多(web cache proxy代理),每个功能都不是很强。
5.支持epoll模型,使得nginx支持高并发。
6.nginx配合动态服务和apache有区别。
7.利用nginx可以对IP限速。可以限制连接数。
实现原理:nginx(apache)--》php--》mysql
nginx的应用场合:
1.静态服务(图片,视频),另一个lighttpd(社区不活跃)。并发:1-3W,html、js、css、.flv
2.动态服务:nginx+fastcgi方式运行php,jsp。并发:500-1500,类似于apache+php,lighttpd+fcgi php
3.反向代理,负载均衡。日PV2000W以下,都可以用nginx做代理。haproxy,F5,a10
4.缓存服务,SQUID,VARNI.
nginx和其它web服务器对比:
1)apache
a.稳定强大
b.Prefork模式取消了进程创建开销,性能很高。
c.处理动态业务数据时,因关联到后端的引擎和数据库,瓶颈不在apache本身
d.高并发时消耗系统资源相对来说多一些
e.基于传统的select模型
2)nginx
a.基于异步IO模型(epoll,kqueue),性能强,能够支持上万并发
b.对小文件支持很好,性能很高(限静态小文件)
c.代码优美,扩展库必须编译进行主程序
d.消耗资源相对低
3)Lighttpd(百度贴吧,豆瓣)
a.基于异步IO模型,性能和nginx相近
b.扩展是SO模式,比nginx要灵活
c.全球使用率较低,安全性没有apache以及nginx好
d.通过插件(mod secdownload)可实现文件URL地址加密
企业生产场景如何选择web服务器(推荐):
静态业务:高并发,用nginx或lighttpd
动态业务:采用nginx和apache均可
既有动态又有静态业务:nginx和apache都可以,单选
对外业务nginx,对内业务apache
安装,配置nginx
1.安装准备:[root@localhost ~]# yum install pcre* -y
[root@localhost ~]# yum install openssl* -y
2.编译:
./configure --prefix=/application/nginx1.12.0 \
--user=nginx \
--group=nginx \
--with-http_stub_status_module \
--with-http_ssl_module
3.启动检查:
[root@localhost application]# /application/nginx/sbin/nginx -t
nginx: the configuration file /application/nginx1.12.0/conf/nginx.conf syntax is ok
nginx: configuration file /application/nginx1.12.0/conf/nginx.conf test is successful
[root@localhost application]# /application/nginx/sbin/nginx
[root@localhost application]# netstat -lntup|grep nginx(另外80端口也可以查)

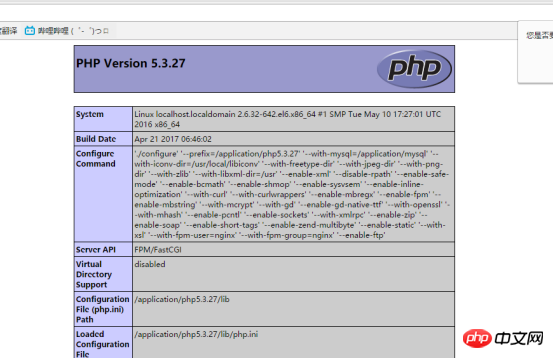
出现这个界面表示成功
[root@localhost application]# vim /application/nginx/html/index.html 修改主页内容
4.关于nginx模块
1)Nginx core modules(必须的),包括Main Events
2)Standard HTTP modules(虽然不是必须的,但是缺省都会安装,不建议改动),包括Core Acess FastCGI Gzip(压缩模块,性能优化) LOG(日志模块) Proxy Rewrite(URL重写模块) Upstream(负载均衡模块)等等
提示:缺省条件下,这两组模块都会安装。修改配置文件,主要是根据这2组模块的功能来修改模块的参数。官网能够查看模块的参数。
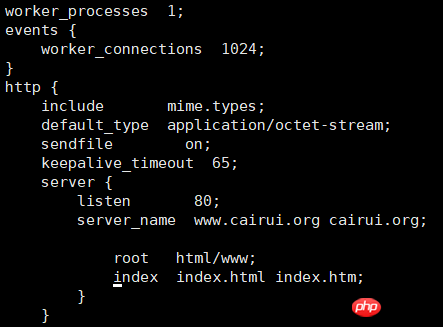
5.nginx的配置
[root@localhost conf]# egrep -v "#|^$" nginx.conf.default >nginx.conf(去掉注释#行)
[root@localhost conf]# vim nginx.conf(cairui.org是别名)

[root@localhost conf]# mkdir /application/nginx/html/www
[root@localhost conf]# touch /application/nginx/html/www/index.html
[root@localhost conf]# vim /application/nginx/html/www/index.html
[root@localhost conf]# /application/nginx/sbin/nginx -t
nginx: the configuration file /application/nginx1.12.0/conf/nginx.conf syntax is ok
nginx: configuration file /application/nginx1.12.0/conf/nginx.conf test is successful
[root@localhost conf]# /application/nginx/sbin/nginx -s reload
修改windows本地hosts文件,保证在win命令提示符内能ping通来自虚拟主机,再上网页查看
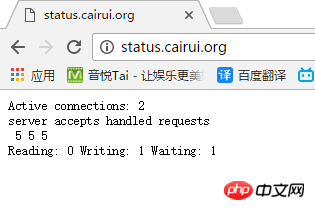
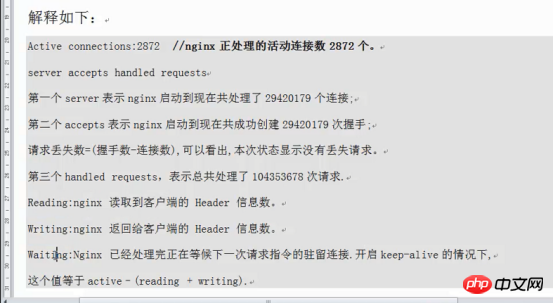
添加状态的server标签:
[root@localhost conf]# vim /application/nginx/conf/nginx.conf

##status
server {
listen 80;
server_name status.cairui.org;
location / {
stub_status on;
access_log off;
}
}
在win本地hosts文件中也要添加,


解决恶意域名绑定:
[root@localhost conf]# vim /application/nginx/conf/nginx.conf(必须放在第一个server)
server {
listen 80;
location / {
deny all;
}
}
开启日志功能:
[root@localhost conf]# cat /application/nginx/conf/nginx.conf.default (找到日志格式)
#log_format main '$remote_addr - $remote_user [$time_local] "$request" '
# '$status $body_bytes_sent "$http_referer" '
# '"$http_user_agent" "$http_x_forwarded_for"';
#access_log logs/access.log main;
拷贝到nginx.conf下,去掉注释


错误日志格式放在最顶端
分析nginx日志的软件:syslog,rsyslog,Awstats,scribe,kafka
Mysql
mysql安装方法:
5.1---编译安装configure,make,make install
5.5---编译安装cmake,make,make install(可以直接用二进制包安装,解压即可)
1.安装mysql
[root@localhost conf]# useradd mysql -s /sbin/nologin -M
[root@localhost tools]# tar xf mysql-5.5.32-linux2.6-x86_64.tar.gz
[root@localhost tools]# mv mysql-5.5.32-linux2.6-x86_64 /application/mysql5.5.32
[root@localhost tools]# ln -s /application/mysql5.5.32/ /application/mysql
[root@localhost tools]# chown -R mysql.mysql /application/mysql/data/
[root@localhost mysql]# ./scripts/mysql_install_db --user=mysql --basedir=/application/mysql/ --datadir=/application/mysql/data/(编译之前需要安装libaio)
[root@localhost mysql]# cp support-files/mysql.server /etc/init.d/mysqld
[root@localhost mysql]# vim /etc/init.d/mysqld

[root@localhost mysql]# cp support-files/my-small.cnf /etc/my.cnf (每个版本的配置文件不同)
cp:是否覆盖"/etc/my.cnf"? y
[root@localhost mysql]# vim /etc/profile

[root@localhost mysql]# service mysqld start
Starting MySQL.. SUCCESS!
[root@localhost mysql]# mysql
数据库优化:
mysql> show databases
mysql> drop Database test;
mysql> select user,host from mysql.user;
mysql> drop user''@localhost;
[root@localhost mysql]# mysql -uroot -pnew-password
修改密码(进入mysql修改)mysql> set password for root@localhost = password('123');
PHP
LNMP下的php:
apache----》libphp5.so
nginx---》fcgi php-fpm port9000(百度)
在安装php之前确保mysql,nginx运行正常[root@localhost mysql]# netstat -lntup|egrep "nginx|mysql"
1.需要安装的软件
安装libiconv(./configure --prefix=/usr/local/libiconv)
安装libmcrypt(不是必须,建议安装)是一个加密的库
./configure
make
make install
sleep2
/sbin/ldconfig
cd libltdl/
./configure --enable-ltdl-install
make
make install
cd ../../cd
安装mhash
./configure
make
make install
sleep 2
cd ../
rm -fr /usr/lib64/libmcrypt.*
rm -fr /usr/lib64/libmhash*
ln -s /usr/local/lib64/libmcrypt.la /usr/lib64/libmcrypt.la
ln -s /usr/local/lib64/libmcrypt.so /usr/lib64/libmcrypt.so
ln -s /usr/local/lib64/libmcrypt.so.4 /usr/lib64/libmcrypt.so.4
ln -s /usr/local/lib64/libmcrypt.so.4.4.8 /usr/lib64/libmcrypt.so.4.4.8
ln -s /usr/local/lib64/libmhash.a /usr/lib64/libmhash.a
ln -s /usr/local/lib64/libmhash.la /usr/lib64/libmhash.la
ln -s /usr/local/lib64/libmhash.so /usr/lib64/libmhash.so
ln -s /usr/local/lib64/libmhash.so.2 /usr/lib64/libmhash.so.2
ln -s /usr/local/lib64/libmhash.so.2.0.1 /usr/lib64/libmhash.so.2.0.1
ln -s /usr/local/bin/libmcrypt-config /usr/bin/libmcrypt-config
安装mcrypt
/sbin/ldconfig
./configure LD_LIBRARY_PATH=/usr/local/lib
make
make install
cd ../
sleep 2
2.安装php
[root@localhost tools]# yum install libxslt* -y
./configure \
--prefix=/application/php5.6.30 \
--with-mysql=/application/mysql \
--with-iconv-dir=/usr/local/libiconv \
--with-freetype-dir \
--with-jpeg-dir \
--with-png-dir \
--with-zlib \
--with-libxml-dir=/usr \
--enable-xml \
--disable-rpath \
--enable-safe-mode \
--enable-bcmath \
--enable-shmop \
--enable-sysvsem \
--enable-inline-optimization \
--with-curl \
--with-curlwrappers \
--enable-mbregx \
--enable-fpm \
--enable-mbstring \
--with-mcrypt \
--with-gd \
--enable-gd-native-ttf \
--with-openssl \
--with-mhash \
--enable-pcntl \
--enable-sockets \
--with-xmlrpc \
--enable-zip \
--enable-soap \
--enable-short-tags \
--enable-zend-multibyte \
--enable-static \
--with-xsl \
--with-fpm-user=nginx \
--with-fpm-group=nginx \
--enable-ftp \
--enable-opcache=no
ln -s /application/mysql/lib/libmysqlclient.so.18 /usr/lib64
报错处理:,,
3.php配置
[root@localhost php-5.3.27]# cp php.ini-production /application/php/lib/php.ini

直接上传
[root@localhost etc]# /application/php/sbin/php-fpm -t
[root@localhost etc]# /application/php/sbin/php-fpm
开机启动
cat >>/etc/rc.local< #nginx+php-fpm by cairui at 2017 /etc/init.d/mysqld start /application/php/sbin/php-fpm /application/nginx/sbin/nginx EOF [root@134 extra]# cat /application/nginx/conf/extra/bbs.conf server { listen 80; server_name bbs.caimengzhi.org; root html/bbs; index index.html index.htmi index.php; location ~ .*\.(php|php5)?$ #此时不{}内不指定目录的话就直接读取上面html/bbs下的php文件 { fastcgi_pass 127.0.0.1:9000; fastcgi_index index.php; include fastcgi.conf; } } [root@localhost conf]# cd /application/nginx/html/www/ [root@localhost www]# vim index.php [root@localhost www]# /application/nginx/sbin/nginx -t [root@localhost www]# /application/nginx/sbin/nginx -s reload wiki软件 [root@localhost www]# mysql mysql> create database wiki; mysql> grant all on wiki.* to wiki@'localhost' identified by 'wiki'; mysql> flush privileges ; mysql> quit (wiki下载HDwiki) [root@localhost www]# wget (注意www) [root@localhost www]# unzip download.php\?n\=HDWiki-v6.0GBK-20170209.zip [root@localhost www]# rm -f download.php\?n\=HDWiki-v6.0GBK-20170209.zip [root@localhost www]# mv hdwiki/* . [root@localhost www]# cd ../ [root@localhost html]# chown -R nginx.nginx www/ 以上是linux+Nginx+Mysql+Php图示,操作步骤详解!的详细内容。更多信息请关注PHP中文网其他相关文章!

 Linux中的维护模式:何时以及为什么使用它Apr 25, 2025 am 12:15 AM
使用Linux维护模式的时机和原因:1)系统启动问题时,2)进行重大系统更新或升级时,3)执行文件系统维护时。维护模式提供安全、控制的环境,确保操作的安全性和效率,减少对用户的影响,并增强系统的安全性。
 Linux:基本命令和操作Apr 24, 2025 am 12:20 AM
Linux中不可或缺的命令包括:1.ls:列出目录内容;2.cd:改变工作目录;3.mkdir:创建新目录;4.rm:删除文件或目录;5.cp:复制文件或目录;6.mv:移动或重命名文件或目录。这些命令通过与内核交互执行操作,帮助用户高效管理文件和系统。
 Linux操作:管理文件,目录和权限Apr 23, 2025 am 12:19 AM
在Linux中,文件和目录管理使用ls、cd、mkdir、rm、cp、mv命令,权限管理使用chmod、chown、chgrp命令。1.文件和目录管理命令如ls-l列出详细信息,mkdir-p递归创建目录。2.权限管理命令如chmod755file设置文件权限,chownuserfile改变文件所有者,chgrpgroupfile改变文件所属组。这些命令基于文件系统结构和用户、组系统,通过系统调用和元数据实现操作和控制。
 Linux中的维护模式是什么?解释了Apr 22, 2025 am 12:06 AM
MaintenancemodeInuxisAspecialBootenvironmentforforcalsystemmaintenancetasks.itallowsadMinistratorStoperFormTaskSlikerSettingPassingPassingPasswords,RepairingFilesystems,andRecoveringFrombootFailuresFailuresFailuresInamInimAlenimalenimalenrenmentrent.ToEnterMainterMainterMaintErmaintErmaintEncemememodeBoode,Interlecttheboo
 Linux:深入研究其基本部分Apr 21, 2025 am 12:03 AM
Linux的核心组件包括内核、文件系统、Shell、用户空间与内核空间、设备驱动程序以及性能优化和最佳实践。1)内核是系统的核心,管理硬件、内存和进程。2)文件系统组织数据,支持多种类型如ext4、Btrfs和XFS。3)Shell是用户与系统交互的命令中心,支持脚本编写。4)用户空间与内核空间分离,确保系统稳定性。5)设备驱动程序连接硬件与操作系统。6)性能优化包括调整系统配置和遵循最佳实践。
 Linux体系结构:揭示5个基本组件Apr 20, 2025 am 12:04 AM
Linux系统的五个基本组件是:1.内核,2.系统库,3.系统实用程序,4.图形用户界面,5.应用程序。内核管理硬件资源,系统库提供预编译函数,系统实用程序用于系统管理,GUI提供可视化交互,应用程序利用这些组件实现功能。
 Linux操作:利用维护模式Apr 19, 2025 am 12:08 AM
Linux的维护模式可以通过GRUB菜单进入,具体步骤为:1)在GRUB菜单中选择内核并按'e'编辑,2)在'linux'行末添加'single'或'1',3)按Ctrl X启动。维护模式提供了一个安全环境,适用于系统修复、重置密码和系统升级等任务。
 Linux:如何进入恢复模式(和维护)Apr 18, 2025 am 12:05 AM
进入Linux恢复模式的步骤是:1.重启系统并按特定键进入GRUB菜单;2.选择带有(recoverymode)的选项;3.在恢复模式菜单中选择操作,如fsck或root。恢复模式允许你以单用户模式启动系统,进行文件系统检查和修复、编辑配置文件等操作,帮助解决系统问题。


热AI工具

Undresser.AI Undress
人工智能驱动的应用程序,用于创建逼真的裸体照片

AI Clothes Remover
用于从照片中去除衣服的在线人工智能工具。

Undress AI Tool
免费脱衣服图片

Clothoff.io
AI脱衣机

Video Face Swap
使用我们完全免费的人工智能换脸工具轻松在任何视频中换脸!

热门文章

热工具

SecLists
SecLists是最终安全测试人员的伙伴。它是一个包含各种类型列表的集合,这些列表在安全评估过程中经常使用,都在一个地方。SecLists通过方便地提供安全测试人员可能需要的所有列表,帮助提高安全测试的效率和生产力。列表类型包括用户名、密码、URL、模糊测试有效载荷、敏感数据模式、Web shell等等。测试人员只需将此存储库拉到新的测试机上,他就可以访问到所需的每种类型的列表。

SublimeText3 Linux新版
SublimeText3 Linux最新版

DVWA
Damn Vulnerable Web App (DVWA) 是一个PHP/MySQL的Web应用程序,非常容易受到攻击。它的主要目标是成为安全专业人员在合法环境中测试自己的技能和工具的辅助工具,帮助Web开发人员更好地理解保护Web应用程序的过程,并帮助教师/学生在课堂环境中教授/学习Web应用程序安全。DVWA的目标是通过简单直接的界面练习一些最常见的Web漏洞,难度各不相同。请注意,该软件中

ZendStudio 13.5.1 Mac
功能强大的PHP集成开发环境

安全考试浏览器
Safe Exam Browser是一个安全的浏览器环境,用于安全地进行在线考试。该软件将任何计算机变成一个安全的工作站。它控制对任何实用工具的访问,并防止学生使用未经授权的资源。


