


这篇文章主要介绍了WebApi2 文件图片上传与下载功能,需要的朋友可以参考下
Asp.Net Framework webapi2 文件上传与下载 前端界面采用Ajax的方式执行
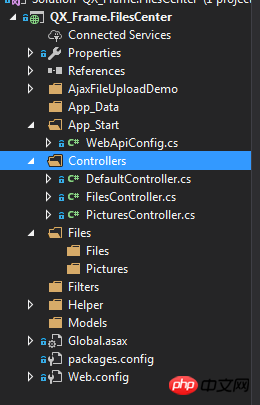
一、项目结构
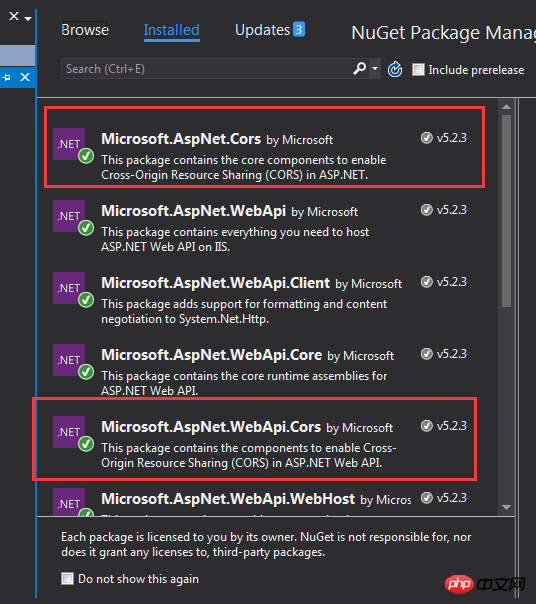
1.App_Start配置了跨域访问,以免请求时候因跨域问题不能提交。具体的跨域配置方式如下,了解的朋友请自行略过。
跨域配置:NewGet安装dll Microsofg.AspNet.Cors
然后在App_Start 文件夹下的WebApiConfig.cs中写入跨域配置代码。
public static class WebApiConfig
  {
    public static void Register(HttpConfiguration config)
    {
      // Web API configuration and services
      // Web API routes
      config.MapHttpAttributeRoutes();
      // Web API configuration and services
      //跨域配置 //need reference from nuget
      config.EnableCors(new EnableCorsAttribute("*", "*", "*"));
      config.Routes.MapHttpRoute(
        name: "DefaultApi",
        routeTemplate: "api/{controller}/{id}",
        defaults: new { id = RouteParameter.Optional }
      );
      //if config the global filter input there need not write the attributes
      //config.Filters.Add(new App.WebApi.Filters.ExceptionAttribute_DG());
    }
  }
跨域就算完成了,请自行测试。
2.新建两个控制器,一个PicturesController.cs,一个FilesController.cs当然图片也是文件,这里图片和文件以不同的方式处理的,因为图片的方式文件上传没有成功,所以另寻他路,如果在座的有更好的方式,请不吝赐教!
二、项目代码
1.我们先说图片上传、下载控制器接口,这里其实没什么好说的,就一个Get获取文件,参数是文件全名;Post上传文件;直接上代码。
using QX_Frame.App.WebApi;
using QX_Frame.FilesCenter.Helper;
using QX_Frame.Helper_DG;
using QX_Frame.Helper_DG.Extends;
using System;
using System.Collections.Generic;
using System.Diagnostics;
using System.IO;
using System.Linq;
using System.Net;
using System.Net.Http;
using System.Net.Http.Headers;
using System.Text;
using System.Threading.Tasks;
using System.Web.Http;
/**
* author:qixiao
* create:2017-5-26 16:54:46
* */
namespace QX_Frame.FilesCenter.Controllers
{
public class PicturesController : WebApiControllerBase
{
//Get : api/Pictures
public HttpResponseMessage Get(string fileName)
{
HttpResponseMessage result = null;
DirectoryInfo directoryInfo = new DirectoryInfo(IO_Helper_DG.RootPath_MVC + @"Files/Pictures");
FileInfo foundFileInfo = directoryInfo.GetFiles().Where(x => x.Name == fileName).FirstOrDefault();
if (foundFileInfo != null)
{
FileStream fs = new FileStream(foundFileInfo.FullName, FileMode.Open);
result = new HttpResponseMessage(HttpStatusCode.OK);
result.Content = new StreamContent(fs);
result.Content.Headers.ContentType = new System.Net.Http.Headers.MediaTypeHeaderValue("application/octet-stream");
result.Content.Headers.ContentDisposition = new ContentDispositionHeaderValue("attachment");
result.Content.Headers.ContentDisposition.FileName = foundFileInfo.Name;
}
else
{
result = new HttpResponseMessage(HttpStatusCode.NotFound);
}
return result;
}
//POST : api/Pictures
public async Task<IHttpActionResult> Post()
{
if (!Request.Content.IsMimeMultipartContent())
{
throw new Exception_DG("unsupported media type", 2005);
}
string root = IO_Helper_DG.RootPath_MVC;
IO_Helper_DG.CreateDirectoryIfNotExist(root + "/temp");
var provider = new MultipartFormDataStreamProvider(root + "/temp");
// Read the form data.
await Request.Content.ReadAsMultipartAsync(provider);
List<string> fileNameList = new List<string>();
StringBuilder sb = new StringBuilder();
long fileTotalSize = 0;
int fileIndex = 1;
// This illustrates how to get the file names.
foreach (MultipartFileData file in provider.FileData)
{
//new folder
string newRoot = root + @"Files/Pictures";
IO_Helper_DG.CreateDirectoryIfNotExist(newRoot);
if (File.Exists(file.LocalFileName))
{
//new fileName
string fileName = file.Headers.ContentDisposition.FileName.Substring(1, file.Headers.ContentDisposition.FileName.Length - 2);
string newFileName = Guid.NewGuid() + "." + fileName.Split('.')[1];
string newFullFileName = newRoot + "/" + newFileName;
fileNameList.Add($"Files/Pictures/{newFileName}");
FileInfo fileInfo = new FileInfo(file.LocalFileName);
fileTotalSize += fileInfo.Length;
sb.Append($" #{fileIndex} Uploaded file: {newFileName} ({ fileInfo.Length} bytes)");
fileIndex++;
File.Move(file.LocalFileName, newFullFileName);
Trace.WriteLine("1 file copied , filePath=" + newFullFileName);
}
}
return Json(Return_Helper.Success_Msg_Data_DCount_HttpCode($"{fileNameList.Count} file(s) /{fileTotalSize} bytes uploaded successfully! Details -> {sb.ToString()}", fileNameList, fileNameList.Count));
}
}
}里面可能有部分代码在Helper帮助类里面写的,其实也仅仅是获取服务器根路径和如果判断文件夹不存在则创建目录,这两个代码的实现如下:
 public static string RootPath_MVC
     {
       get { return System.Web.HttpContext.Current.Server.MapPath("~"); }
     }
//create Directory
    public static bool CreateDirectoryIfNotExist(string filePath)
    {
      if (!Directory.Exists(filePath))
      {
        Directory.CreateDirectory(filePath);
      }
      return true;
    }
2.文件上传下载接口和图片大同小异。
using QX_Frame.App.WebApi;
using QX_Frame.FilesCenter.Helper;
using QX_Frame.Helper_DG;
using System.Collections.Generic;
using System.Diagnostics;
using System.IO;
using System.Linq;
using System.Net;
using System.Net.Http;
using System.Net.Http.Headers;
using System.Text;
using System.Threading.Tasks;
using System.Web;
using System.Web.Http;
/**
 * author:qixiao
 * create:2017-5-26 16:54:46
 * */
namespace QX_Frame.FilesCenter.Controllers
{
  public class FilesController : WebApiControllerBase
  {
    //Get : api/Files
    public HttpResponseMessage Get(string fileName)
    {
      HttpResponseMessage result = null;
      DirectoryInfo directoryInfo = new DirectoryInfo(IO_Helper_DG.RootPath_MVC + @"Files/Files");
      FileInfo foundFileInfo = directoryInfo.GetFiles().Where(x => x.Name == fileName).FirstOrDefault();
      if (foundFileInfo != null)
      {
        FileStream fs = new FileStream(foundFileInfo.FullName, FileMode.Open);
        result = new HttpResponseMessage(HttpStatusCode.OK);
        result.Content = new StreamContent(fs);
        result.Content.Headers.ContentType = new System.Net.Http.Headers.MediaTypeHeaderValue("application/octet-stream");
        result.Content.Headers.ContentDisposition = new ContentDispositionHeaderValue("attachment");
        result.Content.Headers.ContentDisposition.FileName = foundFileInfo.Name;
      }
      else
      {
        result = new HttpResponseMessage(HttpStatusCode.NotFound);
      }
      return result;
    }
    //POST : api/Files
    public async Task<IHttpActionResult> Post()
    {
      //get server root physical path
      string root = IO_Helper_DG.RootPath_MVC;
      //new folder
      string newRoot = root + @"Files/Files/";
      //check path is exist if not create it
      IO_Helper_DG.CreateDirectoryIfNotExist(newRoot);
      List<string> fileNameList = new List<string>();
      StringBuilder sb = new StringBuilder();
      long fileTotalSize = 0;
      int fileIndex = 1;
      //get files from request
      HttpFileCollection files = HttpContext.Current.Request.Files;
      await Task.Run(() =>
      {
        foreach (var f in files.AllKeys)
        {
          HttpPostedFile file = files[f];
          if (!string.IsNullOrEmpty(file.FileName))
          {
            string fileLocalFullName = newRoot + file.FileName;
            file.SaveAs(fileLocalFullName);
            fileNameList.Add($"Files/Files/{file.FileName}");
            FileInfo fileInfo = new FileInfo(fileLocalFullName);
            fileTotalSize += fileInfo.Length;
            sb.Append($" #{fileIndex} Uploaded file: {file.FileName} ({ fileInfo.Length} bytes)");
            fileIndex++;
            Trace.WriteLine("1 file copied , filePath=" + fileLocalFullName);
          }
        }
      });
      return Json(Return_Helper.Success_Msg_Data_DCount_HttpCode($"{fileNameList.Count} file(s) /{fileTotalSize} bytes uploaded successfully!   Details -> {sb.ToString()}", fileNameList, fileNameList.Count));
    }
  }
}实现了上述两个控制器代码以后,我们需要前端代码来调试对接,代码如下所示。
<!doctype>
<head>
<script src="jquery-3.2.0.min.js"></script>
<!--<script src="jquery-1.11.1.js"></script>-->
<!--<script src="ajaxfileupload.js"></script>-->
<script>
$(document).ready(function () {
var appDomain = "http://localhost:3997/";
$("#btn_fileUpload").click(function () {
/**
* 用ajax方式上传文件 -----------
* */
//-------asp.net webapi fileUpload
//
var formData = new FormData($("#uploadForm")[0]);
$.ajax({
url: appDomain + 'api/Files',
type: 'POST',
data: formData,
async: false,
cache: false,
contentType: false,
processData: false,
success: function (data) {
console.log(JSON.stringify(data));
},
error: function (data) {
console.log(JSON.stringify(data));
}
});
//----end asp.net webapi fileUpload
//----.net core webapi fileUpload
// var fileUpload = $("#files").get(0);
// var files = fileUpload.files;
// var data = new FormData();
// for (var i = 0; i < files.length; i++) {
// data.append(files[i].name, files[i]);
// }
// $.ajax({
// type: "POST",
// url: appDomain+'api/Files',
// contentType: false,
// processData: false,
// data: data,
// success: function (data) {
// console.log(JSON.stringify(data));
// },
// error: function () {
// console.log(JSON.stringify(data));
// }
// });
//--------end net core webapi fileUpload
/**
* ajaxfileupload.js 方式上传文件
* */
// $.ajaxFileUpload({
// type: 'post',
// url: appDomain + 'api/Files',
// secureuri: false,
// fileElementId: 'files',
// success: function (data) {
// console.log(JSON.stringify(data));
// },
// error: function () {
// console.log(JSON.stringify(data));
// }
// });
});
//end click
})
</script>
</head>
<title></title>
<body>
<article>
<header>
<h2>article-form</h2>
</header>
<p>
<form action="/" method="post" id="uploadForm" enctype="multipart/form-data">
<input type="file" id="files" name="files" placeholder="file" multiple>file-multiple属性可以选择多项<br><br>
<input type="button" id="btn_fileUpload" value="fileUpload">
</form>
</p>
</article>
</body>至此,我们的功能已全部实现,下面我们来测试一下:

可见,文件上传成功,按预期格式返回!
下面我们测试单图片上传->

然后我们按返回的地址进行访问图片地址。

发现并无任何压力!
下面测试多图片上传->
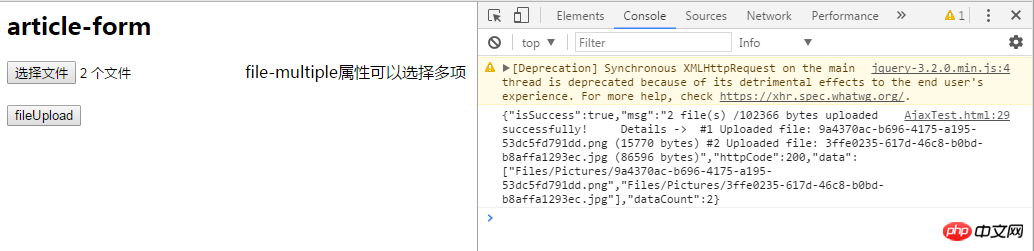
完美~
至此,我们已经实现了WebApi2文件和图片上传,下载的全部功能。
这里需要注意一下Web.config的配置上传文件支持的总大小,我这里配置的是最大支持的文件大小为1MB
<requestFiltering>
  <requestLimits maxAllowedContentLength="1048576" />
</requestFiltering>
  <system.webServer>
   <handlers>
    <remove name="ExtensionlessUrlHandler-Integrated-4.0" />
    <remove name="OPTIONSVerbHandler" />
    <remove name="TRACEVerbHandler" />
    <add name="ExtensionlessUrlHandler-Integrated-4.0" path="*." verb="*" type="System.Web.Handlers.TransferRequestHandler" preCondition="integratedMode,runtimeVersionv4.0" />
   </handlers>
   <security>
   <requestFiltering>
    <requestLimits maxAllowedContentLength="1048576" /><!--1MB-->
    </requestFiltering>
  </security>
  </system.webServer>
【相关推荐】
3. 详细介绍ASP.NET MVC--控制器(controller)
以上是分享WebApi2 文件图片上传与下载功能实例的详细内容。更多信息请关注PHP中文网其他相关文章!

 c#.net适合您吗?评估其适用性Apr 13, 2025 am 12:03 AM
c#.netissutableforenterprise-levelapplications withemofrosoftecosystemdueToItsStrongTyping,richlibraries,androbustperraries,androbustperformance.however,itmaynotbeidealfoross-platement forment forment forment forvepentment offependment dovelopment toveloperment toveloperment whenrawspeedsportor whenrawspeedseedpolitical politionalitable,
 .NET中的C#代码:探索编程过程Apr 12, 2025 am 12:02 AM
C#在.NET中的编程过程包括以下步骤:1)编写C#代码,2)编译为中间语言(IL),3)由.NET运行时(CLR)执行。C#在.NET中的优势在于其现代化语法、强大的类型系统和与.NET框架的紧密集成,适用于从桌面应用到Web服务的各种开发场景。
 C#.NET:探索核心概念和编程基础知识Apr 10, 2025 am 09:32 AM
C#是一种现代、面向对象的编程语言,由微软开发并作为.NET框架的一部分。1.C#支持面向对象编程(OOP),包括封装、继承和多态。2.C#中的异步编程通过async和await关键字实现,提高应用的响应性。3.使用LINQ可以简洁地处理数据集合。4.常见错误包括空引用异常和索引超出范围异常,调试技巧包括使用调试器和异常处理。5.性能优化包括使用StringBuilder和避免不必要的装箱和拆箱。
 测试C#.NET应用程序:单元,集成和端到端测试Apr 09, 2025 am 12:04 AM
C#.NET应用的测试策略包括单元测试、集成测试和端到端测试。1.单元测试确保代码的最小单元独立工作,使用MSTest、NUnit或xUnit框架。2.集成测试验证多个单元组合的功能,常用模拟数据和外部服务。3.端到端测试模拟用户完整操作流程,通常使用Selenium进行自动化测试。
 高级C#.NET教程:ACE您的下一次高级开发人员面试Apr 08, 2025 am 12:06 AM
C#高级开发者面试需要掌握异步编程、LINQ、.NET框架内部工作原理等核心知识。1.异步编程通过async和await简化操作,提升应用响应性。2.LINQ以SQL风格操作数据,需注意性能。3..NET框架的CLR管理内存,垃圾回收需谨慎使用。
 C#.NET面试问题和答案:提高您的专业知识Apr 07, 2025 am 12:01 AM
C#.NET面试问题和答案包括基础知识、核心概念和高级用法。1)基础知识:C#是微软开发的面向对象语言,主要用于.NET框架。2)核心概念:委托和事件允许动态绑定方法,LINQ提供强大查询功能。3)高级用法:异步编程提高响应性,表达式树用于动态代码构建。
 使用C#.NET建筑微服务:建筑师实用指南Apr 06, 2025 am 12:08 AM
C#.NET是构建微服务的热门选择,因为其生态系统强大且支持丰富。1)使用ASP.NETCore创建RESTfulAPI,处理订单创建和查询。2)利用gRPC实现微服务间的高效通信,定义和实现订单服务。3)通过Docker容器化微服务,简化部署和管理。
 C#.NET安全性最佳实践:防止常见漏洞Apr 05, 2025 am 12:01 AM
C#和.NET的安全最佳实践包括输入验证、输出编码、异常处理、以及身份验证和授权。1)使用正则表达式或内置方法验证输入,防止恶意数据进入系统。2)输出编码防止XSS攻击,使用HttpUtility.HtmlEncode方法。3)异常处理避免信息泄露,记录错误但不返回详细信息给用户。4)使用ASP.NETIdentity和Claims-based授权保护应用免受未授权访问。


热AI工具

Undresser.AI Undress
人工智能驱动的应用程序,用于创建逼真的裸体照片

AI Clothes Remover
用于从照片中去除衣服的在线人工智能工具。

Undress AI Tool
免费脱衣服图片

Clothoff.io
AI脱衣机

AI Hentai Generator
免费生成ai无尽的。

热门文章
热工具

Dreamweaver Mac版
视觉化网页开发工具

MinGW - 适用于 Windows 的极简 GNU
这个项目正在迁移到osdn.net/projects/mingw的过程中,你可以继续在那里关注我们。MinGW:GNU编译器集合(GCC)的本地Windows移植版本,可自由分发的导入库和用于构建本地Windows应用程序的头文件;包括对MSVC运行时的扩展,以支持C99功能。MinGW的所有软件都可以在64位Windows平台上运行。

适用于 Eclipse 的 SAP NetWeaver 服务器适配器
将Eclipse与SAP NetWeaver应用服务器集成。

VSCode Windows 64位 下载
微软推出的免费、功能强大的一款IDE编辑器

PhpStorm Mac 版本
最新(2018.2.1 )专业的PHP集成开发工具

