Java实现租车系统的详细过程
- Y2J原创
- 2017-05-08 16:00:153420浏览
这篇文章主要给大家介绍了利用Java实现一个达达租车系统的步骤,文中给出了详细的实现思路和示例代码,并在文末给出了完整的源码供大家学习下载,需要的朋友可以参考借鉴,下面来一起看看吧。
本文介绍的是利用java编写一个控制台版的“达达租车系统”,下面话不多说了,来看看详细实现方法吧。
实现目标
java编写一个控制台版的“达达租车系统”
实现功能
1.展示所有可租车辆
2.选择车型、租车量
3.展示租车清单,包含:总金额、总载货量及其车型、总载人量及其车型
三大分析
数据模型分析

业务模型分析

显示和流程分析

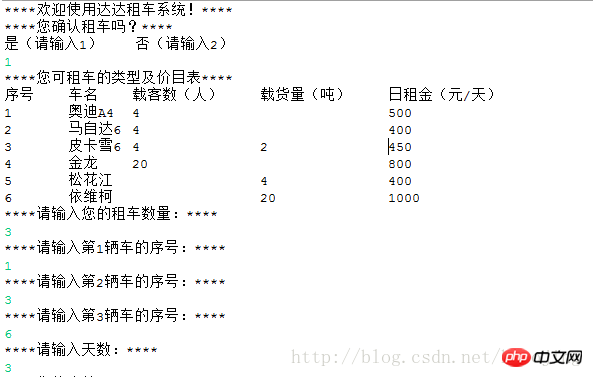
实现效果
租车页面

租车账单

实现思路
首先定义一个Car类,它包含基本功能:车名、载客数、载货量、日租金。接着创建三个小类,分别是客车类、货车类和皮卡类(既能载客又能载货),它们都继承Car类。最后需要一个主类,用于开启整个系统,调用每个小类。
实现代码
package com.jinger;
public abstract class Car {
 public int rent;//日租金
 public int people;//载客人数
 public int loads;//载货量
 public String name;//车名
public int getRent(){
 return rent;
}
public void setRent(int rent){
 this.rent=rent;
}
public int getPeople(){
 return people;
}
public void setPeople(int people){
 this.people=people;
}
public int getLoads(){
 return loads;
}
public void setLoads(int loads){
 this.loads=loads;
}
public String getName(){
 return name;
}
public void setName(String name){
 this.name=name;
}
}
客车类
package com.jinger;
public class PassageCar extends Car{
 public PassageCar(String name,int people,int rent){
 this.setName(name);
 this.setPeople(people);
 this.setRent(rent);


 }

 public String toString(){
 return this.getName()+"\t"+this.getPeople()+"\t\t\t\t"+this.getRent();
 }
 }
卡车类
package com.jinger;
public class Truck extends Car {
 public Truck(String name,int loads,int rent){
 this.setName(name);
 this.setLoads(loads);
 this.setRent(rent);
 }

 public String toString(){
 return this.getName()+"\t\t\t"+this.getLoads()+"\t\t"+this.getRent();
 }
 }
皮卡类
package com.jinger;
public class Pickup extends Car {
 public Pickup(String name,int people,int loads,int rent){
 this.setName(name);
 this.setPeople(people);
 this.setLoads(loads);
 this.setRent(rent);
 }

 public String toString(){
 return this.getName()+"\t"+this.getPeople()+"\t\t"+this.getLoads()+"\t\t"+this.getRent();
 }
 }
主类
package com.jinger;
import java.util.*;
public class Initial {
public static void main(String[] args) {
//对各类车实例化并保存到cars数组
Car[] cars={
new PassageCar("奥迪A4",4,500),
new PassageCar("马自达6",4,400),
new Pickup("皮卡雪6",4,2,450),
new PassageCar("金龙",20,800),
new Truck("松花江",4,400),
new Truck("依维柯",20,1000)};
System.out.println("****欢迎使用达达租车系统!****");
System.out.println("****您确认租车吗?****"+"\n"+"是(请输入1) \t 否(请输入2)");
Scanner in1=new Scanner(System.in);
int is=in1.nextInt();
if(is!=1){
System.out.println("****欢迎下次光临!****");
System.exit(0);
}
if(is==1){
System.out.println("****您可租车的类型及价目表****");
System.out.println("序号"+"\t车名"+"\t载客数(人)"+"\t载货量(吨)"+"\t日租金(元/天)");
//使用循环方式将各类车输出
for(int i=0;i<cars.length;i++){
System.out.println((i+1)+"\t"+cars[i]);
}
System.out.println("****请输入您的租车数量:****");
int num1=in1.nextInt();
Car[] rentcar=new Car[num1];
int price=0;//总价格
int totalpeople=0;//总人数
int totalloads=0;//总载货量
for(int i=0;i<num1;i++){
System.out.println("****请输入第"+(i+1)+"辆车的序号:****");
int numx=in1.nextInt();
rentcar[i]=cars[numx-1];
}
System.out.println("****请输入天数:****");
int day=in1.nextInt();
for(int i=0;i<num1;i++){
price=price+rentcar[i].rent *day;
}
System.out.println("****您的账单:****");
System.out.println("已选载人车:");
for(int i=0;i<num1;i++){
if(rentcar[i].people!=0){
System.out.println(rentcar[i].name+"\t");
}
totalpeople=totalpeople+rentcar[i].people;
}
System.out.println('\n');
System.out.println("已选载货车:");
for(int i=0;i<num1;i++){
if(rentcar[i].loads!=0){
System.out.println(rentcar[i].name+"\t");
}
totalloads=totalloads+rentcar[i].loads;
}
System.out.println('\n');
System.out.println("共载客:"+totalpeople+"人");
System.out.println("共载货:"+totalloads+"吨");
System.out.println("租车总价格:"+price+"元");
System.out.println('\n');
System.out.println("****感谢您的惠顾,欢迎再次光临!****");
}
}
}收获
思路决定编码。
编程要注重自顶而下、逐步求精的设计方法。
【相关推荐】
1. Java免费视频教程
2. 全面解析Java注解
3. FastJson教程手册
以上是Java实现租车系统的详细过程的详细内容。更多信息请关注PHP中文网其他相关文章!
声明:
本文内容由网友自发贡献,版权归原作者所有,本站不承担相应法律责任。如您发现有涉嫌抄袭侵权的内容,请联系admin@php.cn

