


这篇文章主要为大家详细介绍了微信小程序实战之自定义模态弹窗,具有一定的参考价值,感兴趣的小伙伴们可以参考一下
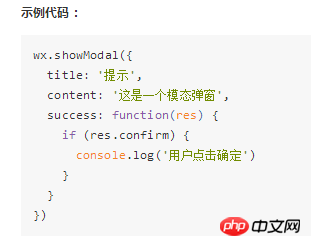
首先看看官方提供的模态弹窗,供大家参考,具体内容如下

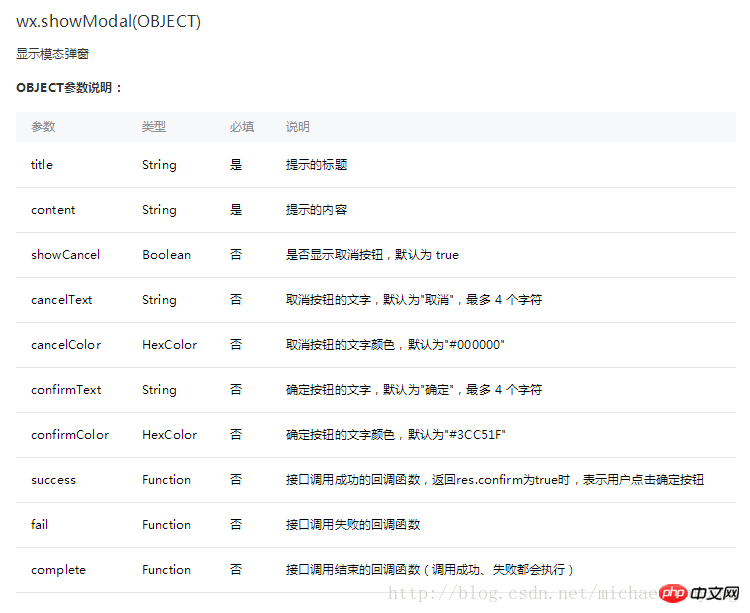
api如下:
示例:
这样的模态弹窗,充其量只能做个alert,提示一下信息。
但是并不能使用它来处理复杂性的弹窗业务,因此写了Michael从新自定义了一个,采用了仿原生的样式写法
wxml:
<!--button-->
<view class="btn" bindtap="powerDrawer" data-statu="open">button</view>

<!--mask-->
<view class="drawer_screen" bindtap="powerDrawer" data-statu="close" wx:if="{{showModalStatus}}"></view>
<!--content-->
<!--使用animation属性指定需要执行的动画-->
<view animation="{{animationData}}" class="drawer_box" wx:if="{{showModalStatus}}">

 <!--drawer content-->
 <view class="drawer_title">弹窗标题</view>
 <view class="drawer_content">
 <view class="top grid">
  <label class="title col-0">标题</label>
  <input class="input_base input_h30 col-1" name="rName" value="可自行定义内容"></input>
 </view>
 <view class="top grid">
  <label class="title col-0">标题</label>
  <input class="input_base input_h30 col-1" name="mobile" value="110"></input>
 </view>
 <view class="top grid">
  <label class="title col-0">标题</label>
  <input class="input_base input_h30 col-1" name="phone" value="拒绝伸手党"></input>
 </view>
 <view class="top grid">
  <label class="title col-0">标题</label>
  <input class="input_base input_h30 col-1" name="Email" value="仅供学习使用"></input>
 </view>
 <view class="top bottom grid">
  <label class="title col-0">备注</label>
  <input class="input_base input_h30 col-1" name="bz"></input>
 </view>
 </view>
 <view class="btn_ok" bindtap="powerDrawer" data-statu="close">确定</view>
</view>
wxss:
/*button*/
.btn {
 width: 80%;
 padding: 20rpx 0;
 border-radius: 10rpx;
 text-align: center;
 margin: 40rpx 10%;
 background: #000;
 color: #fff;
}

/*mask*/
.drawer_screen {
 width: 100%;
 height: 100%;
 position: fixed;
 top: 0;
 left: 0;
 z-index: 1000;
 background: #000;
 opacity: 0.5;
 overflow: hidden;
}

/*content*/
.drawer_box {
 width: 650rpx;
 overflow: hidden;
 position: fixed;
 top: 50%;
 left: 0;
 z-index: 1001;
 background: #FAFAFA;
 margin: -150px 50rpx 0 50rpx;
 border-radius: 3px;
}

.drawer_title{
 padding:15px;
 font: 20px "microsoft yahei";
 text-align: center;
}
.drawer_content {
 height: 210px;
 overflow-y: scroll; /*超出父盒子高度可滚动*/
}

.btn_ok{
 padding: 10px;
 font: 20px "microsoft yahei";
 text-align: center;
 border-top: 1px solid #E8E8EA;
 color: #3CC51F;
}

.top{
 padding-top:8px;
}
.bottom {
 padding-bottom:8px;
}
.title {
 height: 30px;
 line-height: 30px;
 width: 160rpx;
 text-align: center;
 display: inline-block;
 font: 300 28rpx/30px "microsoft yahei";
}

.input_base {
 border: 2rpx solid #ccc;
 padding-left: 10rpx;
 margin-right: 50rpx;
}
.input_h30{
 height: 30px;
 line-height: 30px;
}
.input_h60{
 height: 60px;
}
.input_view{
 font: 12px "microsoft yahei";
 background: #fff;
 color:#000;
 line-height: 30px;
}

input {
 font: 12px "microsoft yahei";
 background: #fff;
 color:#000 ;
}
radio{
 margin-right: 20px;
}
.grid { display: -webkit-box; display: box; }
.col-0 {-webkit-box-flex:0;box-flex:0;}
.col-1 {-webkit-box-flex:1;box-flex:1;}
.fl { float: left;}
.fr { float: right;}
js:
Page({
 data: {
 showModalStatus: false
 },
 powerDrawer: function (e) {
 var currentStatu = e.currentTarget.dataset.statu;
 this.util(currentStatu)
 },
 util: function(currentStatu){
 /* 动画部分 */
 // 第1步:创建动画实例
 var animation = wx.createAnimation({
  duration: 200, //动画时长
  timingFunction: "linear", //线性
  delay: 0 //0则不延迟
 });

 // 第2步:这个动画实例赋给当前的动画实例
 this.animation = animation;

 // 第3步:执行第一组动画
 animation.opacity(0).rotateX(-100).step();

 // 第4步:导出动画对象赋给数据对象储存
 this.setData({
  animationData: animation.export()
 })

 // 第5步:设置定时器到指定时候后,执行第二组动画
 setTimeout(function () {
  // 执行第二组动画
  animation.opacity(1).rotateX(0).step();
  // 给数据对象储存的第一组动画,更替为执行完第二组动画的动画对象
  this.setData({
  animationData: animation
  })

  //关闭
  if (currentStatu == "close") {
  this.setData(
   {
   showModalStatus: false
   }
  );
  }
 }.bind(this), 200)

 // 显示
 if (currentStatu == "open") {
  this.setData(
  {
   showModalStatus: true
  }
  );
 }
 }

})
运行:

以上是微信小程序之自定义模态弹窗实例详解的详细内容。更多信息请关注PHP中文网其他相关文章!
声明
本文内容由网友自发贡献,版权归原作者所有,本站不承担相应法律责任。如您发现有涉嫌抄袭侵权的内容,请联系admin@php.cn

热AI工具

Undresser.AI Undress
人工智能驱动的应用程序,用于创建逼真的裸体照片

AI Clothes Remover
用于从照片中去除衣服的在线人工智能工具。

Undress AI Tool
免费脱衣服图片

Clothoff.io
AI脱衣机

Video Face Swap
使用我们完全免费的人工智能换脸工具轻松在任何视频中换脸!

热门文章
如何修复KB5055612无法在Windows 10中安装?
4 周前ByDDD
<🎜>:泡泡胶模拟器无穷大 - 如何获取和使用皇家钥匙
4 周前By尊渡假赌尊渡假赌尊渡假赌
<🎜>:种植花园 - 完整的突变指南
3 周前ByDDD
北端:融合系统,解释
4 周前By尊渡假赌尊渡假赌尊渡假赌
Mandragora:巫婆树的耳语 - 如何解锁抓钩
3 周前By尊渡假赌尊渡假赌尊渡假赌
热工具

Atom编辑器mac版下载
最流行的的开源编辑器

SublimeText3 英文版
推荐:为Win版本,支持代码提示!

禅工作室 13.0.1
功能强大的PHP集成开发环境

mPDF
mPDF是一个PHP库,可以从UTF-8编码的HTML生成PDF文件。原作者Ian Back编写mPDF以从他的网站上“即时”输出PDF文件,并处理不同的语言。与原始脚本如HTML2FPDF相比,它的速度较慢,并且在使用Unicode字体时生成的文件较大,但支持CSS样式等,并进行了大量增强。支持几乎所有语言,包括RTL(阿拉伯语和希伯来语)和CJK(中日韩)。支持嵌套的块级元素(如P、DIV),

Dreamweaver Mac版
视觉化网页开发工具

