该文使用mysql5.5 centos6.5 64位
一、主从复制的作用
1、如果主服务器出现问题,可以快速切换到从服务器。
2、对与实时性要求不高或者更新不频繁的应用可以在从服务器上执行查询操作,降低主服务器的访问压力。将数据的读写进行分离从而达到负载的效果。
3、可以在从服务器进行数据备份操作,以避免备份期间对主服务器的影响。
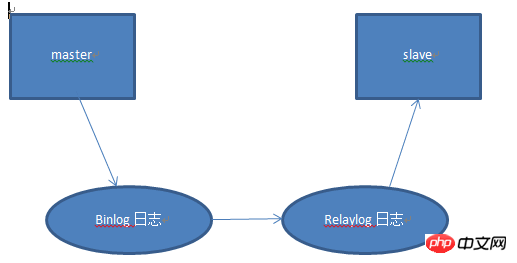
主从复制原理:

原理解析:master服务器开启binlog日志,slave服务器通过master服务器授予的用户将master服务器产生的binlog日志读到本地并转为relaylog日志,然后执行relaylog日志。
二、搭建主从复制环境
master:192.168.6.224
slave:192.168.6.222
1、在主服务器中为从服务器设置授权用户
在主服务器中为从服务器192.168.6.222创建一个用户名为user2的用户,密码是123
mysql> grant all on *.* to user2@192.168.6.222 identified by "123";
参数解释:
grant:mysql授权关键字
*.* :所有库所有表
查看用户授权是否成功:
mysql> show grants for user2@192.168.6.222;
测试在slave服务器上使用user2能否登陆master服务器上的mysql
[root@localhost tmp]# mysql -uuser2 -p123 test -h192.168.6.224;
2、开启主服务器的bin-log日志并开设置server-id的值。
修改主服务器的my.cnf配置文件:
[mysqld]
#开启mysql的bin-log日志
log-bin=mysql-bin
#主服务器该值设置为1
server-id    = 1
3、重置bin-log日志:mysql> reset master;
查看最新的bin-log日志状态看是否在起始位置: mysql> show master status;
mysql> show master status;
+------------------+----------+--------------+------------------+
|
File
             |
Position
 | Binlog_Do_DB | Binlog_Ignore_DB |
+------------------+----------+--------------+------------------+
| mysql-bin.000
001
 |      107 |              |                  |
+------------------+----------+--------------+------------------+
4、备份主数据库数据
a、备份数据
b、更新bin-log日志
在这里我们使用mysqldump方式备份数据并使用 -l -F 参数直接在备份数据的时候设置读锁并更新bin-log日志
mysqldump -uroot -p111111 test -l -F > '/tmp/mysql_back/test.sql';
5、将主服务器备份的数据发送到slave服务器
[root@localhost tmp]# scp mysql_back/test.sql 192.168.6.222:/tmp/mysql_back/
6、重置slave服务器上的bin-log日志并在slave服务器中使用备份的数据
mysql> rester master;
[root@localhost tmp]# mysql -uroot -p111111 test -v -f
7、配置slave服务器中my.cnf参数
a、#配置从服务器server-id =2 (如果有多台从服务器则都有一个唯一的server-id)
server-id = 2
b、#开启bin-log日志
log-bin=mysql-bin
c、#配置需要同步的主机、用户名、密码、端口号
#配置需要同步的主机
 master-host     =   192.168.6.224
# The username the slave will use for authentication when connecting
# to the master - required
 master-user     =   user2
#
# The password the slave will authenticate with when connecting to
# the master - required
 master-password =   123
#
# The port the master is listening on.
# optional - defaults to 3306
 master-port     =  3306
d、重启mysql让配置文件生效
[root@localhost tmp]# service mysqld restart
如果改方式无法重启mysql服务器可以使用下面的方式
mysql> change master to master_host="192.168.6.224",
master_user="user2",
master_password="123",
master_port=3306,
master_log_file="mysql-bin.000002",master_log_pos=107;
mysql> slave start;
8、查看slave状态
mysql . row master .bin.relaybin.bin.
Master_Log_File:代表主机上用于主备同步的日志文件名,
Read_Master_Log_Pos:代表上一次成功同步到的日志文件中的位置。
如果这两项与先前在主服务器上看到的File及Position的值不相符,则无法正确进行同步。
三、测试
1、在master服务器添加数据并查看bin-log日志状态
mysql> insert into t1 values(13);
Query OK, 1 row affected (0.02 sec)

mysql> insert into t1 values(14);
Query OK, 1 row affected (0.01 sec)

mysql> insert into t1 values(15);
Query OK, 1 row affected (0.01 sec)

mysql> show master status;
+------------------+----------+--------------+------------------+
| File             | Position | Binlog_Do_DB | Binlog_Ignore_DB |
+------------------+----------+--------------+------------------+
| mysql-bin.000002 |      656 |              |                  |
+------------------+----------+--------------+------------------+
2、查看slave同步状态
mysql> show slave status
\G;*************************** 1. row ***************************
               Slave_IO_State: Waiting for master to send event
                  Master_Host: 192.168.6.224
                  Master_User: user2
                  Master_Port: 3306
                Connect_Retry: 60
              Master_Log_File: mysql-bin.000002
          Read_Master_Log_Pos: 656
               Relay_Log_File: localhost-relay-bin.000002
                Relay_Log_Pos: 802
        Relay_Master_Log_File: mysql-bin.000002
             Slave_IO_Running: Yes
            Slave_SQL_Running: Yes
在这里可以看到主服务器的Postion与从服务器的Read_Master_Log_Pos值相等且Slave_IO_Running,Slave_SQL_Running值都是 Yes 。这样mysql的主从配置成功。
四、主从复制常用命令
1、start slave #启动复制线程
2、stop slave #停止复制线程
3、show slave status #查看从数据库状态
4、show master logs;#查主数据库有哪些bin-log日志
5、change master to #动态改变到主服务器的配置
6、show processlist;#查看从数据库的运行进程
以上是详解mysql学习之主从复制的详细内容。更多信息请关注PHP中文网其他相关文章!
 如何向新的MySQL用户授予权限May 09, 2025 am 12:16 AM
TograntpermissionstonewMySQLusers,followthesesteps:1)AccessMySQLasauserwithsufficientprivileges,2)CreateanewuserwiththeCREATEUSERcommand,3)UsetheGRANTcommandtospecifypermissionslikeSELECT,INSERT,UPDATE,orALLPRIVILEGESonspecificdatabasesortables,and4)
 如何在MySQL中添加用户:逐步指南May 09, 2025 am 12:14 AM
toadduserInmysqleffectection andsecrely,theTheSepsps:1)USEtheCreateuserStattoDaneWuser,指定thehostandastrongpassword.2)GrantNectalRevileSaryPrivilegesSustate,usiveleanttatement,AdheringTotheTeprinciplelastPrevilegege.3)
 mysql:添加具有复杂权限的新用户May 09, 2025 am 12:09 AM
toaddanewuserwithcomplexpermissionsinmysql,loldtheSesteps:1)创建eTheEserWithCreateuser'newuser'newuser'@''localhost'Indedify'pa ssword';。2)GrantreadAccesstoalltablesin'mydatabase'withGrantSelectOnMyDatabase.to'newuser'@'localhost';。3)GrantWriteAccessto'
 mysql:字符串数据类型和coltrationsMay 09, 2025 am 12:08 AM
MySQL中的字符串数据类型包括CHAR、VARCHAR、BINARY、VARBINARY、BLOB、TEXT,排序规则(Collations)决定了字符串的比较和排序方式。1.CHAR适合固定长度字符串,VARCHAR适合可变长度字符串。2.BINARY和VARBINARY用于二进制数据,BLOB和TEXT用于大对象数据。3.排序规则如utf8mb4_unicode_ci忽略大小写,适合用户名;utf8mb4_bin区分大小写,适合需要精确比较的字段。
 MySQL:我应该在Varchars上使用什么长度?May 09, 2025 am 12:06 AM
最佳的MySQLVARCHAR列长度选择应基于数据分析、考虑未来增长、评估性能影响及字符集需求。1)分析数据以确定典型长度;2)预留未来扩展空间;3)注意大长度对性能的影响;4)考虑字符集对存储的影响。通过这些步骤,可以优化数据库的效率和扩展性。
 mysql blob:有什么限制吗?May 08, 2025 am 12:22 AM
mysqlblobshavelimits:tinyblob(255bytes),blob(65,535 bytes),中间布洛布(16,777,215个比例),andlongblob(4,294,967,967,295 bytes).tousebl观察性:1)考虑performance impactsandSandStorelargeblobsextern; 2)管理backbackupsandreplication carecration; 3)usepathsinst
 MySQL:自动化用户创建的最佳工具是什么?May 08, 2025 am 12:22 AM
自动化在MySQL中创建用户的最佳工具和技术包括:1.MySQLWorkbench,适用于小型到中型环境,易于使用但资源消耗大;2.Ansible,适用于多服务器环境,简单但学习曲线陡峭;3.自定义Python脚本,灵活但需确保脚本安全性;4.Puppet和Chef,适用于大规模环境,复杂但可扩展。选择时需考虑规模、学习曲线和集成需求。
 mysql:我可以在斑点内搜索吗?May 08, 2025 am 12:20 AM
是的,YouCansearchInIdeAblobInMysqlusingsPecificteChniques.1)转换theblobtoautf-8StringWithConvertFunctionWithConvertFunctionandSearchusiseLike.2)forCompresseBlyblobs,useuncompresseblobs,useuncompressbeforeconversion.3)acpperformance impperformance imperformance imptactsanddataEccoding.4)


热AI工具

Undresser.AI Undress
人工智能驱动的应用程序,用于创建逼真的裸体照片

AI Clothes Remover
用于从照片中去除衣服的在线人工智能工具。

Undress AI Tool
免费脱衣服图片

Clothoff.io
AI脱衣机

Video Face Swap
使用我们完全免费的人工智能换脸工具轻松在任何视频中换脸!

热门文章

热工具

SublimeText3 Linux新版
SublimeText3 Linux最新版

WebStorm Mac版
好用的JavaScript开发工具

ZendStudio 13.5.1 Mac
功能强大的PHP集成开发环境

螳螂BT
Mantis是一个易于部署的基于Web的缺陷跟踪工具,用于帮助产品缺陷跟踪。它需要PHP、MySQL和一个Web服务器。请查看我们的演示和托管服务。

SublimeText3汉化版
中文版,非常好用


