


width——对应于canvas元素的width属性;
getContext(af16c4db277e0498b5fa9e30613367f1)——为画布返回绘图上下文;
2)绘制矩形:
fillRect(x,y,w,h)——绘制一个实心矩形;
strokeRect(x,y,w,h)——绘制一个空心矩形;
clearRect(x,y,w,h)——清除指定的矩形;
canvas{
            border:medium double black;
            margin: 4px;
        }
        body > *{
            float: left;
        }
<canvas id="canvas1" width="500" height="200">
您的浏览器不支持<code>canvas</code>!
</canvas><script>
//绘制矩形
var ctx=document.getElementById("canvas1").getContext("2d");
//ctx.fillRect(10,10,50,50);
var offset=10;
var size=50;
var count=5;
for(var i=0;i<count;i++){
ctx.fillRect(i*(offset+size)+offset,offset,size,size);
ctx.strokeRect(i*(offset+size)+offset,(2*offset)+size,size,size);
ctx.clearRect(i*(offset+size)+offset,offset+5,size,size-10);
}
</script>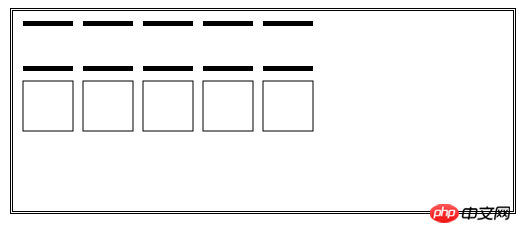
3)设置画布绘制状态:
lineWidth——获取或设置线条的宽度(默认值为1.0);
lineJoin——获取或设置线条与图形连接时的样式(默认值为miter);
fillStyle——获取或设置用于实心图形的样式(默认值为black);
strokeStyle——获取或设置用于线条的样式(默认值为black);
 <canvas id="canvas2" width="500" height="70">
        您的浏览器不支持<code>canvas</code>!
    </canvas>
<script>
//在执行操作前绘制设置状态
var ctx=document.getElementById("canvas2").getContext("2d");
ctx.lineWidth=2;
ctx.strokeRect(10,10,50,50);
ctx.lineWidth=4;
ctx.strokeRect(70,10,50,50);
ctx.lineWidth=6;
ctx.strokeRect(130,10,50,50);
ctx.lineWidth=8;
ctx.strokeRect(200,10,50,50);
</script>
<canvas id="canvas3" width="500" height="140">
        您的浏览器不支持<code>canvas</code>!
    </canvas>
<script>
//设置lineJoin属性
var ctx=document.getElementById("canvas3").getContext("2d");
ctx.lineWidth=20;
ctx.lineJoin="round";
ctx.strokeRect(20,20,100,100);
ctx.lineJoin="bevel";
ctx.strokeRect(160,20,100,100);
ctx.lineJoin="miter";
ctx.strokeRect(300,20,100,100);
</script>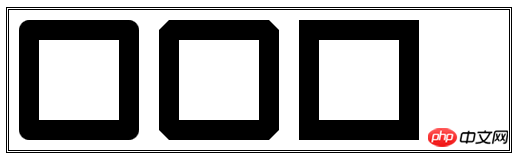
    <canvas id="canvas4" width="500" height="140">
        您的浏览器不支持<code>canvas</code>!
    </canvas>
<script>
//设置填充和笔触样式
var ctx=document.getElementById("canvas4").getContext("2d");
var offset=10;
var size=50;
var count=5;
var lineWidth=3;
var fillColors=["black","grey","lightgrey","red","blue"];
var strokeColors=["rgb(0,0,0)","rgb(100,100,100)","rgb(200,200,200)","rgb(255,0,0)","rgb(0,0,255)"];
for(var i=0;i<count;i++){
ctx.fillStyle=fillColors[i];
ctx.strokeStyle=strokeColors[i];
ctx.fillRect(i*(offset+size)+offset,offset,size,size);
ctx.strokeRect(i*(offset+size)+offset,(2*offset)+size,size,size);
}
</script>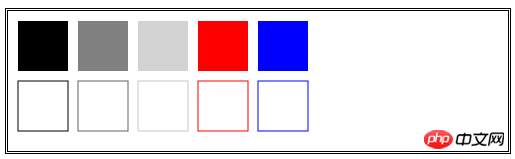
4)使用渐变
createLinearGradient(x0,y0,x1,y1)——创建线性渐变,返回CanvasGradient对象;
createRadialGradient(x0,y0,r0,x1,y1,r1)——创建径向渐变,返回CanvasGradient对象;
CanvasGradient对象的方法:
addColorStop(493344f483624e7bea7e20fb4075f772,b10fb37415d019cfffa8c4d7366c607f)——给渐变的梯度线添加一种纯色;
    <canvas id="canvas5" width="500" height="140">
        您的浏览器不支持<code>canvas</code>!
    </canvas>
<script>
//使用线性渐变
var ctx=document.getElementById("canvas5").getContext("2d");
//var grad=ctx.createLinearGradient(0,0,500,140);
var grad=ctx.createLinearGradient(10,10,60,60);
grad.addColorStop(0,"red");
grad.addColorStop(0.5,"white");
grad.addColorStop(1,"black");
ctx.fillStyle=grad;
//ctx.fillRect(0,0,500,140);
ctx.fillRect(10,10,50,50);
</script>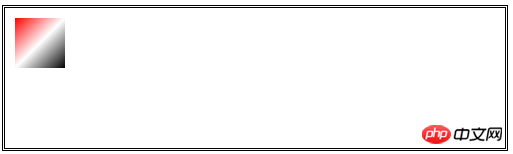
    <canvas id="canvas6" width="500" height="140">
        您的浏览器不支持<code>canvas</code>!
    </canvas>
<script>
//使用径向渐变
var ctx=document.getElementById("canvas6").getContext("2d");
var grad=ctx.createRadialGradient(250,70,20,200,60,100);
grad.addColorStop(0,"red");
grad.addColorStop(0.5,"white");
grad.addColorStop(1,"black");
ctx.fillStyle=grad;
ctx.fillRect(0,0,500,140);
</script>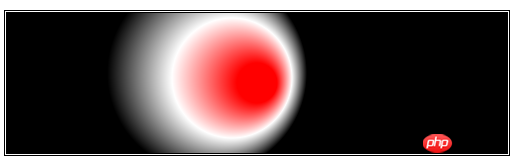
    <canvas id="canvas7" width="500" height="140">
        您的浏览器不支持<code>canvas</code>!
    </canvas>
<script>
//使用较小的图形和径向渐变
var ctx=document.getElementById("canvas7").getContext("2d");
var grad=ctx.createRadialGradient(250,70,20,200,60,100);
grad.addColorStop(0,"red");
grad.addColorStop(0.5,"white");
grad.addColorStop(1,"black");
ctx.fillStyle=grad;
ctx.fillRect(150,20,75,50);
ctx.lineWidth=8;
ctx.strokeStyle=grad;
ctx.strokeRect(250,20,75,50);
</script>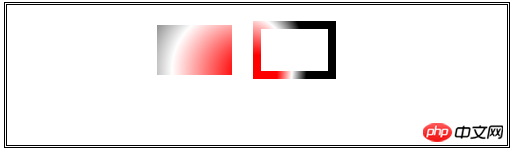
5)使用图案
createPattern(34c7464b2671d69876f543c6f5a9f73c,int2)——创建图案,指定图案文件的来源和重复方式;
int2的值是指定重复样式:分别有repeat、repeat-x、repeat-y、no-repeat;
    <canvas id="canvas8" width="500" height="150">
        您的浏览器不支持<code>canvas</code>!
    </canvas>
    <img id="banana" hidden src="images/banana-small.png"/>
<script>
//使用图像类的图案
var ctx=document.getElementById("canvas8").getContext("2d");
var imageElem=document.getElementById("banana");
var pattern=ctx.createPattern(imageElem,"repeat");
ctx.fillStyle=pattern;
ctx.fillRect(0,0,500,148);
</script>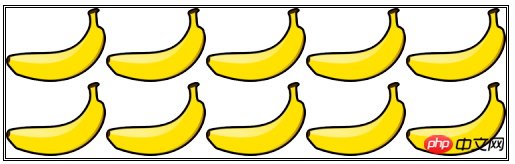
6)保存和恢复状态
save()——保存绘制状态属性的值,并把它们推入状态栈;
restore()——取出状态栈的第一组值,用它们来设置绘制状态;
    <canvas id="canvas9" width="500" height="150" preload="auto">
        您的浏览器不支持<code>canvas</code>!
    </canvas>
    <p>
        <button>Save</button>
        <button>Restore</button>
    </p>
<script>
//保存和恢复状态
var ctx=document.getElementById("canvas9").getContext("2d");
var grad=ctx.createLinearGradient(500,0,500,140);
grad.addColorStop(0,"red");
grad.addColorStop(0.5,"white");
grad.addColorStop(1,"black");
var colors=["black",grad,"red","green","yellow","black","grey"];
var cIndex=0;
ctx.fillStyle=colors[cIndex];
draw();
var buttons=document.getElementsByTagName("button");
for(var i=0;i<buttons.length;i++){
buttons[i].onclick=handleButtonPress;
}
function handleButtonPress(e){
switch(e.target.innerHTML){
case 'Save':
ctx.save();
cIndex=(cIndex+1)%colors.length;
ctx.fillStyle=colors[cIndex];
draw();
break;
case 'Restore':
cIndex=Math.max(0,cIndex-1);
ctx.restore();
draw();
break;
}
}
function draw(){
ctx.fillRect(0,0,500,140);
}
</script>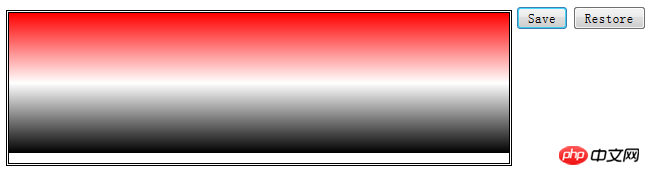
7)绘制图像
drawImage方法——在画布上绘制图像,指定一个img、canvas或video元素作为来源;
    <canvas id="canvas10" width="500" height="150" preload="auto">
        您的浏览器不支持<code>canvas</code>!
    </canvas>
    <img id="banana2" hidden src="images/banana-small.png"/>
<script>
//使用drawImage方法
var ctx2=document.getElementById("canvas10").getContext("2d");
var imageElement=document.getElementById("banana2");
ctx2.drawImage(imageElement,10,10);
ctx2.drawImage(imageElement,120,10,100,120);
ctx2.drawImage(imageElement,20,20,100,50,250,10,100,120);
</script>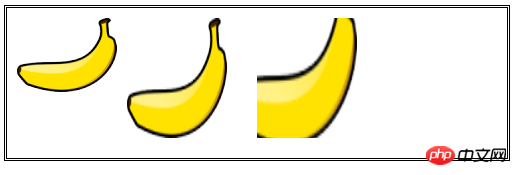
    <video id="vid" src="raw/timessquare.webm" controls preload="auto" width="360" height="240">
        您的浏览器不支持;
    </video>
    <canvas id="canvas11" width="360" height="240">
        您的浏览器不支持;
    </canvas>
    <p>
        <button id="pressme">Snapshot</button>
        <button id="pressme2">PressMe</button>
    </p>
    <canvas id="canvas12" width="360" height="240">
        您的浏览器不支持;
    </canvas>
<script>
//使用视频作为drawImage方法的来源
var ctx3=document.getElementById("canvas11").getContext("2d");
var imageElement3=document.getElementById("vid");
document.getElementById("pressme").onclick=function(e){
ctx3.drawImage(imageElement3,0,0,360,240);
}
var width=100;
var height=10;
ctx3.lineWidth=5;
ctx3.strokeStyle="red";
setInterval(function(){
ctx3.drawImage(imageElement3,0,0,360,240);
ctx3.strokeRect(180-(width/2),120-(height/2),width,height);
},25);
setInterval(function(){
width=(width-1)%200;
height=(height+3)%200;
},100);
</script>
<script>
//将画布作为drawImage方法的来源
var srcCanvasElement=document.getElementById("canvas11");
var ctx4=srcCanvasElement.getContext("2d");
var ctx5=document.getElementById("canvas12").getContext("2d");
var imageElement4=document.getElementById("vid");
document.getElementById("pressme2").onclick=takeSnapshot;
var width=100;
var height=10;
ctx4.lineWidth=5;
ctx4.strokeStyle="red";
ctx5.lineWidth=30;
ctx5.strokeStyle="black";
setInterval(function(){
ctx4.drawImage(imageElement4,0,0,360,240);
ctx4.strokeRect(180-(width/2),120-(height/2),width,height);
},25);
setInterval(function(){
width=(width+1)%200;
height=(height+3)%200;
},100);
function takeSnapshot(){
ctx5.drawImage(srcCanvasElement,0,0,360,240);
ctx5.strokeRect(0,0,360,240);
}
</script>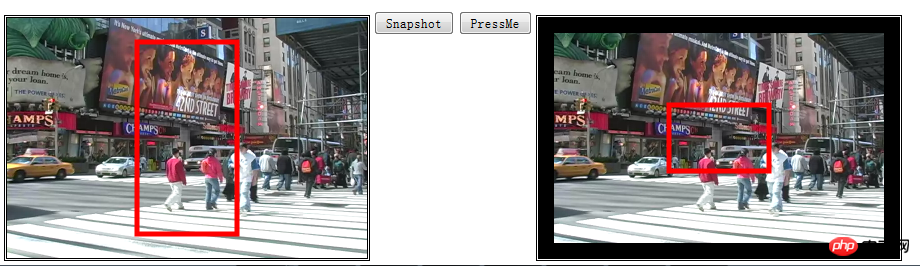
以上是html5之canvas起步的代码示例详解(图)的详细内容。更多信息请关注PHP中文网其他相关文章!

 html5的div一行可以放两个吗Apr 25, 2022 pm 05:32 PM
html5的div元素默认一行不可以放两个。div是一个块级元素,一个元素会独占一行,两个div默认无法在同一行显示;但可以通过给div元素添加“display:inline;”样式,将其转为行内元素,就可以实现多个div在同一行显示了。
 html5中列表和表格的区别是什么Apr 28, 2022 pm 01:58 PM
html5中列表和表格的区别:1、表格主要是用于显示数据的,而列表主要是用于给数据进行布局;2、表格是使用table标签配合tr、td、th等标签进行定义的,列表是利用li标签配合ol、ul等标签进行定义的。
 html5怎么让头和尾固定不动Apr 25, 2022 pm 02:30 PM
固定方法:1、使用header标签定义文档头部内容,并添加“position:fixed;top:0;”样式让其固定不动;2、使用footer标签定义尾部内容,并添加“position: fixed;bottom: 0;”样式让其固定不动。
 html5中不支持的标签有哪些Mar 17, 2022 pm 05:43 PM
html5中不支持的标签有:1、acronym,用于定义首字母缩写,可用abbr替代;2、basefont,可利用css样式替代;3、applet,可用object替代;4、dir,定义目录列表,可用ul替代;5、big,定义大号文本等等。
 HTML5中画布标签是什么May 18, 2022 pm 04:55 PM
HTML5中画布标签是“<canvas>”。canvas标签用于图形的绘制,它只是一个矩形的图形容器,绘制图形必须通过脚本(通常是JavaScript)来完成;开发者可利用多种js方法来在canvas中绘制路径、盒、圆、字符以及添加图像等。
 html5废弃了哪个列表标签Jun 01, 2022 pm 06:32 PM
html5废弃了dir列表标签。dir标签被用来定义目录列表,一般和li标签配合使用,在dir标签对中通过li标签来设置列表项,语法“<dir><li>列表项值</li>...</dir>”。HTML5已经不支持dir,可使用ul标签取代。
 Html5怎么取消td边框May 18, 2022 pm 06:57 PM
3种取消方法:1、给td元素添加“border:none”无边框样式即可,语法“td{border:none}”。2、给td元素添加“border:0”样式,语法“td{border:0;}”,将td边框的宽度设置为0即可。3、给td元素添加“border:transparent”样式,语法“td{border:transparent;}”,将td边框的颜色设置为透明即可。
 html5为什么只需要写doctypeJun 07, 2022 pm 05:15 PM
因为html5不基于SGML(标准通用置标语言),不需要对DTD进行引用,但是需要doctype来规范浏览器的行为,也即按照正常的方式来运行,因此html5只需要写doctype即可。“!DOCTYPE”是一种标准通用标记语言的文档类型声明,用于告诉浏览器编写页面所用的标记的版本。


热AI工具

Undresser.AI Undress
人工智能驱动的应用程序,用于创建逼真的裸体照片

AI Clothes Remover
用于从照片中去除衣服的在线人工智能工具。

Undress AI Tool
免费脱衣服图片

Clothoff.io
AI脱衣机

AI Hentai Generator
免费生成ai无尽的。

热门文章
热工具

SublimeText3 英文版
推荐:为Win版本,支持代码提示!

SublimeText3汉化版
中文版,非常好用

WebStorm Mac版
好用的JavaScript开发工具

SublimeText3 Mac版
神级代码编辑软件(SublimeText3)

SublimeText3 Linux新版
SublimeText3 Linux最新版

