1)用路径绘图:
beginPath()——开始一条新路径;
closePath()——尝试闭合现有路径,方法是绘制一条线,连接最后那条线的终点与初始坐标;
fill()——填充用子路径描述的图形;
isPointInPath(x,y)——如果指定的点在当前路径所描述的图形之内则返回true;
lineTo(x,y)——绘制一条到指定坐标的子路径;
moveTo(x,y)——移动到指定坐标而不绘制子路径;
rect(x,y,w,h)——绘制一个矩形,其左上角位于(x,y),宽度是w,高度是h;
stroke()——给子路径描述的图形绘制轮廓线;
<style type="text/css">
        canvas{
            border:thin solid black;
            margin: 4px;
        }
        body > *{
            float: left;
        }
    </style>
<canvas id="canvas1" width="500" height="140">
您的浏览器不支持<code>canvas</code>!
</canvas> <script>
//由直线创建路径
var ctx=document.getElementById("canvas1").getContext("2d");
ctx.fillStyle="#136455";
ctx.strokeStyle="blue";
ctx.lineWidth=4;
ctx.beginPath();
ctx.moveTo(10,10);
ctx.lineTo(110,10);
ctx.lineTo(110,120);
ctx.closePath();
ctx.fill();
ctx.beginPath();
ctx.moveTo(150,10);
ctx.lineTo(200,10);
ctx.lineTo(200,120);
ctx.lineTo(190,120);
ctx.fill();
ctx.stroke();
ctx.beginPath();
ctx.moveTo(250,10);
ctx.lineTo(250,120);
ctx.stroke();
</script>
lineCap——在绘制线条或闭合图形时设置线条末端的样式;
    <canvas id="canvas2" width="500" height="140">
        您的浏览器不支持<code>canvas</code>!
    </canvas>
<script>
//设置lineCap属性
var ctx2=document.getElementById("canvas2").getContext("2d");
ctx2.strokeStyle="red";
ctx2.lineWidth=2;
ctx2.beginPath();
ctx2.moveTo(0,50);
ctx2.lineTo(200,50);
ctx2.stroke();
ctx2.strokeStyle="black";
ctx2.lineWidth=40;
var xpos=50;
var styles=["butt","round","square"];
for(var i=0;i<styles.length;i++){
ctx2.beginPath();
ctx2.lineCap=styles[i];
ctx2.moveTo(xpos,50);
ctx2.lineTo(xpos,150);
ctx2.stroke();
xpos+=50;
}
</script>
    <canvas id="canvas3" width="500" height="140">
        您的浏览器不支持<code>canvas</code>!
    </canvas>
<script>
//用Rect方法绘制矩形
var ctx3=document.getElementById("canvas3").getContext("2d");
ctx3.fillStyle="yellow";
ctx3.strokeStyle="black";
ctx3.lineWidth=4;
ctx3.beginPath();
ctx3.moveTo(110,10);
ctx3.lineTo(110,100);
ctx3.lineTo(10,10);
ctx3.closePath();
ctx3.rect(110,10,100,90);
ctx3.rect(110,100,130,30);
ctx3.fill();
ctx3.stroke();
</script>
2)绘制圆弧:
arc(x,y,rad,startAngle,endAngle,direction)——绘制一段圆弧到(x,y),半径为rad,起始角度为 startAngle,结束角度为endAngle。可选参数direction指定了圆弧的方向;
arcTo(x1,y1,x2,y2,rad)——绘制一段半径为rad,经过(x1,y1),直到(x2,y2)的圆弧;
    <canvas id="canvas4" width="500" height="140">
        您的浏览器不支持<code>canvas</code>!
    </canvas>
<script>
//使用arcTo方法
var ctx4=document.getElementById("canvas4").getContext("2d");
var point1=[100,10];
var point2=[200,10];
var point3=[200,110];
ctx4.fillStyle="yellow";
ctx4.strokeStyle="black";
ctx4.lineWidth=4;
ctx4.beginPath();
ctx4.moveTo(point1[0],point1[1]);
ctx4.arcTo(point2[0],point2[1],point3[0],point3[1],100);
ctx4.stroke();
drawPoint(point1[0],point1[1]);
drawPoint(point2[0],point2[1]);
drawPoint(point3[0],point3[1]);
ctx4.beginPath();
ctx4.moveTo(point1[0],point1[1]);
ctx4.lineTo(point2[0],point2[1]);
ctx4.lineTo(point3[0],point3[1]);
ctx4.stroke();
function drawPoint(x,y){
ctx4.lineWidth=1;
ctx4.strokeStyle="red";
ctx4.strokeRect(x-2,y-2,4,4);
}
</script>
    <canvas id="canvas5" width="500" height="140">
        您的浏览器不支持<code>canvas</code>!
    </canvas>
<script>
//响应鼠标移动绘制圆弧
var canvasElem = document.getElementById("canvas5");
var ctx5 = canvasElem.getContext("2d");
var point1 = [100, 10];
var point2 = [200, 10];
var point3 = [200, 110];
draw();
canvasElem.onmousemove = function (e) {
if (e.ctrlKey) {
point1 = [e.clientX, e.clientY];
} else if(e.shiftKey) {
point2 = [e.clientX, e.clientY];
} else {
point3 = [e.clientX, e.clientY];
}
ctx5.clearRect(0, 0, 540, 140);
draw();
}
function draw() {
ctx5.fillStyle = "yellow";
ctx5.strokeStyle = "black";
ctx5.lineWidth = 4;
ctx5.beginPath();
ctx5.moveTo(point1[0], point1[1]);
ctx5.arcTo(point2[0], point2[1], point3[0], point3[1], 50);
ctx5.stroke();
drawPoint(point1[0], point1[1]);
drawPoint(point2[0], point2[1]);
drawPoint(point3[0], point3[1]);
ctx5.beginPath();
ctx5.moveTo(point1[0], point1[1]);
ctx5.lineTo(point2[0], point2[1]);
ctx5.lineTo(point3[0], point3[1]);
ctx5.stroke();
}
function drawPoint(x, y) {
ctx5.lineWidth = 1;
ctx5.strokeStyle = "red";
ctx5.strokeRect(x -2, y-2, 4, 4);
}
</script>
    <canvas id="canvas6" width="500" height="140">
        您的浏览器不支持<code>canvas</code>!
    </canvas>
<script>
//使用arc方法
var ctx6=document.getElementById("canvas6").getContext("2d");
ctx6.fillStyle="yellow";
ctx6.lineWidth=3;
ctx6.beginPath();
ctx6.arc(70,70,60,0,Math.PI,true);
ctx6.stroke();
ctx6.beginPath();
ctx6.arc(200,70,60,Math.PI/2,Math.PI/4,false);
ctx6.fill();
ctx6.stroke();
ctx6.beginPath();
var val=0;
for(var i=0;i<4;i++){
ctx6.arc(350,70,60,val,val+Math.PI/4,false);
val+=Math.PI/2;
}
ctx6.closePath();
ctx6.fill();
ctx6.stroke();
</script>
3)绘制贝塞尔曲线
bezierCurveTo(cx1,cy1,cx2,cy2,x,y)——绘制一段贝塞尔曲线到点(x,y),控制点为(cx1,cy1)和(cx2,cy2);
quadraticCurveTo(cx,xy,x,y)——绘制一段二次贝塞尔曲线到点(x,y),控制点为(cx,cy);
<canvas id="canvas" width="500" height="140">
Your browser doesn't support the <code>canvas</code> element
</canvas> <script>
var canvasElem = document.getElementById("canvas");
var ctx = canvasElem.getContext("2d");
var startPoint = [50, 100];
var endPoint = [400, 100];
var cp1 = [250, 50];
var cp2 = [350, 50];
canvasElem.onmousemove = function(e) {
if (e.shiftKey) {
cp1 = [e.clientX, e.clientY];
} else if (e.ctrlKey) {
cp2 = [e.clientX, e.clientY];
}
ctx.clearRect(0, 0, 500, 140);
draw();
}
draw();
function draw() {
ctx.lineWidth = 3;
ctx.strokeStyle = "black";
ctx.beginPath();
ctx.moveTo(startPoint[0], startPoint[1]);
ctx.bezierCurveTo(cp1[0], cp1[1], cp2[0], cp2[1],
endPoint[0], endPoint[1]);
ctx.stroke();
ctx.lineWidth = 1;
ctx.strokeStyle = "red";
var points = [startPoint, endPoint, cp1, cp2];
for (var i = 0; i < points.length; i++) {
drawPoint(points[i]);
}
drawLine(startPoint, cp1);
drawLine(endPoint, cp2);
}
function drawPoint(point) {
ctx.beginPath();
ctx.strokeRect(point[0] -2, point[1] -2, 4, 4);
}
function drawLine(from, to) {
ctx.beginPath();
ctx.moveTo(from[0], from[1]);
ctx.lineTo(to[0], to[1]);
ctx.stroke();
}
</script>
<canvas id="canvas" width="500" height="140">
Your browser doesn't support the <code>canvas</code> element
</canvas> <script>
//绘制二次贝塞尔曲线
var canvasElem = document.getElementById("canvas");
var ctx = canvasElem.getContext("2d");
var startPoint = [50, 100];
var endPoint = [400, 100];
var cp1 = [250, 50];
canvasElem.onmousemove = function(e) {
if (e.shiftKey) {
cp1 = [e.clientX, e.clientY];
}
ctx.clearRect(0, 0, 500, 140);
draw();
}
draw();
function draw() {
ctx.lineWidth = 3;
ctx.strokeStyle = "black";
ctx.beginPath();
ctx.moveTo(startPoint[0], startPoint[1]);
ctx.quadraticCurveTo(cp1[0], cp1[1], endPoint[0], endPoint[1]);
ctx.stroke();
ctx.lineWidth = 1;
ctx.strokeStyle = "red";
var points = [startPoint, endPoint, cp1];
for (var i = 0; i < points.length; i++) {
drawPoint(points[i]);
}
drawLine(startPoint, cp1);
drawLine(endPoint, cp1);
}
function drawPoint(point) {
ctx.beginPath();
ctx.strokeRect(point[0] -2, point[1] -2, 4, 4);
}
function drawLine(from, to) {
ctx.beginPath();
ctx.moveTo(from[0], from[1]);
ctx.lineTo(to[0], to[1]);
ctx.stroke();
}
</script>
4)创建剪辑区域
clip()——创建新的裁剪区域;
    <canvas id="canvas7" width="500" height="140">
        您的浏览器不支持<code>canvas</code>!
    </canvas>
<script>
var ctx7=document.getElementById("canvas7").getContext("2d");
ctx7.fillStyle="yellow";
ctx7.beginPath();
ctx7.rect(0,0,500,140);
ctx7.fill();
ctx7.beginPath();
ctx7.rect(100,20,300,100);
ctx7.clip();
ctx7.fillStyle="red";
ctx7.beginPath();
ctx7.rect(0,0,500,140);
ctx7.fill();
</script>
5)绘制文本:
fillText(28f128881ce1cdc57a572953e91f7d0f,x,y,width)——在位置(x,y)上绘制并填充文本。宽度参数可选,用来设置文本宽度的上限;
strokeText(28f128881ce1cdc57a572953e91f7d0f,x,y,width)——在位置(x,y)上绘制并描边文本。宽度参数可选,用来设置文本宽度的上限;
font——设置绘制文本时使用的字体;
textAlign——设置文本的对齐方式:start、end、left、right、center;
textBaseline——设置文本的基线:top、hanging、middle、alphabetic、ideographic、bottom;
6)使用特效和转换:
6.1)使用阴影:
shadowBlur——设置阴影的模糊程度;
shadowColor——设置阴影的颜色;
shadowOffsetX——设置阴影的水平偏移量;
shadowOffsetY——设置阴影的垂直偏移量;
   <canvas id="canvas8" width="500" height="140">
        您的浏览器不支持<code>canvas</code>!
    </canvas>
<script>
//给图形和文本应用阴影
var ctx8=document.getElementById("canvas8").getContext("2d");
ctx8.fillStyle="lightgrey";
ctx8.strokeStyle="black";
ctx8.lineWidth=3;
ctx8.shadowOffsetX=5;
ctx8.shadowOffsetY=5;
ctx8.shadowBlur=5;
ctx8.shadowColor="grey";
ctx8.beginPath();
ctx8.arc(420,70,50,0,Math.PI,true);
ctx8.stroke();
ctx8.beginPath();
ctx8.arc(420,80,40,0,Math.PI,false);
ctx8.fill();
ctx8.font="100px sans-serif";
ctx8.fillText("hello",50,100);
ctx8.strokeText("hello",50,100);
</script>
6.2)使用透明度:
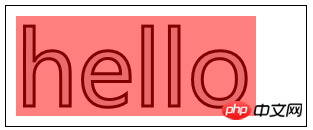
globalAlpha——给文本和图形设置透明度(从0到1);
    <canvas id="canvas9" width="300" height="120">
        您的浏览器不支持<code>canvas</code>!
    </canvas>
<script>
//使用globalAlpha属性,设置透明度
var ctx9=document.getElementById("canvas9").getContext("2d");
ctx9.fillStyle="lightgrey";
ctx9.strokeStyle="black";
ctx9.lineWidth=3;
ctx9.font="100px sans-serif";
ctx9.fillText("hello",10,100);
ctx9.strokeText("hello",10,100);
ctx9.fillStyle="red";
ctx9.globalAlpha=0.5;
ctx9.fillRect(10,10,240,100);
</script>
6.3)使用合成:
globalCompositeOperation——与透明度属性结合使用,来控制图形和文本在画布上绘制的方式;
globalCompositeOperation允许的值:
=copy——将来源绘制于目标之上,忽略一切透明度设置;
=source-atop——在两个图像都不透明处显示来源图像,
目标图像不透明但来源图像透明处显示目标图像,其它位置显示为透明;
=source-in——来源图像和目标图像都不透明处显示来源图像。其它位置显示为透明;
=source-out——来源图像不透明但目标图像透明处显示来源图像。其它位置显示为透明;
=source-over——来源图像不透明处显示来源图像。其它位置显示目标图像;
=destination-atop——与source-atop相同,但用目标图像替代来源图像,反之亦然;
=destination-in——与source-in相同,但用目标图像替代来源图像,反之亦然;
=destination-over——与source-over相同,但用目标图像替代来源图像,反之亦然;
=destination-out——与source-out相同,但用目标图像替代来源图像,反之亦然;
=lighter——显示来源图像与目标图像的总和,颜色值限制最高255(100%);
=xor——对来源图像和目标图像执行异或运算;
    <canvas id="canvas10" width="300" height="120">
        您的浏览器不支持<code>canvas</code>!
    </canvas>
    <label>Comosition Value:</label>
    <select id="list">
        <option>copy</option>
        <option>destination-atop</option>
        <option>destination-in</option>
        <option>destination-over</option>
        <option>destination-out</option>
        <option>lighter</option>
        <option>source-atop</option>
        <option>source-in</option>
        <option>source-out</option>
        <option>source-over</option>
        <option>xor</option>
    </select>
<script>
//使用globalCompositeOperation属性
var ctx10=document.getElementById("canvas10").getContext("2d");
ctx10.fillStyle="lightgrey";
ctx10.strokeStyle="black";
ctx10.lineWidth=3;
var compVal="copy";
document.getElementById("list").onchange=function(e){
compVal= e.target.value;
draw();
}
draw();
function draw(){
ctx10.clearRect(0,0,300,120);
ctx10.globalAlpha=1.0;
ctx10.font="100px sans-serif";
ctx10.fillText("hello",10,100);
ctx10.strokeText("hello",10,100);
ctx10.globalCompositeOperation=compVal;
ctx10.fillStyle="red";
ctx10.globalAlpha=0.5;
ctx10.fillRect(100,10,150,100);
}
</script>
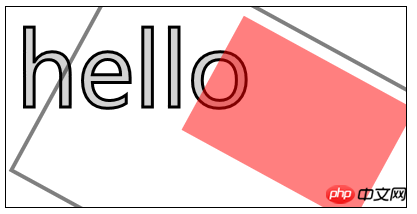
6.4)使用变换:
scale(bb479ad834d672760e0ec214639fcaef,182fef142790640cd129550a3ae82cf2)——沿X轴缩放画布xScale倍,沿Y轴yScale倍;
rotate(0c0cb308ee3d2ee3281772bfc9b806c2)——使画布围绕点(0,0)顺时针旋转指定的弧度数;
translate(5b9dd43a32a43128ec18aa4963aab5c6,4dd001c2c15310e89980bff65765bfc2)——重映射画布坐标为沿X轴x,沿Y轴y;
transform(a,b,c,d,e,f)——合并现有的变换和a-f值所指定的矩阵;
setTansform(a,b,c,d,e,f)——用a-f值所指定的矩阵替换现有的变换;
    <canvas id="canvas11" width="400" height="200">
        您的浏览器不支持<code>canvas</code>!
    </canvas>
<script>
//使用变换
var ctx11=document.getElementById("canvas11").getContext("2d");
ctx11.fillStyle="lightgrey";
ctx11.strokeStyle="black";
ctx11.lineWidth=3;
ctx11.clearRect(0,0,300,120);
ctx11.globalAlpha=1.0;
ctx11.font="100px sans-serif";
ctx11.fillText("hello",10,100);
ctx11.strokeText("hello",10,100);
ctx11.scale(1.3,1.3);
ctx11.translate(100,-50);
ctx11.rotate(0.5);
ctx11.fillStyle="red";
ctx11.globalAlpha=0.5;
ctx11.fillRect(100,10,150,100);
ctx11.strokeRect(0,0,300,200);
</script>
以上是html5之canvas进阶的代码详解(图)的详细内容。更多信息请关注PHP中文网其他相关文章!
 H5代码示例:实际应用和教程Apr 25, 2025 am 12:10 AM
H5提供了多种新特性和功能,极大地增强了前端开发的能力。1.多媒体支持:通过和元素嵌入媒体,无需插件。2.画布(Canvas):使用元素动态渲染2D图形和动画。3.本地存储:通过localStorage和sessionStorage实现数据持久化存储,提升用户体验。
 H5和HTML5之间的连接:相似性和差异Apr 24, 2025 am 12:01 AM
H5和HTML5是不同的概念:HTML5是HTML的一个版本,包含新元素和API;H5是基于HTML5的移动应用开发框架。HTML5通过浏览器解析和渲染代码,H5应用则需要容器运行并通过JavaScript与原生代码交互。
 H5代码的基础:密钥元素及其目的Apr 23, 2025 am 12:09 AM
HTML5的关键元素包括、、、、、等,用于构建现代网页。1.定义头部内容,2.用于导航链接,3.表示独立文章内容,4.组织页面内容,5.展示侧边栏内容,6.定义页脚,这些元素增强了网页的结构和功能性。
 HTML5和H5:了解常见用法Apr 22, 2025 am 12:01 AM
HTML5和H5没有区别,H5是HTML5的简称。1.HTML5是HTML的第五个版本,增强了网页的多媒体和交互功能。2.H5常用于指代基于HTML5的移动网页或应用,适用于各种移动设备。
 HTML5:现代网络的基础(H5)Apr 21, 2025 am 12:05 AM
HTML5是超文本标记语言的最新版本,由W3C标准化。HTML5引入了新的语义化标签、多媒体支持和表单增强,提升了网页结构、用户体验和SEO效果。HTML5引入了新的语义化标签,如、、、等,使网页结构更清晰,SEO效果更好。HTML5支持多媒体元素和,无需第三方插件,提升了用户体验和加载速度。HTML5增强了表单功能,引入了新的输入类型如、等,提高了用户体验和表单验证效率。
 H5代码:编写清洁有效的HTML5Apr 20, 2025 am 12:06 AM
如何写出干净高效的HTML5代码?答案是通过语义化标签、结构化代码、性能优化和避免常见错误。1.使用语义化标签如、等,提升代码可读性和SEO效果。2.保持代码结构化和可读性,使用适当缩进和注释。3.优化性能,通过减少不必要的标签、使用CDN和压缩代码。4.避免常见错误,如标签未闭合,确保代码有效性。
 H5:如何增强网络上的用户体验Apr 19, 2025 am 12:08 AM
H5通过多媒体支持、离线存储和性能优化提升网页用户体验。1)多媒体支持:H5的和元素简化开发,提升用户体验。2)离线存储:WebStorage和IndexedDB允许离线使用,提升体验。3)性能优化:WebWorkers和元素优化性能,减少带宽消耗。
 解构H5代码:标签,元素和属性Apr 18, 2025 am 12:06 AM
HTML5代码由标签、元素和属性组成:1.标签定义内容类型,用尖括号包围,如。2.元素由开始标签、内容和结束标签组成,如内容。3.属性在开始标签中定义键值对,增强功能,如。这些是构建网页结构的基本单位。


热AI工具

Undresser.AI Undress
人工智能驱动的应用程序,用于创建逼真的裸体照片

AI Clothes Remover
用于从照片中去除衣服的在线人工智能工具。

Undress AI Tool
免费脱衣服图片

Clothoff.io
AI脱衣机

Video Face Swap
使用我们完全免费的人工智能换脸工具轻松在任何视频中换脸!

热门文章

热工具

PhpStorm Mac 版本
最新(2018.2.1 )专业的PHP集成开发工具

Atom编辑器mac版下载
最流行的的开源编辑器

WebStorm Mac版
好用的JavaScript开发工具

SecLists
SecLists是最终安全测试人员的伙伴。它是一个包含各种类型列表的集合,这些列表在安全评估过程中经常使用,都在一个地方。SecLists通过方便地提供安全测试人员可能需要的所有列表,帮助提高安全测试的效率和生产力。列表类型包括用户名、密码、URL、模糊测试有效载荷、敏感数据模式、Web shell等等。测试人员只需将此存储库拉到新的测试机上,他就可以访问到所需的每种类型的列表。

EditPlus 中文破解版
体积小,语法高亮,不支持代码提示功能


