微信小程序-swiper组件详解实例
- 高洛峰原创
- 2017-03-11 14:20:432552浏览
这篇文章主要介绍了微信小程序 swiper组件详解及实例代码的相关资料,需要的朋友可以参考下
微信小程序 swiper组件
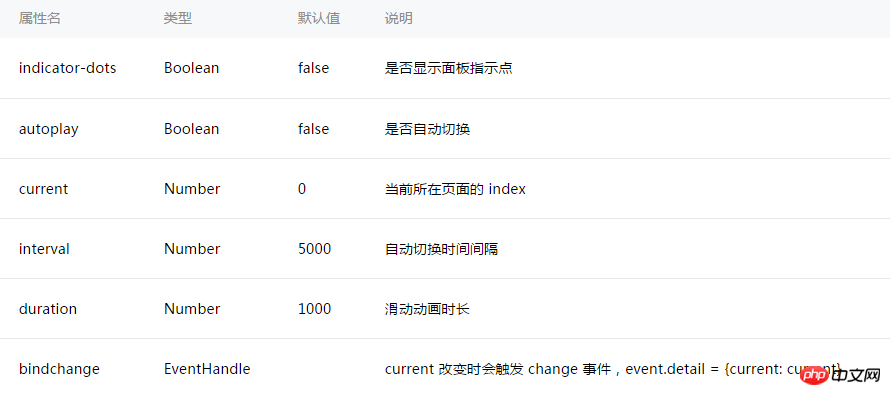
常用属性:

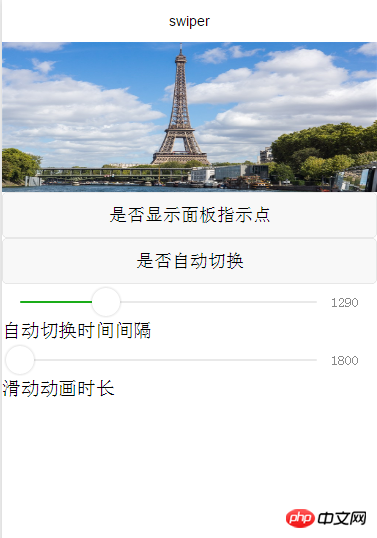
效果图:

swiper.wxml添加代码:
<swiper indicator-dots="{{indicatorDots}}"
 autoplay="{{autoplay}}" interval="{{interval}}" duration="{{duration}} " bindchange="bindchangeTag">
 <block wx:for="{{imgUrls}}">
  <swiper-item>
   <image src="{{item}}" class="slide-image"/>
  </swiper-item>
 </block>
</swiper>
<button bindtap="changeIndicatorDots"> 是否显示面板指示点 </button>
<button bindtap="changeAutoplay"> 是否自动切换 </button>
<slider bindchange="intervalChange" show-value min="1000" max="2000"/> 自动切换时间间隔
<slider bindchange="durationChange" show-value min="1800" max="10000"/> 滑动动画时长
js:
Page({
 data: {
  imgUrls: [
   'http://img02.tooopen.com/images/20150928/tooopen_sy_143912755726.jpg',
   'http://img06.tooopen.com/images/20160818/tooopen_sy_175866434296.jpg',
   'http://img06.tooopen.com/images/20160818/tooopen_sy_175833047715.jpg'
  ],
  indicatorDots: false,
  autoplay: false,
  interval: 1000,
  duration: 1800
 },
 //是否显示面板指示点
 changeIndicatorDots: function(e) {
  this.setData({
   indicatorDots: !this.data.indicatorDots
  })
 },
 //是否自动切换
 changeAutoplay: function(e) {
  this.setData({
   autoplay: !this.data.autoplay
  })
 },
 //自动切换时间间隔
 intervalChange: function(e) {
  this.setData({
   // e.detail.value获取slider的值
   interval: e.detail.value
  })
 },
 //滑动动画时长
 durationChange: function(e) {
  this.setData({
   duration: e.detail.value
  })
 },
 //当页面改变是会触发
 bindchangeTag:function(e){
  console.log("bindchangeTag...")
 },
 onLoad:function(options){
  // 页面初始化 options为页面跳转所带来的参数
 },
 onReady:function(){
  // 页面渲染完成
 },
 onShow:function(){
  // 页面显示
 },
 onHide:function(){
  // 页面隐藏
 },
 onUnload:function(){
  // 页面关闭
 }
})
css:
.slide-image{
  width: 100%;
  height: 160px;
}
感谢阅读,希望能帮助到大家,谢谢大家对本站的支持!
以上是微信小程序-swiper组件详解实例的详细内容。更多信息请关注PHP中文网其他相关文章!
声明:
本文内容由网友自发贡献,版权归原作者所有,本站不承担相应法律责任。如您发现有涉嫌抄袭侵权的内容,请联系admin@php.cn

