GUI之 事件处理基础
- 高洛峰原创
- 2016-10-20 10:38:181796浏览
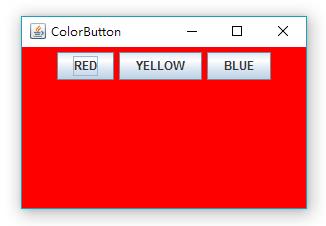
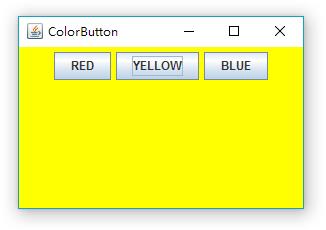
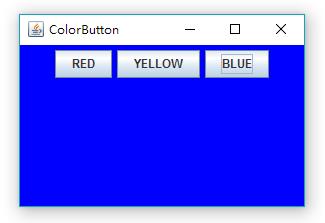
事件处理可以简单地这么理解,当有一个事件产生,程序要根据这个事件做出响应。比如,我们做了一个可以通过按钮改变背景颜色的窗口,当我们点击按钮时便产生了一个事件,程序会根据这个事件来做出响应,也就是去改变背景的颜色。
那么程序是怎样做出响应的呢?这就需要事件监听器ActionListener,这是一个接口,里面包含了actionPerformed方法(也就是根据事件去执行的操作),所以我们要实现这个接口(实现接口里的actionPerformed方法)做出一个监听器对象出来,并且用按钮来注册这个监听器对象,这样当按钮被点击的时候,就会调用这个监听器来执行响应了。


运行结果
代码(第42行开始为实现接口):
package buttonPanel;

import java.awt.*;
import java.awt.event.*; //事件监听器接口ActionListener的位置。
import javax.swing.*;

public class ButtonFrame extends JFrame {
    private ButtonPanel buttonPanel;
    private static final int DEFAULT_WIDTH = 300;
    private static final int DEFAULT_HEIGHT = 200;

    public ButtonFrame() {
        setSize(DEFAULT_WIDTH,DEFAULT_HEIGHT);
        setLocationByPlatform(true);

        //构造按钮
        JButton redButton = new JButton("RED");
        JButton yellowButton = new JButton("YELLOW");
        JButton blueButton = new JButton("BLUE");

        buttonPanel = new ButtonPanel();

        //添加按钮到面板
        buttonPanel.add(redButton);
        buttonPanel.add(yellowButton);
        buttonPanel.add(blueButton);

        add(buttonPanel);

        //构造对应颜色的动作监听器
        ColorAction redAction = new ColorAction(Color.red);
        ColorAction yellowAction = new ColorAction(Color.yellow);
        ColorAction blueAction = new ColorAction(Color.blue);

        //每个按钮注册对应的监听器
        redButton.addActionListener(redAction);
        yellowButton.addActionListener(yellowAction);
        blueButton.addActionListener(blueAction);
    }

    //为了方便调用buttonPanel,将ColorAction作为ButtonFrame的内部类。
    private class ColorAction implements ActionListener {
        private Color backgroundColor;
        public ColorAction(Color c) {
            backgroundColor = c;
        }
        public void actionPerformed(ActionEvent event) {
            buttonPanel.setBackground(backgroundColor);
        }
    }

    public static void main(String[] args) {
        EventQueue.invokeLater(new Runnable() {
            public void run() {
                JFrame frame = new ButtonFrame();
                frame.setTitle("ColorButton");
                frame.setDefaultCloseOperation(EXIT_ON_CLOSE);
                frame.setVisible(true);
            }
        });
    }
}

class ButtonPanel extends JPanel {
    private static final int DEFAUT_WIDTH = 300;
    private static final int DEFAUT_HEIGHT = 200;

    @Override
    protected void paintComponent(Graphics g) {
        g.create();
        super.paintComponent(g);
    }

    @Override
    public Dimension getPreferredSize() {
        return new Dimension(DEFAUT_WIDTH,DEFAUT_HEIGHT);
    }
}
在上述代码中,为了方便监听器调用buttonPanel,将ColorAction作为ButtonFrame的内部类。如果将ColorAction类独立出去,需要将buttonPanel传递到ColorAction,实现如下:
package buttonPanel2;

import java.awt.*;
import java.awt.event.*;
import javax.swing.*;

public class ButtonFrame2 extends JFrame {
    private ButtonPanel buttonPanel;
    private static final int DEFAULT_WIDTH = 300;
    private static final int DEFAULT_HEIGHT = 200;

    public ButtonFrame2() {
        setSize(DEFAULT_WIDTH,DEFAULT_HEIGHT);
        setLocationByPlatform(true);

        JButton redButton = new JButton("RED");
        JButton yellowButton = new JButton("YELLOW");
        JButton blueButton = new JButton("BLUE");

        buttonPanel = new ButtonPanel();

        buttonPanel.add(redButton);
        buttonPanel.add(yellowButton);
        buttonPanel.add(blueButton);

        add(buttonPanel);

        //将此对象通过this传到ColorAction的构造器。
        ColorAction redAction = new ColorAction(this,Color.red);
        ColorAction yellowAction = new ColorAction(this,Color.yellow);
        ColorAction blueAction = new ColorAction(this,Color.blue);

        redButton.addActionListener(redAction);
        yellowButton.addActionListener(yellowAction);
        blueButton.addActionListener(blueAction);
    }

    public void setButtonPanelsBackground(Color backgroundColor) {
        buttonPanel.setBackground(backgroundColor);
    }

    public static void main(String[] args) {
        EventQueue.invokeLater(new Runnable() {
            public void run() {
                JFrame frame = new ButtonFrame2();
                frame.setTitle("ColorButton");
                frame.setDefaultCloseOperation(EXIT_ON_CLOSE);
                frame.setVisible(true);
            }
        });
    }
}

class ColorAction implements ActionListener {
    private ButtonFrame2 buttonFrame;
    private Color backgroundColor;

    //通过构造器的方法把ButtonFrame2对象传过来,这个对象包含了成员变量buttonPanel,以便对其更换背景色。
    public ColorAction(ButtonFrame2 buttonFrame,Color c) {
        this.buttonFrame = buttonFrame; //this.buttonFrame只是对象管理者,管理的还是ButtonFrame的对象frame。
        backgroundColor = c;
    }
    public void actionPerformed(ActionEvent event) {
        buttonFrame.setButtonPanelsBackground(backgroundColor);
        //这是我们在ButtonFrame2中添加的新方法。
    }
}

class ButtonPanel extends JPanel {
    private static final int DEFAUT_WIDTH = 300;
    private static final int DEFAUT_HEIGHT = 200;

    public ButtonPanel() {
        setBackground(Color.pink);
    }

    @Override
    protected void paintComponent(Graphics g) {
        g.create();
        super.paintComponent(g);
    }

    @Override
    public Dimension getPreferredSize() {
        return new Dimension(DEFAUT_WIDTH,DEFAUT_HEIGHT);
    }
}

ButtonFrame2
代码存在一个缺陷,就是在构造按钮、添加按钮到面板、构造相应颜色的监听器和注册监听器的时候有代码复制的情况,为了避免代码复制,我们可以创建一个makeButton方法,把这些重复的操作包含在内,实现如下:
package buttonPanel3;

import java.awt.*;
import java.awt.event.*;
import javax.swing.*;

public class ButtonFrame3 extends JFrame {
    private ButtonPanel buttonPanel;
    private static final int DEFAULT_WIDTH = 300;
    private static final int DEFAULT_HEIGHT = 200;

    public ButtonFrame3() {
        setSize(DEFAULT_WIDTH,DEFAULT_HEIGHT);
        setLocationByPlatform(true);

        buttonPanel = new ButtonPanel();
        add(buttonPanel);

        makeButton("RED",Color.red);
        makeButton("YELLOW",Color.yellow);
        makeButton("BLUE",Color.blue);
    }

    //为了避免代码重复,我们将重复的操作放在这个函数里。
    public void makeButton(String name,final Color bg) {
        JButton button = new JButton(name);
        buttonPanel.add(button);
        button.addActionListener(new ActionListener() { //可以new一个接口出来,但是后面必须接花括号实现内部方法。
            public void actionPerformed(ActionEvent event) {
                buttonPanel.setBackground(bg);
            }
        });
    }

    public static void main(String[] args) {
        EventQueue.invokeLater(new Runnable() {
            public void run() {
                JFrame frame = new ButtonFrame3();
                frame.setTitle("ColorButton");
                frame.setDefaultCloseOperation(EXIT_ON_CLOSE);
                frame.setVisible(true);
            }
        });
    }
}

class ButtonPanel extends JPanel {
    private static final int DEFAUT_WIDTH = 300;
    private static final int DEFAUT_HEIGHT = 200;

    @Override
    protected void paintComponent(Graphics g) {
        g.create();
        super.paintComponent(g);
    }

    @Override
    public Dimension getPreferredSize() {
        return new Dimension(DEFAUT_WIDTH,DEFAUT_HEIGHT);
    }
}

ButtonFrame3
在代码中,监听器只被调用了一次,也就是在addActionListener()时。所以我们没有必要为监听器单独做一个类出来,而是只需在用到监听器时直接new一个ActionListener接口出来,并在花括号里实现接口方法即可。
声明:
本文内容由网友自发贡献,版权归原作者所有,本站不承担相应法律责任。如您发现有涉嫌抄袭侵权的内容,请联系admin@php.cn
上一篇:JAVA中的for-each循环与迭代下一篇:Java内存以及GC

