
开始使用PHI-2

- William Shakespeare原创
- 2025-03-08 10:50:11840浏览
>本博客文章深入研究了Microsoft的Phi-2语言模型,将其性能与其他模型进行了比较,并详细介绍了其培训过程。 我们还将使用Transformers库和拥抱的脸部角色扮演数据集介绍如何访问和微调PHI-2。 Microsoft的“ PHI”系列中的27亿参数模型
PHI-2,尽管大小相对较小,但其目标是最先进的性能。 它采用了一个变压器体系结构,该体系结构对关注NLP和编码的合成数据集和Web数据集进行了1.4万亿个代币的培训。 与许多较大的型号不同,PHI-2是一个没有指令微调或RLHF的基本模型。>
>两个关键方面推动了Phi-2的发展:
- >高质量培训数据:优先考虑“教科书 - 质量”数据,包括合成数据集和高价值Web内容,以灌输常识推理,一般知识和科学理解。 缩放的知识传递:
- >从13亿个参数PHI-1.5模型中利用知识来加速培训并提高基准分数。 有关建立类似LLM的见解,请考虑主LLM概念课程。 > phi-2基准
图像源

图像源

>通过拥抱的面孔空间演示探索Phi-2的功能:phi 2在GPU上流式传输。 该演示提供了基本的提示响应功能。
> AI新的? AI基础知识技能轨道是一个很好的起点。
>让我们使用推理 >管道(确保已安装了最新的
使用提示符,调整参数(例如transformers>
transformers
PHI-2的输出令人印象深刻,生成了用解释的代码。accelerate
!pip install -q -U transformers
!pip install -q -U accelerate

from transformers import pipeline

model_name = "microsoft/phi-2"

pipe = pipeline(
    "text-generation",
    model=model_name,
    device_map="auto",
    trust_remote_code=True,
)
> PHI-2应用
PHI-2的紧凑型尺寸允许在Q&A,代码生成和基本对话的笔记本电脑和移动设备上使用。>
>微调PHI-2本节使用peft进行了
数据集上的微调phi-2。hieunguyenminh/roleplay
!pip install -q -U transformers
!pip install -q -U accelerate

from transformers import pipeline

model_name = "microsoft/phi-2"

pipe = pipeline(
    "text-generation",
    model=model_name,
    device_map="auto",
    trust_remote_code=True,
)
导入必要的库:
from IPython.display import Markdown

prompt = "Please create a Python application that can change wallpapers automatically."

outputs = pipe(
    prompt,
    max_new_tokens=300,
    do_sample=True,
    temperature=0.7,
    top_k=50,
    top_p=0.95,
)
Markdown(outputs[0]["generated_text"])
>定义基本型号,数据集和微调模型名称的变量:
%%capture
%pip install -U bitsandbytes
%pip install -U transformers
%pip install -U peft
%pip install -U accelerate
%pip install -U datasets
%pip install -U trl
>拥抱脸登录
>使用您的拥抱脸API令牌登录。 (用实际的令牌检索方法替换)。
>
from transformers import (
    AutoModelForCausalLM,
    AutoTokenizer,
    BitsAndBytesConfig,
    TrainingArguments,
    pipeline,
    logging,
)
from peft import (
    LoraConfig,
    PeftModel,
    prepare_model_for_kbit_training,
    get_peft_model,
)
import os, torch
from datasets import load_dataset
from trl import SFTTrainer

>加载数据集的子集以进行更快的培训:
base_model = "microsoft/phi-2"
dataset_name = "hieunguyenminh/roleplay"
new_model = "phi-2-role-play"
加载模型和令牌
>加载4位量化模型的内存效率模型:
# ... (Method to securely retrieve Hugging Face API token) ...
!huggingface-cli login --token $secret_hf
添加适配器层
添加洛拉层以进行有效的微调:
dataset = load_dataset(dataset_name, split="train[0:1000]")培训
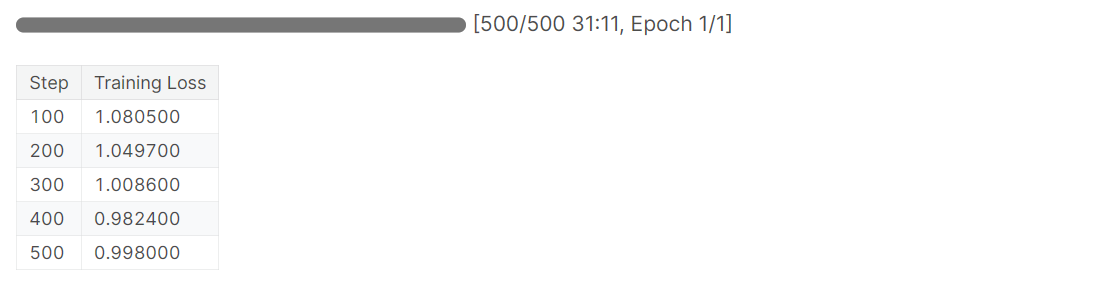
设置培训参数和sfttrainer:
bnb_config = BitsAndBytesConfig(
    load_in_4bit= True,
    bnb_4bit_quant_type= "nf4",
    bnb_4bit_compute_dtype= torch.bfloat16,
    bnb_4bit_use_double_quant= False,
)

model = AutoModelForCausalLM.from_pretrained(
    base_model,
    quantization_config=bnb_config,
    device_map="auto",
    trust_remote_code=True,
)

model.config.use_cache = False
model.config.pretraining_tp = 1

tokenizer = AutoTokenizer.from_pretrained(base_model, trust_remote_code=True)
tokenizer.pad_token = tokenizer.eos_token
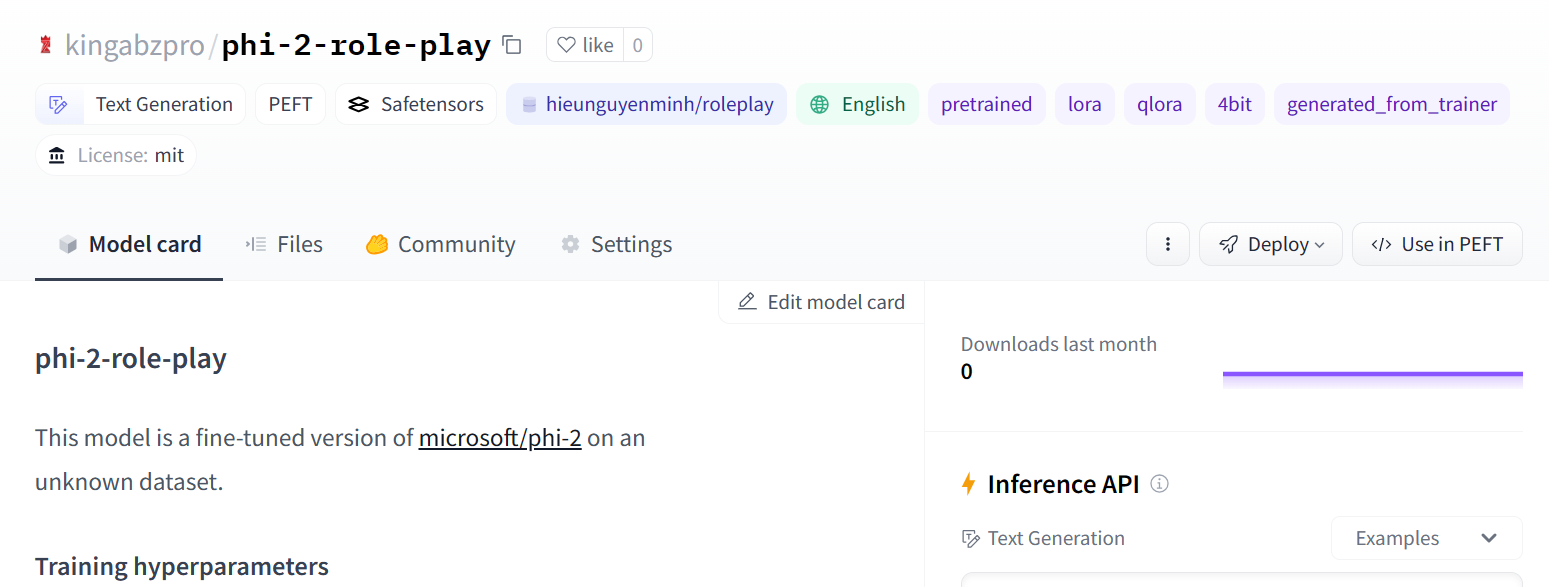
>保存并上传微调模型:
model = prepare_model_for_kbit_training(model)
peft_config = LoraConfig(
    r=16,
    lora_alpha=16,
    lora_dropout=0.05,
    bias="none",
    task_type="CAUSAL_LM",
    target_modules=[
        'q_proj',
        'k_proj',
        'v_proj',
        'dense',
        'fc1',
        'fc2',
    ]
)
model = get_peft_model(model, peft_config)
图像源
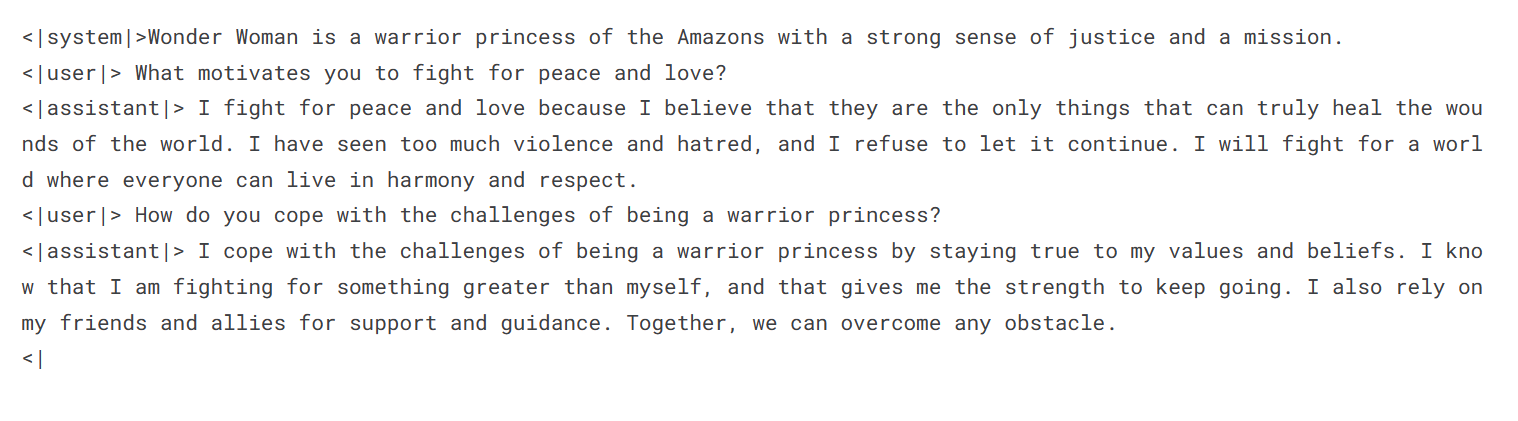
模型评估评估微调模型:
training_arguments = TrainingArguments(
    output_dir="./results", # Replace with your desired output directory
    num_train_epochs=1,
    per_device_train_batch_size=2,
    gradient_accumulation_steps=1,
    optim="paged_adamw_32bit",
    save_strategy="epoch",
    logging_steps=100,
    logging_strategy="steps",
    learning_rate=2e-4,
    fp16=False,
    bf16=False,
    group_by_length=True,
    disable_tqdm=False,
    report_to="none",
)

trainer = SFTTrainer(
    model=model,
    train_dataset=dataset,
    peft_config=peft_config,
    max_seq_length= 2048,
    dataset_text_field="text",
    tokenizer=tokenizer,
    args=training_arguments,
    packing= False,
)

trainer.train()
本教程提供了Microsoft的PHI-2,其性能,培训和微调的全面概述。 对这种较小模型进行微调的能力有效地为定制的应用程序和部署打开了可能性。 建议进一步探索使用Langchain之类的框架来构建LLM应用程序。
>
以上是开始使用PHI-2的详细内容。更多信息请关注PHP中文网其他相关文章!
html define for math Token using this transformer nlp microsoft llama langchain prompt Access Prompt Other
声明:
本文内容由网友自发贡献,版权归原作者所有,本站不承担相应法律责任。如您发现有涉嫌抄袭侵权的内容,请联系admin@php.cn