


Method 1: Disable USB Ports Using Device Manager
Device Manager is a handy utility that lets you manage all the hardware devices connected to your system. Here’s how you can use it to disable specific USB ports on your Windows 10 or 11 computer:
Step 1: Right-click on the Start icon and select Device Manager from the list.

Step 2: Double-click Universal Serial Bus controllers to expand it. Right-click the USB port you want to turn off and select Disable device.

You can repeat the above steps to disable other USB ports on your PC. Later, if you want to re-enable a USB port, right-click on it and select Enable device.
Method 2: Disable USB Ports With Registry Editor
Another way to disable USB ports on Windows is through the Registry Editor. However, since registry files contain crucial configurations for Windows and its apps, it’s important to exercise caution while making changes.
Step 1: Click the search icon on the taskbar, type in registry editor, and select Run as administrator.

Step 2: Paste the following path in the address bar at the top and press Enter.
HKEY_LOCAL_MACHINE\System\CurrentControlSet\Services\USBSTOR
Step 3: Double-click the Start DWORD, type 4 in the Value data field, and click OK.

Restart your PC after this, and your USB ports will be disabled. If you wish to re-enable the USB ports later, repeat the steps outlined above and set the value data of the Start DWORD to 3.
Method 3: Disable USB Ports With Group Policy Editor
Those using the Professional, Education, or Enterprise editions of Windows can disable a PC’s USB ports via the Local Group Policy Editor, too. Here are the steps for the same.
Step 1: Press the Windows + R keyboard shortcut to open the Run dialog box. Type gpedit.msc in the text box and press OK.
Step 2: Use the left pane to navigate to the following folder:
Computer Configuration\Administrative Templates\System\Removable Storage Access
Step 3: Double-click the All Removable Storage classes: Deny all access policy on your right.

Step 4: Select the Enabled option and hit Apply, followed by OK.

Step 5: Similarly, enable the Removable Disks: Deny execute access, Removable Disks: Deny read access, and Removable Disks: Deny write access policies.

Once you complete the above steps, the USB ports on your computer will stop working. You can get them working again by setting the above-mentioned policies to Not Configured or Disabled.
Method 4: Disable USB Ports via the Command Prompt
You can also run a command to quickly disable USB ports on a PC. Here’s how:
Step 1: Right-click on the Start icon and select Terminal (Admin) from the list.

Step 2: Type the following command in the console and press Enter.
reg add HKLM\System\CurrentControlSet\Services\cdrom /t REG_DWORD /v "Start" /d 4 /f

To re-enable the USB ports later, you can use the following command:
reg add HKLM\System\CurrentControlSet\Services\cdrom /t REG_DWORD /v "Start" /d 1 /f
以上是4 Ways to Disable USB Ports on Windows的详细内容。更多信息请关注PHP中文网其他相关文章!

 Microsoft用新的表面笔记本电脑挑战MacBook AirMay 08, 2025 am 03:02 AM
微软的最新表面笔记本电脑旨在与MacBook Air竞争,但有一些值得注意的折衷方案。 没有表面连接端口与以前的型号有很大的不同,这反映了Thunderbolt和USB的越来越多
 解决eclipse中svn插件总是提示输入密码的问题May 07, 2025 pm 05:03 PM
一、背景最近在eclipse中使用svn插件进行远程仓库代码管理时,老是出现提示让输入密码,特别烦人,经过努力,终于解决该问题,拿来和大家分享~二、svn插件密码机制以及出现问题的原因分析当我们第一次使用svn插件并输入密码时,会生成一个保存密码的文件,然后每次svn插件默认去读取用户名和密码信息。启动eclipse时,会自动将配置信息读取到程序缓存中。svn的密码修改以后,无法再次登录,也没有提示重新输入密码。这时,我们可以通过删除相关配置文件的方式让svn插件提示我们重新输入密码。但是,ec
 win8系统还原怎么操作 win8系统还原详细步骤May 07, 2025 pm 05:00 PM
在Windows8中启动系统还原的步骤是:1.按下Windows键 X,打开快捷菜单;2.选择“控制面板”,进入“系统和安全”,点击“系统”;3.选择“系统保护”,点击“系统还原”;4.输入管理员密码并选择还原点。选择合适的还原点时,建议选择问题出现之前的还原点,或记得系统运行良好的特定日期。系统还原过程中,如遇到“无法完成系统还原”,可尝试其他还原点或使用“sfc/scannow”命令修复系统文件。还原后,需检查系统运行情况,重新安装或配置软件,并重新备份数据,定期创建新还原点。
 《现代操作系统 原书第3版》May 07, 2025 pm 04:57 PM
《现代操作系统(英文版第3版)》是一部由Tanenbaum教授编写的经典之作,凭借其在三个操作系统设计中的深厚经验,书中将理论与实践完美融合。该书第3版深入探讨了多项主题,如进程、线程、存储管理、文件系统、I/O死锁、接口设计、多媒体、性能权衡,并介绍了操作系统设计的最新趋势。书中不仅详细讲解了现代操作系统的原理与实践,还特别关注了Linux操作系统、WindowsVista操作系统、嵌入式操作系统、实时操作系统以及多媒体操作系统。涵盖了WindowsVista以及最新的Linux/Unix操作
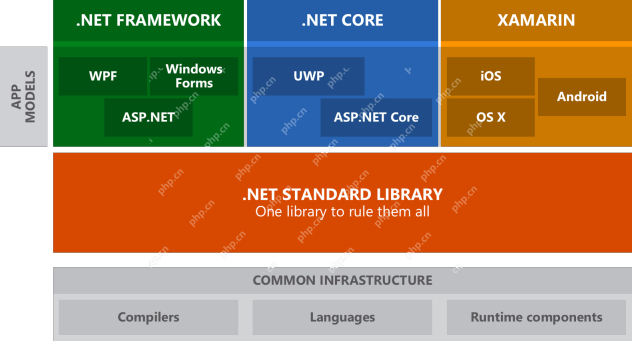 .NET Core快速入门教程 1、开篇:说说.NET Core的那些事儿May 07, 2025 pm 04:54 PM
一、.NETCore的起源谈到.NETCore,就不能不提它的前身.NET。当年Java风头正盛,微软也对Java青睐有加,Windows平台上的Java虚拟机就是微软依据JVM标准开发的,据称是当时性能最佳的Java虚拟机。然而,微软有自己的小算盘,试图将Java与Windows平台捆绑,增加一些Windows特有的功能。Sun公司对此不满,导致双方关系破裂,微软随后推出了.NET。.NET从诞生之初就借鉴了Java的许多特性,并在语言特性和窗体开发等方面逐渐超越了Java。Java在1.6版
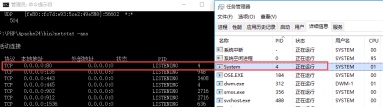 解决Windows10下80端口被PID为4的System占用的问题May 07, 2025 pm 04:51 PM
一、背景近期出于好奇心,我更新了Windows10系统,操作起来非常顺手,体验也相当不错。然而,在IDEA中进行开发时,使用80端口启动项目时却发现端口已经被占用。经过一番尝试,我找到了解决方案,现分享给大家。二、解决步骤1.通过执行netstat-ano|findstr"80"命令,查看占用80端口的进程号PID。2.由于80端口被系统服务占用,无法直接终止进程,因此使用netshhttpshowservicestate命令查看当前的HTTP服务状态,结果如图所示:从图中可
 为Web开发者准备的10个最新工具May 07, 2025 pm 04:48 PM
Web开发设计是一个充满潜力的职业领域。然而,这个行业也面临着诸多挑战。随着越来越多的企业和品牌转向网络市场,Web开发者有机会展示他们的技能并在职业生涯中取得成功。然而,随着对Web开发需求的持续增长,开发人员的数量也在增加,导致竞争日益激烈。但令人振奋的是,如果你具备天赋和意愿,你总能找到新方法来创造独特的设计和创意。作为一名Web开发人员,你可能需要不断寻找新的工具和资源。这些新工具和资源不仅能让你的工作更加便捷,还能提升工作质量,从而帮助你赢得更多的业务和客户。Web开发的趋势不断变化,
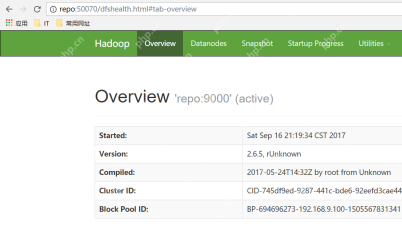 Hadoop伪分布式集群搭建May 07, 2025 pm 04:45 PM
软件准备我使用的是CentOS-6.6的虚拟机,主机名为repo。参考在Windows中安装Linux虚拟机的步骤,我在该虚拟机中安装了JDK,参考在Linux中安装JDK的指南。此外,该虚拟机配置了免秘钥登录自身,参考配置各台虚拟机之间免秘钥登录的设置。Hadoop安装包的下载地址为:https://mirrors.aliyun.com/apache/hadoop/common/,我使用的是hadoop2.6.5版本。将Hadoop安装包上传到服务器并解压[root@repo~]#tarzxv


热AI工具

Undresser.AI Undress
人工智能驱动的应用程序,用于创建逼真的裸体照片

AI Clothes Remover
用于从照片中去除衣服的在线人工智能工具。

Undress AI Tool
免费脱衣服图片

Clothoff.io
AI脱衣机

Video Face Swap
使用我们完全免费的人工智能换脸工具轻松在任何视频中换脸!

热门文章
热工具

SecLists
SecLists是最终安全测试人员的伙伴。它是一个包含各种类型列表的集合,这些列表在安全评估过程中经常使用,都在一个地方。SecLists通过方便地提供安全测试人员可能需要的所有列表,帮助提高安全测试的效率和生产力。列表类型包括用户名、密码、URL、模糊测试有效载荷、敏感数据模式、Web shell等等。测试人员只需将此存储库拉到新的测试机上,他就可以访问到所需的每种类型的列表。

适用于 Eclipse 的 SAP NetWeaver 服务器适配器
将Eclipse与SAP NetWeaver应用服务器集成。

Atom编辑器mac版下载
最流行的的开源编辑器

Dreamweaver CS6
视觉化网页开发工具

WebStorm Mac版
好用的JavaScript开发工具

