


我们将使用当前的 dev.to 前端挑战作为探索如何快速构建用于 3D 可视化的基本静态文件 Web 应用程序的手段。我们将使用 THREE.js(我最喜欢的库之一)来组合一个基本的太阳系工具,可用于显示挑战中的标记输入。
愿景
以下是当前启发该项目的 dev.to 挑战:
https://dev.to/challenges/frontend-2024-09-04
那么,让我们看看我们能以多快的速度将这些东西组合在一起!
入门
在一个全新的 Github 项目中,我们将使用 Vite 来启动并运行项目,并通过开箱即用的热模块替换(或 HMR)来实现快速迭代:
git clone [url]
cd [folder]
yarn create vite --template vanilla .
这将创建一个开箱即用的无框架 Vite 项目。我们只需要安装依赖项,添加三个,然后运行“实时”开发项目:
yarn install
yarn add three
yarn run dev
这将为我们提供一个“实时”版本,我们可以近乎实时地进行开发和调试。现在我们准备好进去并开始撕掉东西了!
发动机结构
如果您从未使用过 THREE,有一些事情值得了解。
在引擎设计中,通常在任何给定时间都会发生三个活动或循环。如果这三个操作都是串行完成的,则意味着您的核心“游戏循环”具有一系列三种活动:
必须处理某种用户输入轮询或事件
渲染调用本身
存在某种内部逻辑/更新行为
诸如网络之类的东西(例如,更新数据包进来)可以被视为此处的输入,因为(如用户操作)它们触发的事件必须传播到应用程序状态的某些更新中。

当然,在这一切的背后有一些国家本身的代表。如果您使用 ECS,也许这是一组组件表。在我们的例子中,这主要是作为三个对象的实例化(如场景实例)开始的。
考虑到这一点,让我们开始为我们的应用程序编写基本占位符。
剥离东西
我们将从重构顶级index.html开始:
我们不需要静态文件引用
我们不需要 Javascript 钩子
我们需要一个全局范围的样式表
我们希望从 HTML 中挂钩 ES6 模块作为我们的顶级入口点
这使得我们的顶级index.html 文件看起来像这样:
  <meta charset="UTF-8">
  <meta name="viewport" content="width=device-width, initial-scale=1.0">
  <title>Vite App</title>
  <link rel="stylesheet" href="index.css" type="text/css">
  <script type="module" src="index.mjs"></script>
我们的全局范围样式表将简单地指定正文应占据整个屏幕 - 没有填充、边距或溢出。
body {
    width: 100vw;
    height: 100vh;
    overflow: hidden;
    margin: 0;
    padding: 0;
}
现在我们准备添加 ES6 模块,以及一些基本的占位符内容,以确保我们的应用程序在清理其余部分时正常运行:
/**
 * index.mjs
 */

function onWindowLoad(event) {
    console.log("Window loaded", event);
}

window.addEventListener("load", onWindowLoad);
现在我们可以开始拿出东西了!我们将删除以下内容:
main.js
javascript.svg
counter.js
公开/
style.css
当然,如果你在浏览器中查看“实时”视图,它将是空白的。但没关系!现在我们已经准备好进行 3d 了。
三个你好世界
我们将从经典的三个“hello world”旋转立方体开始。其余的逻辑将位于我们在上一阶段创建的 ES6 模块中。首先我们需要导入三个:
import * as THREE from "three";
但是现在怎么办?
THREE 有一个既简单又强大的特定图形管道。有几个因素需要考虑:
场景
相机
渲染器,它具有(如果未提供)自己的渲染目标和以场景和相机作为参数的 render() 方法
场景只是一个顶级场景图节点。这些节点是三个有趣属性的组合:
一个变换(来自父节点)和一个子节点数组
几何体,它定义我们的顶点缓冲区内容和结构(以及索引缓冲区 - 基本上是定义网格的数值数据)
材质,定义 GPU 如何处理和渲染几何数据
因此,我们需要定义每一件事才能开始。我们将从我们的相机开始,这得益于了解我们的窗口尺寸:
const width = window.innerWidth;
const height = window.innerHeight;
const camera = new THREE.PerspectiveCamera(70, width/height, 0.01, 10);
camera.position.z = 1;
现在我们可以定义场景,我们将向其中添加一个带有“盒子”几何体和“网格法线”材质的基本立方体:
const scene = new THREE.Scene();
const geometry = new THREE.BoxGeometry(0.2, 0.2, 0.2);
const material = new THREE.MeshNormalMaterial();
const mesh = new THREE.Mesh(geometry, material);
scene.add(mesh);
Lastly, we'll instantiate the renderer. (Note that, since we don't provide a rendering target, it will create its own canvas, which we will then need to attach to our document body.) We're using a WebGL renderer here; there are some interesting developments in the THREE world towards supporting a WebGPU renderer, too, which are worth checking out.
const renderer = new THREE.WebGLRenderer({
    "antialias": true
});
renderer.setSize(width, height);
renderer.setAnimationLoop(animate);
document.body.appendChild(renderer.domElement);
We have one more step to add. We pointed the renderer to an animation loop function, which will be responsible for invoking the render function. We'll also use this opportunity to update the state of our scene.
function animate(time) {
    mesh.rotation.x = time / 2000;
    mesh.rotation.y = time / 1000;
    renderer.render(scene, camera);
}
But this won't quite work yet. The singleton context for a web application is the window; we need to define and attach our application state to this context so various methods (like our animate() function) can access the relevant references. (You could embed the functions in our onWindowLoad(), but this doesn't scale very well when you need to start organizing complex logic across multiple modules and other scopes!)
So, we'll add a window-scoped app object that combines the state of our application into a specific object.
window.app = {
    "renderer": null,
    "scene": null,
    "camera": null
};
Now we can update the animate() and onWindowLoad() functions to reference these properties instead. And once you've done that you will see a Vite-driven spinning cube!

Lastly, let's add some camera controls now. There is an "orbit controls" tool built into the THREE release (but not the default export). This is instantiated with the camera and DOM element, and updated each loop. This will give us some basic pan/rotate/zoom ability in our app; we'll add this to our global context (window.app).
import { OrbitControls } from "three/addons/controls/OrbitControls.js";
// ...in animate():
window.app.controls.update();
// ...in onWindowLoad():
window.app.controls = new OrbitControls(window.app.camera, window.app.renderer.domElement);
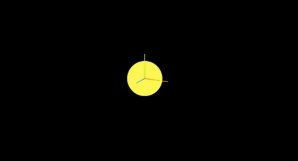
We'll also add an "axes helper" to visualize coordinate frame verification and debugging inspections.
// ...in onWindowLoad():
app.scene.add(new THREE.AxesHelper(3));
Not bad. We're ready to move on.
Turning This Into a Solar System
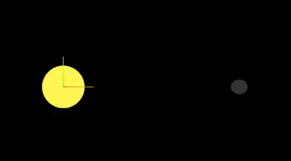
Let's pull up what the solar system should look like. In particular, we need to worry about things like coordinates. The farthest object out will be Pluto (or the Kuiper Belt--but we'll use Pluto as a reference). This is 7.3 BILLION kilometers out--which brings up an interesting problem. Surely we can't use near/far coordinates that big in our camera properties!
These are just floating point values, though. The GPU doesn't care if the exponent is 1 or 100. What matters is, that there is sufficient precision between the near and far values to represent and deconflict pixels in the depth buffer when multiple objects overlap. So, we can move the "far" value out to 8e9 (we'll use kilometers for units here) so long as we also bump up the "near" value, which we'll increase to 8e3. This will give our depth buffer plenty of precision to deconflict large-scale objects like planets and moons.
Next we're going to replace our box geometry and mesh normal material with a sphere geometry and a mesh basic material. We'll use a radius of 7e5 (or 700,000 kilometers) for this sphere. We'll also back out our initial camera position to keep up with the new scale of our scene.
// in onWindowLoad():
app.camera.position.x = 1e7;
// ...
const geometry = new THREE.SPhereGEometry(7e5, 32, 32);
const material = new THERE.MeshBasicMaterial({"color": 0xff7700});
You should now see something that looks like the sun floating in the middle of our solar system!
Planets
Let's add another sphere to represent our first planet, Mercury. We'll do it by hand for now, but it will become quickly obvious how we want to reusably-implement some sort of shared planet model once we've done it once or twice.
We'll start by doing something similar as we did with the sun--defining a spherical geometry and a single-color material. Then, we'll set some position (based on the orbital radius, or semi-major axis, of Mercury's orbit). Finally, we'll add the planet to the scene. We'll also want (though we don't use it yet) to consider what the angular velocity of that planet's orbit is, once we start animating it. We'll consolidate these behaviors, given this interface, within a factory function that returns a new THREE.Mesh instance.
function buildPlanet(radius, initialPosition, angularVelocity, color) {
    const geometry = new THREE.SphereGeometry(radius, 32, 32);
    const material = new THREE.MeshBasicMaterial({"color": color});
    const mesh = new THREE.Mesh(geometry, material);
    mesh.position.set(initialPosition.x, initialPosition.y, initialPosition.z);
    return mesh;
}
Back in onWindowLoad(), we'll add the planet by calling this function and adding the result to our scene. We'll pass the parameters for Mercury, using a dullish grey for the color. To resolve the angular velocity, which will need to be in radius per second, we'll pass the orbital period (which Wikipedia provides in planet data cards) through a unit conversion:

The resulting call looks something like this:
// ...in onWindowLoad():
window.app.scene.add(buildPlanet(2.4e3, new THREE.Vector3(57.91e6, 0, 0), 2 * Math.PI / 86400 / 87.9691, 0x333333));
(We can also remove the sun rotation calls from the update function at this point.)
If you look at the scene at this point, the sun will look pretty lonely! This is where the realistic scale of the solar system starts becoming an issue. Mercury is small, and compared to the radius of the sun it's still a long way away. So, we'll add a global scaling factor to the radius (to increase it) and the position (to decrease it). This scaling factor will be constant so the relative position of the planets will still be realistic. We'll tweak this value until we are comfortable with how visible our objects are within the scene.
const planetRadiusScale = 1e2;
const planetOrbitScale = 1e-1;
// ...in buildPlanet():
const geometry = new THREE.SphereGeometry(planetRadiusScale * radius, 32, 32);
// ...
mesh.position.set(
    planetOrbitScale * initialPosition.x,
    planetOrbitScale * initialPosition.y,
    planetOrbitScale * initialPosition.z
);
You should now be able to appreciate our Mercury much better!
MOAR PLANETZ
We now have a reasonably-reusable planetary factory. Let's copy and paste spam a few times to finish fleshing out the "inner" solar system. We'll pull our key values from a combination of Wikipedia and our eyeballs' best guess of some approximate color.
// ...in onWindowLoad():
window.app.scene.add(buildPlanet(2.4e3, new THREE.Vector3(57.91e6, 0, 0), 2 * Math.PI / 86400 / 87.9691, 0x666666));
window.app.scene.add(buildPlanet(6.051e3, new THREE.Vector3(108.21e6, 0, 0), 2 * Math.PI / 86400 / 224.701, 0xaaaa77));
window.app.scene.add(buildPlanet(6.3781e3, new THREE.Vector3(1.49898023e8, 0, 0), 2 * Math.PI / 86400 / 365.256, 0x33bb33));
window.app.scene.add(buildPlanet(3.389e3, new THREE.Vector3(2.27939366e8, 0, 0), 2 * Math.PI / 86400 / 686.980, 0xbb3333));
Hey! Not bad. It's worth putting a little effort into reusable code, isn't it?

But this is still something of a mess. We will have a need to reuse this data, so we shouldn't copy-paste "magic values" like these. Let's pretend the planet data is instead coming from a database somewhere. We'll mock this up by creating a global array of objects that are procedurally parsed to extract our planet models. We'll add some annotations for units while we're at it, as well as a "name" field that we can use later to correlate planets, objects, data, and markup entries.
At the top of the module, then, we'll place the following:
const planets = [
    {
        "name": "Mercury",
        "radius_km": 2.4e3,
        "semiMajorAxis_km": 57.91e6,
        "orbitalPeriod_days": 87.9691,
        "approximateColor_hex": 0x666666
    }, {
        "name": "Venus",
        "radius_km": 6.051e3,
        "semiMajorAxis_km": 108.21e6,
        "orbitalPeriod_days": 224.701,
        "approximateColor_hex": 0xaaaa77
    }, {
        "name": "Earth",
        "radius_km": 6.3781e3,
        "semiMajorAxis_km": 1.49898023e8,
        "orbitalPeriod_days": 365.256,
        "approximateColor_hex":  0x33bb33
    }, {
        "name": "Mars",
        "radius_km": 3.389e3,
        "semiMajorAxis_km": 2.27939366e8,
        "orbitalPeriod_days": 686.980,
        "approximateColor_hex":  0xbb3333
    }
];
Now we're ready to iterate through these data items when populating our scene:
// ...in onWindowLoad():
planets.forEach(p => {
    window.app.scene.add(buildPlanet(p.radius_km, new THREE.Vector3(p.semiMajorAxis_km, 0, 0), 2 * Math.PI / 86400 / p.orbitalPeriod_days, p.approximateColor_hex));
});
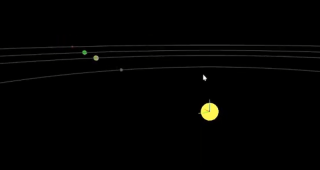
Adding Some Tracability
Next we'll add some "orbit traces" that illustrate the path each planet will take during one revolution about the sun. Since (for the time being, until we take into account the specific elliptical orbits of each planet) this is just a circle with a known radius. We'll sample that orbit about one revolution in order to construct a series of points, which we'll use to instantiate a line that is then added to the scene.
This involves the creation of a new factory function, but it can reuse the same iteration and planet models as our planet factory. First, let's define the factory function, which only has one parameter for now:
function buildOrbitTrace(radius) {
    const points = [];
    const n = 1e2;
    for (var i = 0; i


<p>Now we'll modify the iteration in our onWindowLoad() function to instantiate orbit traces for each planet:<br>
</p>

<pre class="brush:php;toolbar:false">// ...in onWindowLoad():
planets.forEach(p => {
    window.app.scene.add(buildPlanet(p.radius_km, new THREE.Vector3(p.semiMajorAxis_km, 0, 0), 2 * Math.PI / 86400 / p.orbitalPeriod_days, p.approximateColor_hex));
    window.app.scene.add(buildOrbitTrace(p.semiMajoxAxis_km));
});
Now that we have a more three-dimensional scene, we'll also notice that our axis references are inconsistent. The OrbitControls model assumes y is up, because it looks this up from the default camera frame (LUR, or "look-up-right"). We'll want to adjust this after we initially instantiate the original camera:
// ...in onWindowLoad():
app.camera.position.z = 1e7;
app.camera.up.set(0, 0, 1);
Now if you rotate about the center of our solar system with your mouse, you will notice a much more natural motion that stays fixed relative to the orbital plane. And of course you'll see our orbit traces!
Clicky-Clicky
Now it's time to think about how we want to fold in the markup for the challenge. Let's take a step back and consider the design for a moment. Let's say there will be a dialog that comes up when you click on a planet. That dialog will present the relevant section of markup, associated via the name attribute of the object that has been clicked.

But that means we need to detect and compute clicks. This will be done with a technique known as "raycasting". Imagine a "ray" that is cast out of your eyeball, into the direction of the mouse cursor. This isn't a natural part of the graphics pipeline, where the transforms are largely coded into the GPU and result exclusively in colored pixels.
In order to back out those positions relative to mouse coordinates, we'll need some tools that handle those transforms for us within the application layer, on the CPU. This "raycaster" will take the current camera state (position, orientation, and frustrum properties) and the current mouse position. It will look through the scene graph and compare (sometimes against a specific collision distance) the distance of those node positions from the mathematical ray that this represents.
Within THREE, fortunately, there are some great built-in tools for doing this. We'll need to add two things to our state: the raycaster itself, and some representation (a 2d vector) of the mouse state.
window.app = {
    // ... previous content
    "raycaster": null,
    "mouse_pos": new THREE.Vector2(0, 0)
};
We'll need to subscribe to movement events within the window to update this mouse position. We'll create a new function, onMouseMove(), and use it to add an event listener in our onWindowLoad() initialization after we create the raycaster:
// ...in onWindowLoad():
window.app.raycaster = new THREE.Raycaster();
window.addEventListener("pointermove", onPointerMove);
Now let's create the listener itself. This simply transforms the [0,1] window coordinates into [-1,1] coordinates used by the camera frame. This is a fairly straightforward pair of equations:
function onPointerMove(event) {
    window.app.mouse_pos.x = (event.clientX / window.innerWidth) * 2 - 1;
    window.app.mouse_pos.y = (event.clientY / window.innerHeight) * 2 - 1;
}
Finally, we'll add the raycasting calculation to our rendering pass. Technically (if you recall our "three parts of the game loop" model) this is an internal update that is purely a function of game state. But we'll combine the rendering pass and the update calculation for the time being.
// ...in animate():
window.app.raycaster.setFromCamera(window.app.mouse_pos, window.app.camera):
const intersections = window.app.raycaster.intersectObjects(window.app.scene.children);
if (intersections.length > 0) { console.log(intersections); }
Give it a quick try! That's a pretty neat point to take a break.
What's Next?
What have we accomplished here:
We have a representation of the sun and inner solar system
We have reusable factories for both planets and orbit traces
We have basic raycasting for detecting mouse collisions in real time
We have realistic dimensions (with some scaling) in our solar system frame
But we're not done yet! We still need to present the markup in response to those events, and there's a lot more we can add! So, don't be surprised if there's a Part Two that shows up at some point.
以上是[ 随机软件项目:dev.to 前端挑战的详细内容。更多信息请关注PHP中文网其他相关文章!

 从C/C到JavaScript:所有工作方式Apr 14, 2025 am 12:05 AM
从C/C 转向JavaScript需要适应动态类型、垃圾回收和异步编程等特点。1)C/C 是静态类型语言,需手动管理内存,而JavaScript是动态类型,垃圾回收自动处理。2)C/C 需编译成机器码,JavaScript则为解释型语言。3)JavaScript引入闭包、原型链和Promise等概念,增强了灵活性和异步编程能力。
 JavaScript引擎:比较实施Apr 13, 2025 am 12:05 AM
不同JavaScript引擎在解析和执行JavaScript代码时,效果会有所不同,因为每个引擎的实现原理和优化策略各有差异。1.词法分析:将源码转换为词法单元。2.语法分析:生成抽象语法树。3.优化和编译:通过JIT编译器生成机器码。4.执行:运行机器码。V8引擎通过即时编译和隐藏类优化,SpiderMonkey使用类型推断系统,导致在相同代码上的性能表现不同。
 超越浏览器:现实世界中的JavaScriptApr 12, 2025 am 12:06 AM
JavaScript在现实世界中的应用包括服务器端编程、移动应用开发和物联网控制:1.通过Node.js实现服务器端编程,适用于高并发请求处理。2.通过ReactNative进行移动应用开发,支持跨平台部署。3.通过Johnny-Five库用于物联网设备控制,适用于硬件交互。
 使用Next.js(后端集成)构建多租户SaaS应用程序Apr 11, 2025 am 08:23 AM
我使用您的日常技术工具构建了功能性的多租户SaaS应用程序(一个Edtech应用程序),您可以做同样的事情。 首先,什么是多租户SaaS应用程序? 多租户SaaS应用程序可让您从唱歌中为多个客户提供服务
 如何使用Next.js(前端集成)构建多租户SaaS应用程序Apr 11, 2025 am 08:22 AM
本文展示了与许可证确保的后端的前端集成,并使用Next.js构建功能性Edtech SaaS应用程序。 前端获取用户权限以控制UI的可见性并确保API要求遵守角色库
 JavaScript:探索网络语言的多功能性Apr 11, 2025 am 12:01 AM
JavaScript是现代Web开发的核心语言,因其多样性和灵活性而广泛应用。1)前端开发:通过DOM操作和现代框架(如React、Vue.js、Angular)构建动态网页和单页面应用。2)服务器端开发:Node.js利用非阻塞I/O模型处理高并发和实时应用。3)移动和桌面应用开发:通过ReactNative和Electron实现跨平台开发,提高开发效率。
 JavaScript的演变:当前的趋势和未来前景Apr 10, 2025 am 09:33 AM
JavaScript的最新趋势包括TypeScript的崛起、现代框架和库的流行以及WebAssembly的应用。未来前景涵盖更强大的类型系统、服务器端JavaScript的发展、人工智能和机器学习的扩展以及物联网和边缘计算的潜力。
 神秘的JavaScript:它的作用以及为什么重要Apr 09, 2025 am 12:07 AM
JavaScript是现代Web开发的基石,它的主要功能包括事件驱动编程、动态内容生成和异步编程。1)事件驱动编程允许网页根据用户操作动态变化。2)动态内容生成使得页面内容可以根据条件调整。3)异步编程确保用户界面不被阻塞。JavaScript广泛应用于网页交互、单页面应用和服务器端开发,极大地提升了用户体验和跨平台开发的灵活性。


热AI工具

Undresser.AI Undress
人工智能驱动的应用程序,用于创建逼真的裸体照片

AI Clothes Remover
用于从照片中去除衣服的在线人工智能工具。

Undress AI Tool
免费脱衣服图片

Clothoff.io
AI脱衣机

AI Hentai Generator
免费生成ai无尽的。

热门文章
热工具

Dreamweaver CS6
视觉化网页开发工具

螳螂BT
Mantis是一个易于部署的基于Web的缺陷跟踪工具,用于帮助产品缺陷跟踪。它需要PHP、MySQL和一个Web服务器。请查看我们的演示和托管服务。

DVWA
Damn Vulnerable Web App (DVWA) 是一个PHP/MySQL的Web应用程序,非常容易受到攻击。它的主要目标是成为安全专业人员在合法环境中测试自己的技能和工具的辅助工具,帮助Web开发人员更好地理解保护Web应用程序的过程,并帮助教师/学生在课堂环境中教授/学习Web应用程序安全。DVWA的目标是通过简单直接的界面练习一些最常见的Web漏洞,难度各不相同。请注意,该软件中

MinGW - 适用于 Windows 的极简 GNU
这个项目正在迁移到osdn.net/projects/mingw的过程中,你可以继续在那里关注我们。MinGW:GNU编译器集合(GCC)的本地Windows移植版本,可自由分发的导入库和用于构建本地Windows应用程序的头文件;包括对MSVC运行时的扩展,以支持C99功能。MinGW的所有软件都可以在64位Windows平台上运行。

SecLists
SecLists是最终安全测试人员的伙伴。它是一个包含各种类型列表的集合,这些列表在安全评估过程中经常使用,都在一个地方。SecLists通过方便地提供安全测试人员可能需要的所有列表,帮助提高安全测试的效率和生产力。列表类型包括用户名、密码、URL、模糊测试有效载荷、敏感数据模式、Web shell等等。测试人员只需将此存储库拉到新的测试机上,他就可以访问到所需的每种类型的列表。

