掌握代码重构:使用 Rector PHP 的完整指南
- WBOYWBOYWBOYWBOYWBOYWBOYWBOYWBOYWBOYWBOYWBOYWBOYWB原创
- 2024-08-26 06:31:32801浏览

照片由 Matteo del Piano 在 Unsplash 上拍摄
PHP 校长简介
在不断发展的 PHP 开发世界中,保持代码库干净、最新且高效至关重要。这就是 Rector PHP 发挥作用的地方。如果您一直想知道如何使用 Rector PHP、如何安装它或者 Rector PHP 到底是什么,那么这份综合指南非常适合您。我们将引导您了解基础知识,提供详细的 Rector PHP 教程,并提供有关 PHP Rector 以及如何有效使用它的见解。读完本文后,您将牢牢掌握 Rector PHP 以及它如何增强您的开发工作流程。
PHP 校长是什么?
Rector 于 2020 年启动,但在 2024 年才发布 1.0 版本。它是一个对代码库执行静态分析的命令行工具。根据该分析可以应用更改。我想一个很好的例子是,如果你的代码库充满了 array() 调用,而这现在被认为是一种旧的做法,现在被 [] 短数组语法取代。
通过代码库来替换它是很乏味的。我们可以使用一个简单的查找和替换工具,但是如果有一个 array() 封装了一个字符串或一个不应更改的注释,该怎么办?现在我们必须检查每个被替换的实例。
这类问题正是Rector所擅长的。相反,Rector 能够查看代码并明确知道它是否是要替换的数组。
你可能会问,PHP CS Fixer 也可以做到这一点,这是事实。但 Rector 还让 PHPStan 在后台工作,不仅可以识别语法,还可以分析类型。这意味着 Rector 可以检测某个类何时具有特定的父类、变量何时为特定类型或函数的预期返回类型。赋予它更大的范围来对代码库进行大量更改。
如何安装 Rector PHP
对于经验丰富的 PHP 开发人员来说,这似乎是显而易见的,但有两种主要方法,这实际上取决于您想要如何使用 Rector。
如果您想使用 Rector 作为持续集成的一部分,那么通过 Composer 将不同的 Rector 安装到您的项目中是有意义的。
composer require --dev rector/rector
但是,如果您想在单个或多个项目上尝试使用 Rector 来执行升级,那么最好使用
全局安装 Rector
composer global require rector/rector
无论您选择哪一步,下一步都是在项目的根目录中创建一个配置,并包含所有包含您希望升级的 PHP 代码的文件夹。当然,这不包括供应商文件夹,因为我们不想修改它。
这就是 Laravel 项目的配置可能如下所示:
use Rector\Config\RectorConfig;
use Rector\Php71\Rector\List_\ListToArrayDestructRector;

return RectorConfig::configure()
    ->withPaths([__DIR__. '/config', __DIR__. '/src', __DIR__. '/tests', __DIR__. '/routes'])
    ->withImportNames(removeUnusedImports: true);
PHP Rector:如何有效使用它
就像上一节一样,使用 Rector 可以根据你想如何使用它来决定。校长通过选择规则来应用变更。这与 PHP CS Fixer 相同。这些规则都会检测问题,然后尝试解决它们旨在解决的问题。
如果我们希望以持续集成的方式使用 Rector,因为我们希望所有代码在开发时都尽可能优化,我们可能只使用一组特定的规则。
Rector 有一组规则,通常被描述为死代码或代码质量,分别删除代码或增强和优化。坚持使用这些设置是非常有利的,因为我们可以确信它们在大多数情况下都有效。但您绝对应该意识到 Rector 编写代码的方式从来都不是完美的。通常,在编写规则时,它们可能会涵盖典型场景,并且可能会遗漏一些在您的代码库中找到的情况。这可能会导致代码损坏。
如果您想使用 Rector,您绝对应该为您的应用程序编写测试。没有它们,Rector 很容易导致引入错误,而这些错误在成为问题之前你不会发现。
使用 Rector 时要考虑的另一件事是您应该使用像 PHP CS Fixer 这样的 linting 工具。 Rector 不会查看空格、方法调用之间的空格和换行符及其参数等。在 Rector 应用其修复后,使用 linting 工具应将代码格式保持为您期望的标准。
Rector PHP 分步教程
现在我们已经安装了 Rector,我们准备好尝试一下,让我们尝试应用一个规则。让我们从更新之前制作的配置文件开始。
use Rector\Config\RectorConfig;
use Rector\Php71\Rector\List_\ListToArrayDestructRector;

return RectorConfig::configure()
    ->withPaths([__DIR__. '/config', __DIR__. '/src', __DIR__. '/tests', __DIR__. '/routes'])
    ->withImportNames(removeUnusedImports: true)
    ->withRules([
        ListToArrayDestructRector::class,
    ]);
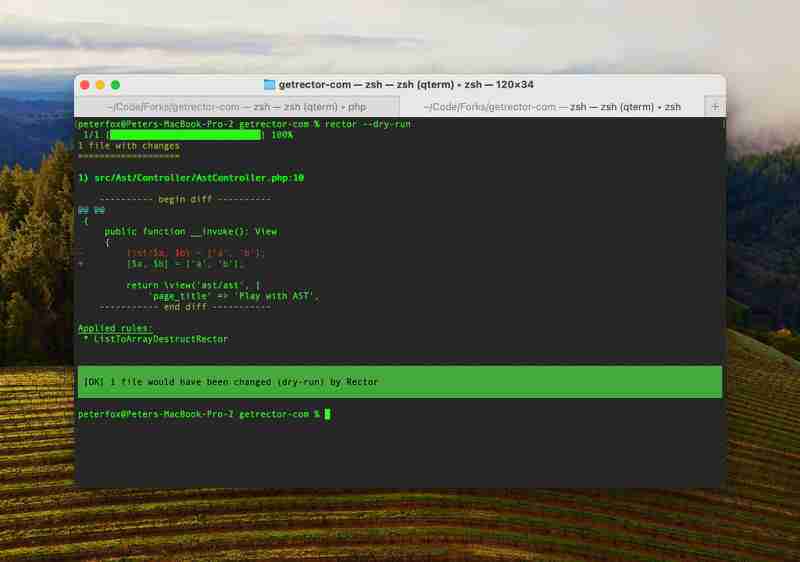
在此配置中,我们将替换列表的使用,从而使用数组重组。我们期望做出的改变如下:
-list($a, $b) = ['a', 'b'];
+[$a, $b] = ['a', 'b'];
Now we can test this config by performing a dry run of Rector.
rector --dry-run
If everything has been successful we should now see an output that contains a diff of all the changes to each file, with a list of the rules that made the changes. Our config only lists one rule so only one rule is applied but if more rules are added we’ll see a list of one or more here.

This is then a great time to review the changes and make sure the rule is performing as expected. Once we’re happy we can run Rector again. Without the dry run flag, changes will be written to the files.
rector
After it’s completed we should run our favourite linting tool and then run our tests. That’s it. We’ve now used Rector.
Conclusion: Boosting Your PHP Development with Rector
Rector PHP is a powerful tool that can significantly enhance your PHP development workflow by automating code refactoring and ensuring your codebase remains clean and modern. By understanding what Rector PHP is, learning how to install it, and mastering how to use it effectively, you can leverage its capabilities to streamline code updates, improve code quality, and reduce the risk of code feeling like a “legacy” project. Whether you’re integrating Rector into your continuous integration pipeline or using it for large-scale codebase upgrades, Rector is an indispensable asset for any PHP developer looking to maintain a high standard of code excellence.
If you want to take you knowledge of Rector further I suggest going to https://getrector.com/.
I’m Peter Fox, a software developer in the UK who works with Laravel. Thank you for reading my article, I’ve got many more to read at https://articles.peterfox.me. I’m also now Sponsorable on GitHub. If you’d like to encourage me to write more articles like this please do consider dropping a small one-off donation.
以上是掌握代码重构:使用 Rector PHP 的完整指南的详细内容。更多信息请关注PHP中文网其他相关文章!

