timeit.repeat - 通过重复来理解模式
- 王林原创
- 2024-08-09 07:25:021192浏览
1.问题
在您的软件工程职业生涯中,您可能会遇到一段性能不佳的代码,花费的时间超出了可接受的范围。更糟糕的是,多次执行时性能不一致且变化很大。
此时,您必须接受这样的事实:在软件性能方面,存在很多不确定性。数据可以分布在一个窗口内,有时遵循正态分布。其他时候,它可能会不稳定,没有明显的模式。
2. 方法
这就是基准测试发挥作用的时候。执行代码五次固然很好,但最终,您只有五个数据点,每个数据点都具有太多价值。我们需要对同一代码块进行更多次的重复才能看到模式。
3.问题
一个人应该有多少个数据点?关于它已经有很多文章了,我报道过其中一篇论文
严格的性能评估需要建立基准,
多次执行和测量以处理随机
执行时间的变化。研究人员应该提供措施
报告结果时的变化。
Kalibera, T. 和 Jones, R. (2013)。在合理的时间内进行严格的基准测试。 2013 年内存管理国际研讨会论文集。 https://doi.org/10.1145/2491894.2464160
在测量性能时,我们可能希望测量 CPU、内存或磁盘使用情况,以更全面地了解性能。通常最好从简单的事情开始,比如流逝的时间,因为它更容易形象化。 17% 的 CPU 使用率并不能告诉我们太多信息。应该是什么? 20%还是5%? CPU 使用率并不是人类感知性能的自然方式之一。
4. 实验
我将使用 python 的 timeit.repeat 方法来重复一个简单的代码执行块。该代码块只是将 1 到 2000 之间的数字相乘。
from functools import reduce
reduce((lambda x, y: x * y), range(1, 2000))
这是方法签名
(function) def repeat(
    stmt: _Stmt = "pass",
    setup: _Stmt = "pass",
    timer: _Timer = ...,
    repeat: int = 5,
    number: int = 1000000,
    globals: dict[str, Any] | None = None
) -> list[float]
什么是重复和数字?
让我们从数字开始。如果代码块太小,它会很快终止,以至于您无法测量任何内容。这个参数提到了 stmt 必须执行的次数。您可以将其视为新的代码块。返回的浮点数是 stmt X 号执行时间。
在我们的例子中,我们将数字保留为 1000,因为乘法到 2000 的成本很高。
接下来,继续重复。这指定了上述块必须执行的重复次数或次数。如果重复次数为 5,则 list[float] 返回 5 个元素。
让我们从创建一个简单的执行块开始
def run_experiment(number_of_repeats, number_of_runs=1000):
    execution_time = timeit.repeat(
        "from functools import reduce; reduce((lambda x, y: x * y), range(1, 2000))",
        repeat=number_of_repeats,
        number=number_of_runs
    )
    return execution_time
我们希望以不同的重复值执行它
repeat_values = [5, 20, 100, 500, 3000, 10000]
代码非常简单明了
5. 探索结果
现在我们到达了实验中最重要的部分 - 解释数据。请注意,不同的人有不同的解释,并且没有单一的正确答案。
您对正确答案的定义很大程度上取决于您想要实现的目标。您是否担心 95% 用户的性能下降?或者,您是否担心尾部 5% 的直言不讳的用户的性能下降?
5.1.多个重复值的执行时间分析统计
正如我们所看到的,最短和最长时间是奇怪的。它展示了一个数据点如何足以改变均值。最糟糕的是,高最小值和高最大值适用于不同的重复值。没有相关性,它只是展示了异常值的力量。
接下来我们转向中位数,并注意到随着重复次数的增加,中位数会下降,除了 20 之外。可以用什么解释呢?它只是表明,较少的重复次数意味着我们不一定能全面了解可能的值。
转向截断平均值,其中最低的 2.5% 和最高的 2.5% 被修剪掉。当您不关心异常用户并希望关注中间 95% 用户的表现时,这非常有用。
请注意,尝试提高中间 95% 用户的性能可能会降低异常 5% 用户的性能。

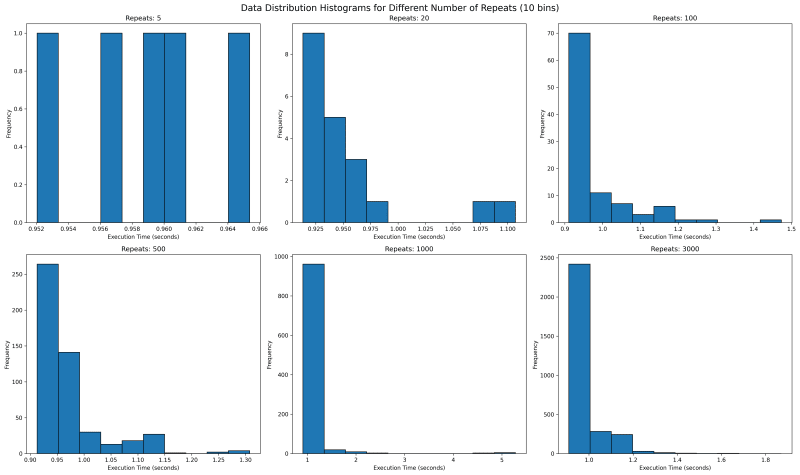
5.2. Execution Time Distribution for multiple values of repeat
Next we want to see where all the data lies. We would use histogram with bin of 10 to see where the data falls. With repetitions of 5 we see that they are mostly equally spaced. This is not one usually expects as sampled data should follow a normal looking distribution.
In our case the value is bounded on the lower side and unbounded on the upper side, since it will take more than 0 seconds to run any code, but there is no upper time limit. This means our distribution should look like a normal distribution with a long right tail.
Going forward with higher values of repeat, we see a tail emerging on the right. I would expect with higher number of repeat, there would be a single histogram bar, which is tall enough that outliers are overshadowed.

5.3. Execution Time Distribution for values 1000 and 3000
How about we look at larger values of repeat to get a sense? We see something unusual. With 1000 repeats, there are a lot of outliers past 1.8 and it looks a lot more tighter. The one on the right with 3000 repeat only goes upto 1.8 and has most of its data clustered around two peaks.
What can it mean? It can mean a lot of things including the fact that sometimes maybe the data gets cached and at times it does not. It can point to many other side effects of your code, which you might have never thought of. With the kind of distribution of both 1000 and 3000 repeats, I feel the TM95 for 3000 repeat is the most accurate value.

6. Appendix
6.1. Code
import timeit
import matplotlib.pyplot as plt
import json
import os
import statistics
import numpy as np

def run_experiment(number_of_repeats, number_of_runs=1000):
    execution_time = timeit.repeat(
        "from functools import reduce; reduce((lambda x, y: x * y), range(1, 2000))",
        repeat=number_of_repeats,
        number=number_of_runs
    )
    return execution_time

def save_result(result, repeats):
    filename = f'execution_time_results_{repeats}.json'
    with open(filename, 'w') as f:
        json.dump(result, f)

def load_result(repeats):
    filename = f'execution_time_results_{repeats}.json'
    if os.path.exists(filename):
        with open(filename, 'r') as f:
            return json.load(f)
    return None

def truncated_mean(data, percentile=95):
    data = np.array(data)
    lower_bound = np.percentile(data, (100 - percentile) / 2)
    upper_bound = np.percentile(data, 100 - (100 - percentile) / 2)
    return np.mean(data[(data >= lower_bound) & (data <= upper_bound)])

# List of number_of_repeats to test
repeat_values = [5, 20, 100, 500, 1000, 3000]

# Run experiments and collect results
results = []
for repeats in repeat_values:
    result = load_result(repeats)
    if result is None:
        print(f"Running experiment for {repeats} repeats...")
        try:
            result = run_experiment(repeats)
            save_result(result, repeats)
            print(f"Experiment for {repeats} repeats completed and saved.")
        except KeyboardInterrupt:
            print(f"\nExperiment for {repeats} repeats interrupted.")
            continue
    else:
        print(f"Loaded existing results for {repeats} repeats.")

    # Print time taken per repetition
    avg_time = statistics.mean(result)
    print(f"Average time per repetition for {repeats} repeats: {avg_time:.6f} seconds")

    results.append(result)

trunc_means = [truncated_mean(r) for r in results]
medians = [np.median(r) for r in results]
mins = [np.min(r) for r in results]
maxs = [np.max(r) for r in results]

# Create subplots
fig, axs = plt.subplots(2, 2, figsize=(15, 12))
fig.suptitle('Execution Time Analysis for Different Number of Repeats', fontsize=16)

metrics = [
    ('Truncated Mean (95%)', trunc_means),
    ('Median', medians),
    ('Min', mins),
    ('Max', maxs)
]

for (title, data), ax in zip(metrics, axs.flatten()):
    ax.plot(repeat_values, data, marker='o')
    ax.set_title(title)
    ax.set_xlabel('Number of Repeats')
    ax.set_ylabel('Execution Time (seconds)')
    ax.set_xscale('log')
    ax.grid(True, which="both", ls="-", alpha=0.2)

    # Set x-ticks and labels for each data point
    ax.set_xticks(repeat_values)
    ax.set_xticklabels(repeat_values)

    # Rotate x-axis labels for better readability
    ax.tick_params(axis='x', rotation=45)

plt.tight_layout()

# Save the plot to a file
plt.savefig('execution_time_analysis.png', dpi=300, bbox_inches='tight')
print("Plot saved as 'execution_time_analysis.png'")

# Create histograms for data distribution with 10 bins
fig, axs = plt.subplots(2, 3, figsize=(20, 12))
fig.suptitle('Data Distribution Histograms for Different Number of Repeats (10 bins)', fontsize=16)

for repeat, result, ax in zip(repeat_values, results, axs.flatten()):
    ax.hist(result, bins=10, edgecolor='black')
    ax.set_title(f'Repeats: {repeat}')
    ax.set_xlabel('Execution Time (seconds)')
    ax.set_ylabel('Frequency')

plt.tight_layout()

# Save the histograms to a file
plt.savefig('data_distribution_histograms_10bins.png', dpi=300, bbox_inches='tight')
print("Histograms saved as 'data_distribution_histograms_10bins.png'")

# Create histograms for 1000 and 3000 repeats with 30 bins
fig, axs = plt.subplots(1, 2, figsize=(15, 6))
fig.suptitle('Data Distribution Histograms for 1000 and 3000 Repeats (30 bins)', fontsize=16)

for repeat, result, ax in zip([1000, 3000], results[-2:], axs):
    ax.hist(result, bins=100, edgecolor='black')
    ax.set_title(f'Repeats: {repeat}')
    ax.set_xlabel('Execution Time (seconds)')
    ax.set_ylabel('Frequency')

plt.tight_layout()

# Save the detailed histograms to a file
plt.savefig('data_distribution_histograms_detailed.png', dpi=300, bbox_inches='tight')
print("Detailed histograms saved as 'data_distribution_histograms_detailed.png'")

plt.show()
以上是timeit.repeat - 通过重复来理解模式的详细内容。更多信息请关注PHP中文网其他相关文章!

